
 Background
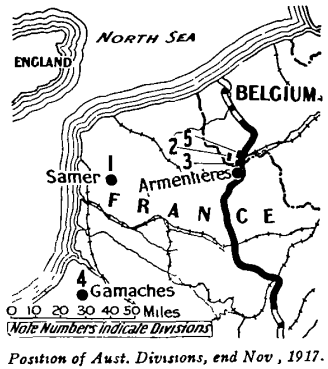
Following the cessation of the Third Ypres or Passchendaele offensive the British Army in Flanders went into its winter positions and for I Anzac Corps, relieved from their Ypres front line positions, they proceeded to the quiet front at Messines. In mid-November 1917 and for the first time during the War all five Australian divisions were under the single command of I Anzac Corps, although for the short term the heavily worked 4th Australian Division was relegated to a GHQ back area for rest, ostensibly acting as the Corps ‘reserve’ Division. However following the German attack on the 30th November at Cambrai the 4th Australian Division was ordered up to Peronne as the next available reserve. Here it stayed within the British Fifth Army until the New Year in the area laid waste by the withdrawing Germans to the Hindenburg Line earlier in 1917.
 The Ypres fighting from September to November 1917 had cost the Australians 38,093 officers and men, and with the dwindling stream of reinforcements from Australia, anxieties were growing whether they would be able to reinforce sufficiently. In December the Australian people rejected conscription for the second time in a referendum. Although the soldiers voted marginally in favour, the majority of the men at the front voted against, with the pro-conscription coming from the newly arrived reinforcements in the depots in England. With voluntary enlistment falling, commanders were facing the prospect of some units having to be broken up. With winter setting in General Birdwood’s focus was now how to keep the troops fit and well, and avoid the illnesses and trench foot that had caused many casualties the previous winter on the Somme. At one stage and to lessen the impact of the winter on illness, the poor discipline of the Australians in England, and to help with transportation to and from home, General Birdwood proposed to the Australian Government a move for the Australian Army Corps back to Egypt and replace British units in the Palestine campaign. Events later in March would see Birdwood telegraphing Senator Pearce to hold action on this proposal. Sports and entertainment were thus given high priority.
Combat
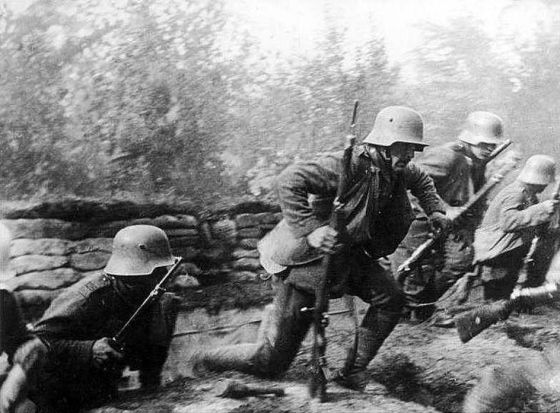
 Most expected that the British offensive around Ypres would resume in the Spring, but the attitude changed in mid-December when Field Marshall Haig issued an order to prepare for a German Spring Offensive instead and work commenced on developing the British lines of defence (photograph left of the 22nd Battalion creating wire entanglements), plus the conservation of the troops and the training for a defensive battle. His loss of six divisions to Italy and the shortage of reinforcements were as big a part in his decision making as the prospect of facing a regenerated German Army following the collapse of the Russians on the Eastern Front. The new British Armies had not yet specially practiced the art of defence as almost all their instruction since 1915 were to be on the offensive at the Somme, Arras and Ypres. Haig believed that it would be almost impossible to stop a massive German strike at the front so the British Armies prepared for defence in depth, comprising three systems with each having at least three lines. The forward line was to be prepared only as an outpost, designed to stop all but the major attack. The second system was to be placed some two to three miles behind the front line, built on advantageous ground, and some 2,000 – 3,000 yards in depth. The area between these first and second systems would become the battle zone. This was the only period in the war in which the Australian divisions undertook on a large scale the construction of defences with concrete (photograph below of Australian engineers completing a concrete dugout in March 1918). For operations, orders were given that raids should not be undertaken unless there were special reasons, artillery was to be used in a limited way to reduce the retaliatory firing on the defences, but active patrolling was encouraged. The Germans did likewise and aggressively patrolled, attacking the outposts. An example was on the 30th November 1917 when a German raiding party attacked an outpost held by the 59th Battalion and during the stiff defence seven of the eight defenders were left for dead and one captured. A neighbouring post drove off the attackers and discovered all seven men wounded. Meanwhile 3 officers and 70 men of the 39th Battalion raided the German lines sustaining 14 casualties, including Lieut. Ramsay mortally wounded, and killing 30 Germans.
 Throughout the winter of 1917-18 the back areas at Messines were extremely quiet. On the 16th December the 2nd Australian Division relieved the 3rd Australian Division and took over the southern section of the Australian Corps front in the vicinity of Ploegsteert. The 3rd Australian Division was temporarily placed into the front line in the Armentieres sector on the southern end thus extending the Australian Corps frontage. This sector, held by the Portuguese, was deemed unsafe and they had the special task of improving the defences before being relieved on 3rd January 1918. On 12th January the 4th Australian Division ended its temporary assignment to the Fifth Army and moved north to join the other four Australian Divisions in the Australian Army Corps at the southern end of the Ypres battlefield, taking over the northern end of Corps frontage at Hollebeke and Hill 60. Meanwhile the British began to extend its front southwards taking over from the French, first to St. Quentin and then by the end of January to Barisis in the Aisne Department. Haig now had 125 miles to defend with 57 divisions, but these divisions were much weaker than before. Intelligence estimated that Germans were transferring 30 to 40 divisions from the now quiet east over the winter, so for Haig the question was how to distribute his forces against the expected attack. With the Americans still slowly arriving it made sense that if the Germans were to attack it would be sooner than later, probably in early March. Although the weather had been bad for flying and for observation, British airmen had brought in photographs of numerous new aerodromes, dumps, railway sidings and hospital camps in the region opposite the British Third and Fifth Armies from Arras to Peronne. But similar reports were coming in opposite the British Second Army on the Lys, and also on the French front in Champagne near Rheims.
At the end of January the 3rd Australian Division relieved the 2nd Australian Division and took over the southern section of the Australian Corps front in the vicinity of Ploegsteert, and a few days later the 5th Australian Division relieved 1st Australian Division and took over the centre section in the vicinity of Messines. [Click link for geo-referenced map reproduced with permission from the National Library of Scotland]. Aggressive patrolling continued. On the 10th February nine officers and 195 men of the 37th & 38th Battalions raided south-west of Warneton and penetrated to the second trench capturing 33 prisoners and claimed to have killed 102 of the enemy. The raiders had 39 casualties including Lieut. Crowe and Lieut. Dixon killed in action. The raid gained Birdwood’s congratulations.
By mid-February 1918 British intelligence now estimated that the Germans now had 178 divisions on the Western Front, with nearly half being opposite the British Army. However Haig felt that the main blow would come against the French to the south, but his Army commanders should be prepared for an attack across the old Somme battlefields where communication for the British remained difficult. He also felt that the initial blow was less likely to be delivered in Flanders where the ground remained wet much later in the Spring than further to the south. By the end of the month air reconnaissance and other intelligence picked up signs of a new German Army HQ being established between Arras and St. Quentin. By then British GHQ estimated that the German forces in the west had grown to 181 divisions, and during the following fortnight signs of a pending attack became increasingly evident.
On the 2nd March 1918 the 1st Australian Division relieved 4th Australian Division and took over the northern section of the Australian Corps front in the vicinity of Hollebeke and Hill 60. During the relief several posts south of the Ypres-Comines canal were raided by a German party of 5 officers and 120 others. Major Henwood of the 10th Battalion, having just taken over the position was killed, along with Lieut. Luscombe of the 13th Battalion. The Australians claimed to have killed 26 of the attackers and took a number prisoner, they themselves having 28 casualties and seven men of the 10th Battalion taken prisoner. The following night a party of 10 officers and 225 other ranks from all battalions of the 9th Brigade raided killing 50 of the enemy and capturing an officer and a machine gun. On the 8th March the 2nd Australian Division relieved the 3rd Australian Division and took over the southern section of the Australian Corps front in the vicinity of Ploegsteert. A patrol of the 18th Battalion came across a German officer’s patrol reconnoitring the position at Pont Rouge, killing three and taking two prisoners.
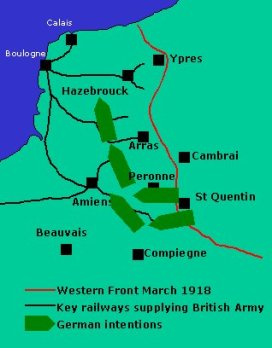
On the 19th March statements from Alsatian and Polish deserters, a captured flying officer and other prisoners were all pointing to the principal point of the German attack on the British sector would be in the Arras – St. Quentin sector in the coming days. The troops of the British Third & Fifth Armies were told to expect an attack on the morning of either 20th or 21st March. However for the men in the frontline, similar warnings had been issued before and nothing had previously happened. In light of the intelligence Haig transferred four of his divisions from the Second Army in the north to the Third & Fifth Armies expected to take the brunt of the attack. The triple defence system had been established along the British line, but the sector recently taken over from the French was in the poorest condition. Moreover the Fifth Army’s sector was the widest and most lightly held. Shortly before 5am on the 21st March 1918, the whole mighty German force which had been expected to attack on three fronts fell upon just one, the central position between Arras and St. Quentin held by the British Third & Fifth Armies.
Outcome
 Within days the ferocity and speed of the German Spring Offensive, spearheaded by their elite Stormtroopers, saw the advancing divisions achieve territory gains on the Western Front not seen since 1914 and the formation of the trench systems that ran the length of the front. The old Somme battlefields won at such cost in 1916 were soon in German hands and their Armies were now threatening the pivotal communication hub of Amiens, the gateway to the French Channel ports. The battle hardened soldiers of the Australian Imperial Force were now required to leave the quiet Messines sector and to meet and halt the might of the German Army in familiar surroundings on the Somme, just to the east of Amiens. The 3rd & 4th Australian Divisions were the first to head south and were temporarily assigned to the British 62nd Division holding the line at Hebuterne to the north of Albert. The relief of the Australian Divisions manning the forward positions by the British began on the 26th March at Messines with the 5th Australian Division relieved by the 19th & 21st Divisions, the 2nd Australian Division (25th Division) at Ploegsteert on 3rd April, and the 1st Australian Division (9th Division) at Hollebeke on the 5th April.
 FIRST WORLD WAR TIMELINE