
 Background
Despite the heroics of the AIF – in particular the 6th Brigade and 22nd Battalion – on the flank of the Arras offensive at Bullecourt, the desired British breakthrough was not achieved, nor was it to the south with General Nivelle’s much heralded French Spring offensive at the Chemin des Dames. Furthermore the subsequent mutinies within the French Army and the collapse of the Russian Army on the Eastern Front meant that the onus of taking the fight to the Germans now lay solely with the British, paving the way for General Haig’s long favoured offensive in the Ypres Salient in Belgium.
 The attack of the 3rd May 1917 at Bullecourt had a devastating effect on the 22nd Battalion and they, like the majority of I Anzac Corps, spent the summer reinforcing, refitting and training for Haig’s Ypres campaign, first in the pleasant village and countryside of Bouzincourt on the Somme and then to Campagne in northern France. By this stage of the war both sides were now adopting the strategy of defence in depth, and for the Germans around Ypres their strong-points were dominated by concrete block houses and pill-boxes (example, photograph right of a pillbox at Garter Point) that provided protection for their men and machine guns. Thus the training had to be modified to meet this new challenge. Instead of having to attack the enemy in definitive lines of trenches, the expectation was to find them irregularly positioned. Troops now had to advance in a fighting formation behind a barrage which moved slowly enough to allow them to fight in areas behind it, a form of semi-open warfare where troops in depth were protected by a slow barrage. The focus thus turned to attacking in columns as opposed to waves to deal decisively with any hostile strong point, fortified shell hole etc. In addition the troops carried out tactical exercises with special reference to wood fighting, as well as being prepared to advance through gas clouds of mustard gas. The rifle would again become the principal weapon for the infantry.
 The ground to the east and south of Ypres is characterised by a series of ridges running crescent shaped from south to north and it was the systematic step-by-step taking of these areas of high ground – starting with the preliminary attack on the Messines Ridge on 7th June 1917 – with limited but well defined objectives that formed Haig’s strategy (maps left and below courtesy of Australians on the Western Front 1914-1918). The final objective was the town of Passchendaele on a ridge some 12 kms to the north-east of Ypres, hence the alternative name often given to the Third Battle of Ypres.
The great bombardment at Ypres began on 15th July 1917, and with over 3,000 British guns this was more than at Arras earlier in the year and almost twice as many that the 4th Army had on the Somme the previous year. The Third Battle of Ypres began at 3.50am on the 31st July 1917 with the attack by the British infantry at Pilckem Ridge supported by the artillery of the 1st, 2nd & 5th Australian Divisions and a feint by General Godley’s II Anzac Corps in front of the Warneton Line. By nightfall of a ‘most satisfactory’ day Haig’s British and French troops had taken and held the third objective. Following the Battle of Langemarck in mid-August, General Birdwood’s I Anzac Corps would see its first major action in the 3rd Ypres campaign with the successful attack on the 20th September 1917 by the 1st & 2nd Australian Divisions at the Menin Road.
Combat
 On the night of the 16th/17th September 1917 the 22nd Battalion entered the front-line in a sector on the Menin Road or Westhoek Ridge, taking over from the 17th & 19th London Regiments (frontage from J.8.c.6.1 to J.2.c.3.4). [click on link for geo-referenced Trench map reproduced with the permission of the National Library of Scotland]. The 6th Brigade held a double frontage, as the 5th & 7th Brigades were preparing for the Menin Road attack scheduled for the 20th September. During the 48 hour short tour of the front-line valuable reconnaissance and
  preparatory work was undertaken, but heavy shelling took its toll with 33 men of the 22nd Battalion being killed or died of wounds. Lieut. Greig, a Gallipoli veteran (pictured centre with peak cap amongst his V Platoon), was killed by shrapnel in the support lines as he was about to check on the men. Nine men in ‘C’ Company were sheltering in a block house when it took a direct hit from an enemy shell killing them all outright, including 1090 Pte Twist (click to watch the film of his personal story, plus visit the Family Stories section of this website). On the night of the 17th/18th September 2272 Sgt Day, DCM, led a successful patrol which despite being engaged by an enemy patrol, managed to fight them off, taking a prisoner and thus gaining valuable intelligence for the pending Menin Road attack. The following night the front line was handed over to the 5th & 7th Brigades, with the 22nd Battalion being relieved by the attacking battalions and going in to reserve at Belgian Chateau during the successful attack.

On the 21st September the 6th Brigade took over the newly captured ground on the Becelaere Ridge from the 5th & 7th Brigades, and during the night the 22nd Battalion relieved two battalions of the 7th Brigade near Hannebeke Wood in what was now the support line, in an area littered with German dead (frontage J.8.b.7.1 to J.2.d.6.2 in the map above). Enemy shelling was heavy and continuous and the Battalion suffered close to 100 casualties, including fourteen killed or died of wounds. ‘A’ Company alone lost almost forty men during this tour of duty. Lieut. Thwaites was seriously wounded and as a consequence invalided home to Australia. During the night of the 23rd September the 13th Brigade relieved the 6th Brigade and the 22nd Battalion moved back to Dominion Camp. Here the battalion stayed for a week where as part of 6th Brigade formed part of the Corps Reserve to the 4th & 5th Australian Divisions that attacked Polygon Wood on the 26th September. German bombing planes were very active and visited the area nightly, and on occasions the aerial activity was  intense, with up to eighty to ninety machines in the air at any one time. On the 1st October the 22nd Battalion moved to the ruins of Ypres (photograph right of Australians marching past the ruins of the Cloth Hall) and then during the night relieved the 34th & 47th Battalions in the support line along the Zonnebeke Ridge. Capt. Woolf was wounded during the relief and Lieut. Braithwaite took charge of ‘C’ Company. The strength of the Battalion at the beginning of October was 34 Officers and 812 other ranks.
The Battle of Broodseinde
 The next phase in Haig’s step-by-step offensive was to be the attack on the Broodseinde Ridge. The preliminary bombardment commenced consisting of a series of practice barrages, twice daily, but with no other intense bombardment until zero hour. On the 3rd October the 22nd Battalion along with the other Anzac attack battalions began to move east and bivouacked in shell holes, but during the day British artillery caused about 20 casualties and two Lewis guns were destroyed by shorts. Just before midnight the ‘Jumping Off Tape’ for the attack was laid by the 6th Field Company. Capt. Stewart received a Bar to his Military Cross as he supervised the laying out of the JOT and with one NCO on the corner of
 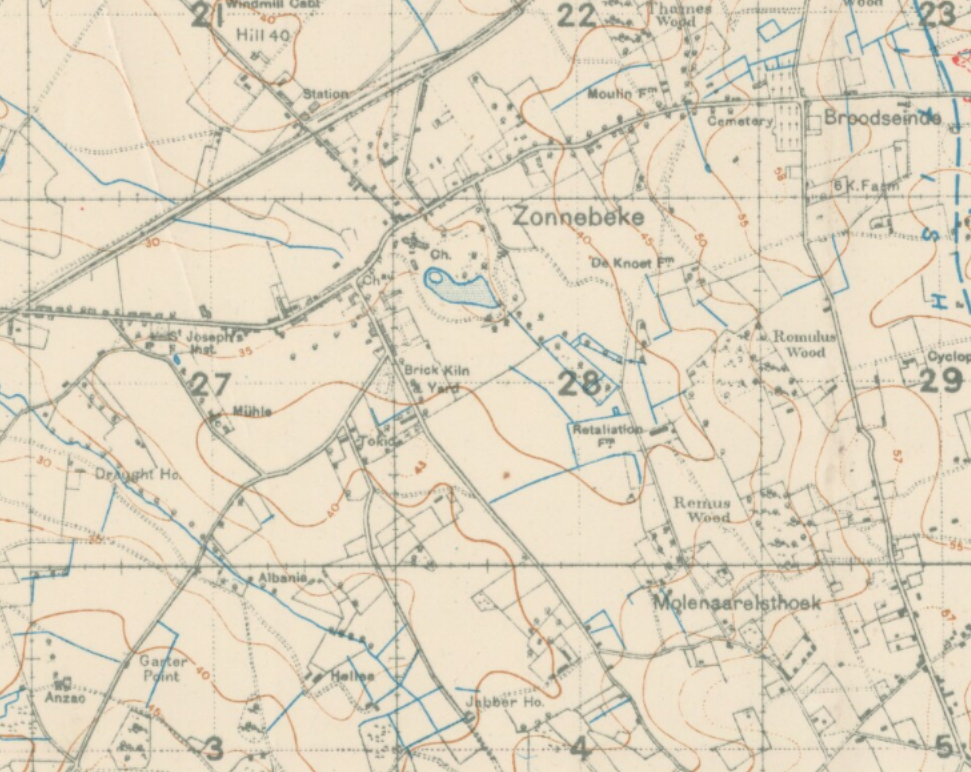 Zonnebeke Lake dealt with the snipers and brought back 30 prisoners plus 3 Machine Guns. [click link for geo-referenced Trench map reproduced with the permission of the National Library of Scotland]. At various hours after dusk the men moved to the tapes. As Bean recalled the I Anzac Corps 1st & 2nd Divisions having carried out one great attack just two weeks before advanced to this second operation in exuberant mood, their spirits lifted by having four Anzac divisions fighting alongside each other, plus having the British 7th Division on their right whose fighting quality had been witnessed by the Australians on their flank at Bullecourt five months previously. The chief danger to the operation would appear to the chance of a break in the weather. All night there had been drizzling rain, the morning was cold and raw, and the going was becoming heavy.
 With the 7th Brigade and Zonnebeke Lake on their left the 22nd Battalion lined up on the JOT in the 2nd Australian Division sector without incident. The four companies A-D were positioned from left to right, and by 4am on 4th October 1917 were lying in shell holes waiting for zero hour at 6am. From 4am to 5.30am the enemy provided intermittent shelling which ceased for five minutes but then at 5.35am a furious German barrage fell around the waiting men and the evacuated outposts, increasing in intensity as zero hour drew near. When the British barrage crashed out at 6am, the men covered with earth and debris rose and pushed forward under what was the densest and best barrage that the battalion had ever advanced behind. The German barrage, which had actually been lain as the prelude to their own infantry advance at the same zero hour, ceased almost entirely and the German attack dissipated under the weight of shells falling on their own JOT and the effectiveness of the Australian machine gun barrage which even eclipsed that of the Germans at Bullecourt. In these altered circumstances the Germans did not attempt a serious struggle and surrendered freely. At 7.23am and almost without opposition the Battalion gained its objective – the Red Line – on the reverse slope of the Broodseinde Ridge and immediately commenced its consolidation and the construction of a continuous trench system. The 21st and 24th Battalions waited on the 22nd’s objective until the barrage moved on with great accuracy and enabled them to take the second objective – the Blue Line – some 400 yards on the forward slope of the Broodseinde Ridge. They accomplished their mission with great success and the German Staff Officers who waited in pillboxes for news of their own attack, were taken by surprise. One party of thirty, including a Colonel and his Staff surrendered to Pte Drury of C Company when he entered their pillbox, and before they could destroy their papers and maps. The Adjutant Capt. Stewart and 4669 RSM Cadwell picked up another party of twenty-five. Battalion Headquarters moved forward to De Knoet Farm almost immediately, in part to avoid the heavy shelling that was falling on their original position. In one German dugout in the vicinity of the Farm a party of twenty-three Germans refused to surrender and were
  killed by bombs dropped through the ventilator. Amongst the men from the Battalion killed were Lieut. Blanchard – leading a party around Zonnebeke Lake to connect with the 25th Battalion – , Lieut. Kellaway, (photograph left, back row, second left) killed by a high explosive shell, and 2nd Lieut. McIntyre, shot while leading his men against a party of Germans advancing with fixed bayonets, several having been killed by Lieut. McIntyre’s revolver. Many of the missing were killed during the half-hour barrage that preceded the attack. With the Regimental Aid Post at the Brick Kilns (location D.28.a.1.0.) Major Craig, the medical officer of the Battalion, was severely wounded and would not return to the Battalion. With the success of the 3rd Australian Division on the left and the 1st Australian Division on the right, the attack on the 4th October was one of the most successful in the history of the Australian Army. This was the third blow struck by the British at Ypres in fifteen days and with complete success, driving the Germans from one of the most important positions on the Western Front. General Plumer indeed called this ‘the greatest victory since the Marne’, and at this point the British faced the possibility of achieving a decisive breakthrough. For the Germans the 4th October was a significant defeat and they had suffered serious losses. However, losses too for the Australians were heavy with the three divisions sustaining 6,500 casualties.
 A total of twenty-five medals & awards were made to the men of the 22nd Battalion for gallantry during the Broodseinde attack including: 989 L-Cpl Horan (Bar to DCM) as he fought his way through several parties of enemy killing a number with his bayonet, capturing others and re-organised his own and other sections to meet and drive back the enemy counter-attack despite being wounded; 4131 Sgt Harris (DCM) despite being wounded three times he continued to lead his platoon in the early stages of the attack, rushed a hostile block house which was holding up the advance, silenced the machine gun and captured the occupants, and while continuing to organise and encourage his men he was again wounded; 4669 RSM Cadwell (Belgian Croix de Guerre) – above photograph, back row middle – on seeing that an enemy post had not been mopped up and that its Machine Gun was still in action, armed with only a revolver he worked his way towards the post and although wounded in the neck he succeeded in silencing the gun and making the crew prisoners; 5691 Pte Wilton (Bar to MM) used his Lewis Gun with great effect, firing from the hip, and inflicted severe casualties on all parties of the enemy, and though wounded he insisted in remaining on duty until relieved; Capt. Rodda (MC) organised a party and rushed and bombed a hostile block house that was causing casualties, killing 6, taking 15 prisoner and capturing two heavy machine guns.
 On the following day the Battalion remained on the Red Line which had been consolidated by a continuous trench system, in support to the 21st & 24th Battalions ahead. Enemy shelling was fairly heavy but casualties during the day were light in comparison. During the night the Battalion was relieved by the 20th Battalion as the 6th Brigade went into reserve between Hannebeke Wood and Anzac House. These days in reserve were miserable with the regular downpours making the battle ground a quagmire. Having no coats they carried their waterproof sheets as capes and returned to their shell holes to find them drenched, half-filled with mud and water. The only accommodation consisted of these shell holes, and all available men worked long hours burying cables and on fatigues. Despite being exhausted and expecting relief, orders
  were received to move forward and relieve the 18th Battalion of the 5th Brigade. Torrential rain was now making the conditions worse but Haig, to the surprise of many, decided to push on with the offensive. General Birdwood, who knew that his troops were at the limits of endurance through exhaustion, hoped for a postponement but as his Corps had but a slight task on the flank of the next attack he did not protest. The fighting strength of the 22nd Battalion at this stage was now little more than 100 men, and it was thus necessary to bring up the men that had been in reserve and acting as the Battalion nucleus at Caestre.
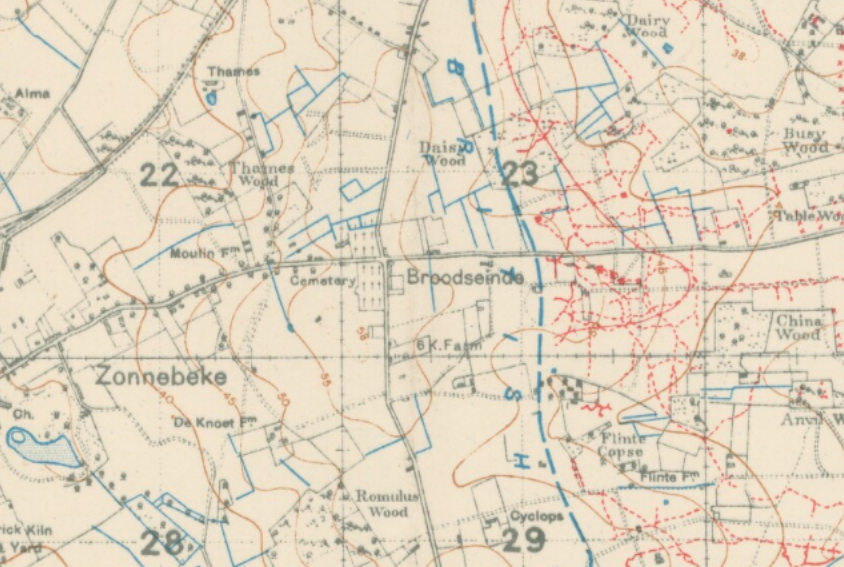 The French First Army and British Second and Fifth armies attacked on 9th October 1917 in what was known as the Battle of Poelcapelle from the Broodseinde ridge towards Passchendaele. The 6th Brigade was to support the attack by the 5th Army to their left, and with the 22nd Battalion the furthest right of the Brigade’s four battalions, south of the Broodseinde – Zonnebeke road, in grid block D.23.d. [click link for geo-referenced Trench map reproduced with the permission of the National Library of Scotland]. The junction was with the 8th Battalion on their right who stayed put during the attack was thus the pivot point for the attack. The supporting artillery was not able to move forward due to the mud and as a result the barrage was so thin that from the start the German machine guns were able to cause havoc for the advancing parties. Two detachments of the 22nd under Capt. Bunning and Lieut. Anderson attacking the area of the old German Headquarters at the sandpit reached their objective but suffered heavily in the fighting with the nearby German posts. The southern party under Capt. Bunning – who was awarded the MC for personally carrying out a dangerous reconnaissance – reached its position under cover of rifle grenades, but Lieut. Campbell of the 6th Machine Gun Company was killed by a shell that caused casualties amongst the entire Vickers Gun crew. While digging in Lieut. Skene-Smith who had only just returned to the Battalion was wounded then sniped and killed while on a stretcher. The northern party under Lieut. Anderson, MC, had only gone 20 yards when it was nearly wiped out, severely wounding Lieut. Anderson and Lieut. Dooley, but eight survivors under Lieut. Chalmers pushed on. There was no communication trench to the rear and as result German snipers took a heavy toll. 2176 Pte Moore (MM) covered the consolidation of his post by vigorous sniping until relieved despite being physically exhausted and only 20 yards from an enemy block house. 6044 Pte Brodie (Belgian Croix de Guerre) was a first class marksman and used his skill to the full to prevent his party located close to a strongly garrisoned Pill Box suffering further casualties from these hostile snipers, and three enemy rushes were beaten off largely due to Brodie’s shooting. Twenty men from the 22nd Battalion were either killed or died of their wounds during this flanking operation.
 At 4am on the 10th October the 49th Battalion relieved the 22nd Battalion in the forward posts on the firing line, moving back to the old Red Line, now the support line. At 7pm the worn out remnants of the Battalion made their way slowly back to the dug-outs on the Ypres-Comines canal near Ypres. In this sector progress along the narrow duckboards (example right) was slow but also treacherous for anyone that slipped off the boards and into the mud and water-filled shell holes. Two days later the Battalion left camp at 7am and entrained at Ypres Station and marched to Steenvorde to the billets previously occupied and where they remained for two weeks. The companies were now organised as three platoons per company on account of the weak strength of the Battalion, with only about 75 men per company available for the next tour of the front line. The first week of November was cold and cloudy with sharp biting winds, when on the 7th November the Battalion received orders to move to Westhoek to relieve the 20th Battalion in the support line. The relief was carried out that night without incident. There was intermittent shelling throughout the tour in the vicinity of Polygon Wood racecourse.
 It would not be until the second week of November before the final objective of Passchendaele would be taken by the Canadian 1st and 2nd Divisions (photograph of the village showing just the outline of the roads following the artillery bombardment that destroyed the town). The final attack on the 10th November 1917 was carried out in a rainstorm. The weather, combined with a reinforcing response to the joint Austrian-German attack in Italy at Caporetto that necessitated the sending of six British divisions to bolster the Italians, resulted in the end for the 3rd Ypres offensive. The following day the 22nd Battalion was relieved by the 8th West Yorks and in heavy rain with boots deteriorating marched to Wippenhoek, away from the battlefield and towards the winter sanctuary of the Kemmel huts.
Outcome
 The 3rd Ypres campaign, controversial in 1917 and remaining so ever since, will forever be remembered as a campaign of ‘wretchedness in the Flanders mud’. The cautious step-by-step approach by Haig did result in territorial gains but came at a high cost of some 450,000 British and Dominion casualties, comparable to the Somme 1916 offensive, and was nowhere near achieving the initially held objective of driving the German Army from the channel coast. Despite the early successes, once the weather broke and turned the battlefield into an impassable quagmire, any thought of a decisive breakthrough had gone. However the offensive did have a significant impact on the eventual outcome of the war. Through this offensive Haig was able to buy time by putting the German Army under great strain thus preventing it from taking advantage of the French failure at the Aisne and their subsequent mutinies, enabling Petain time to rebuild in preparation for the arrival of the Americans, all during a period of crisis back home in Britain brought about by the German unrestricted submarine warfare and the political and military breakdown in Russia. For the Germans, eighty-six of their best divisions took part, and with resources reaching critical their quality was never the same again.
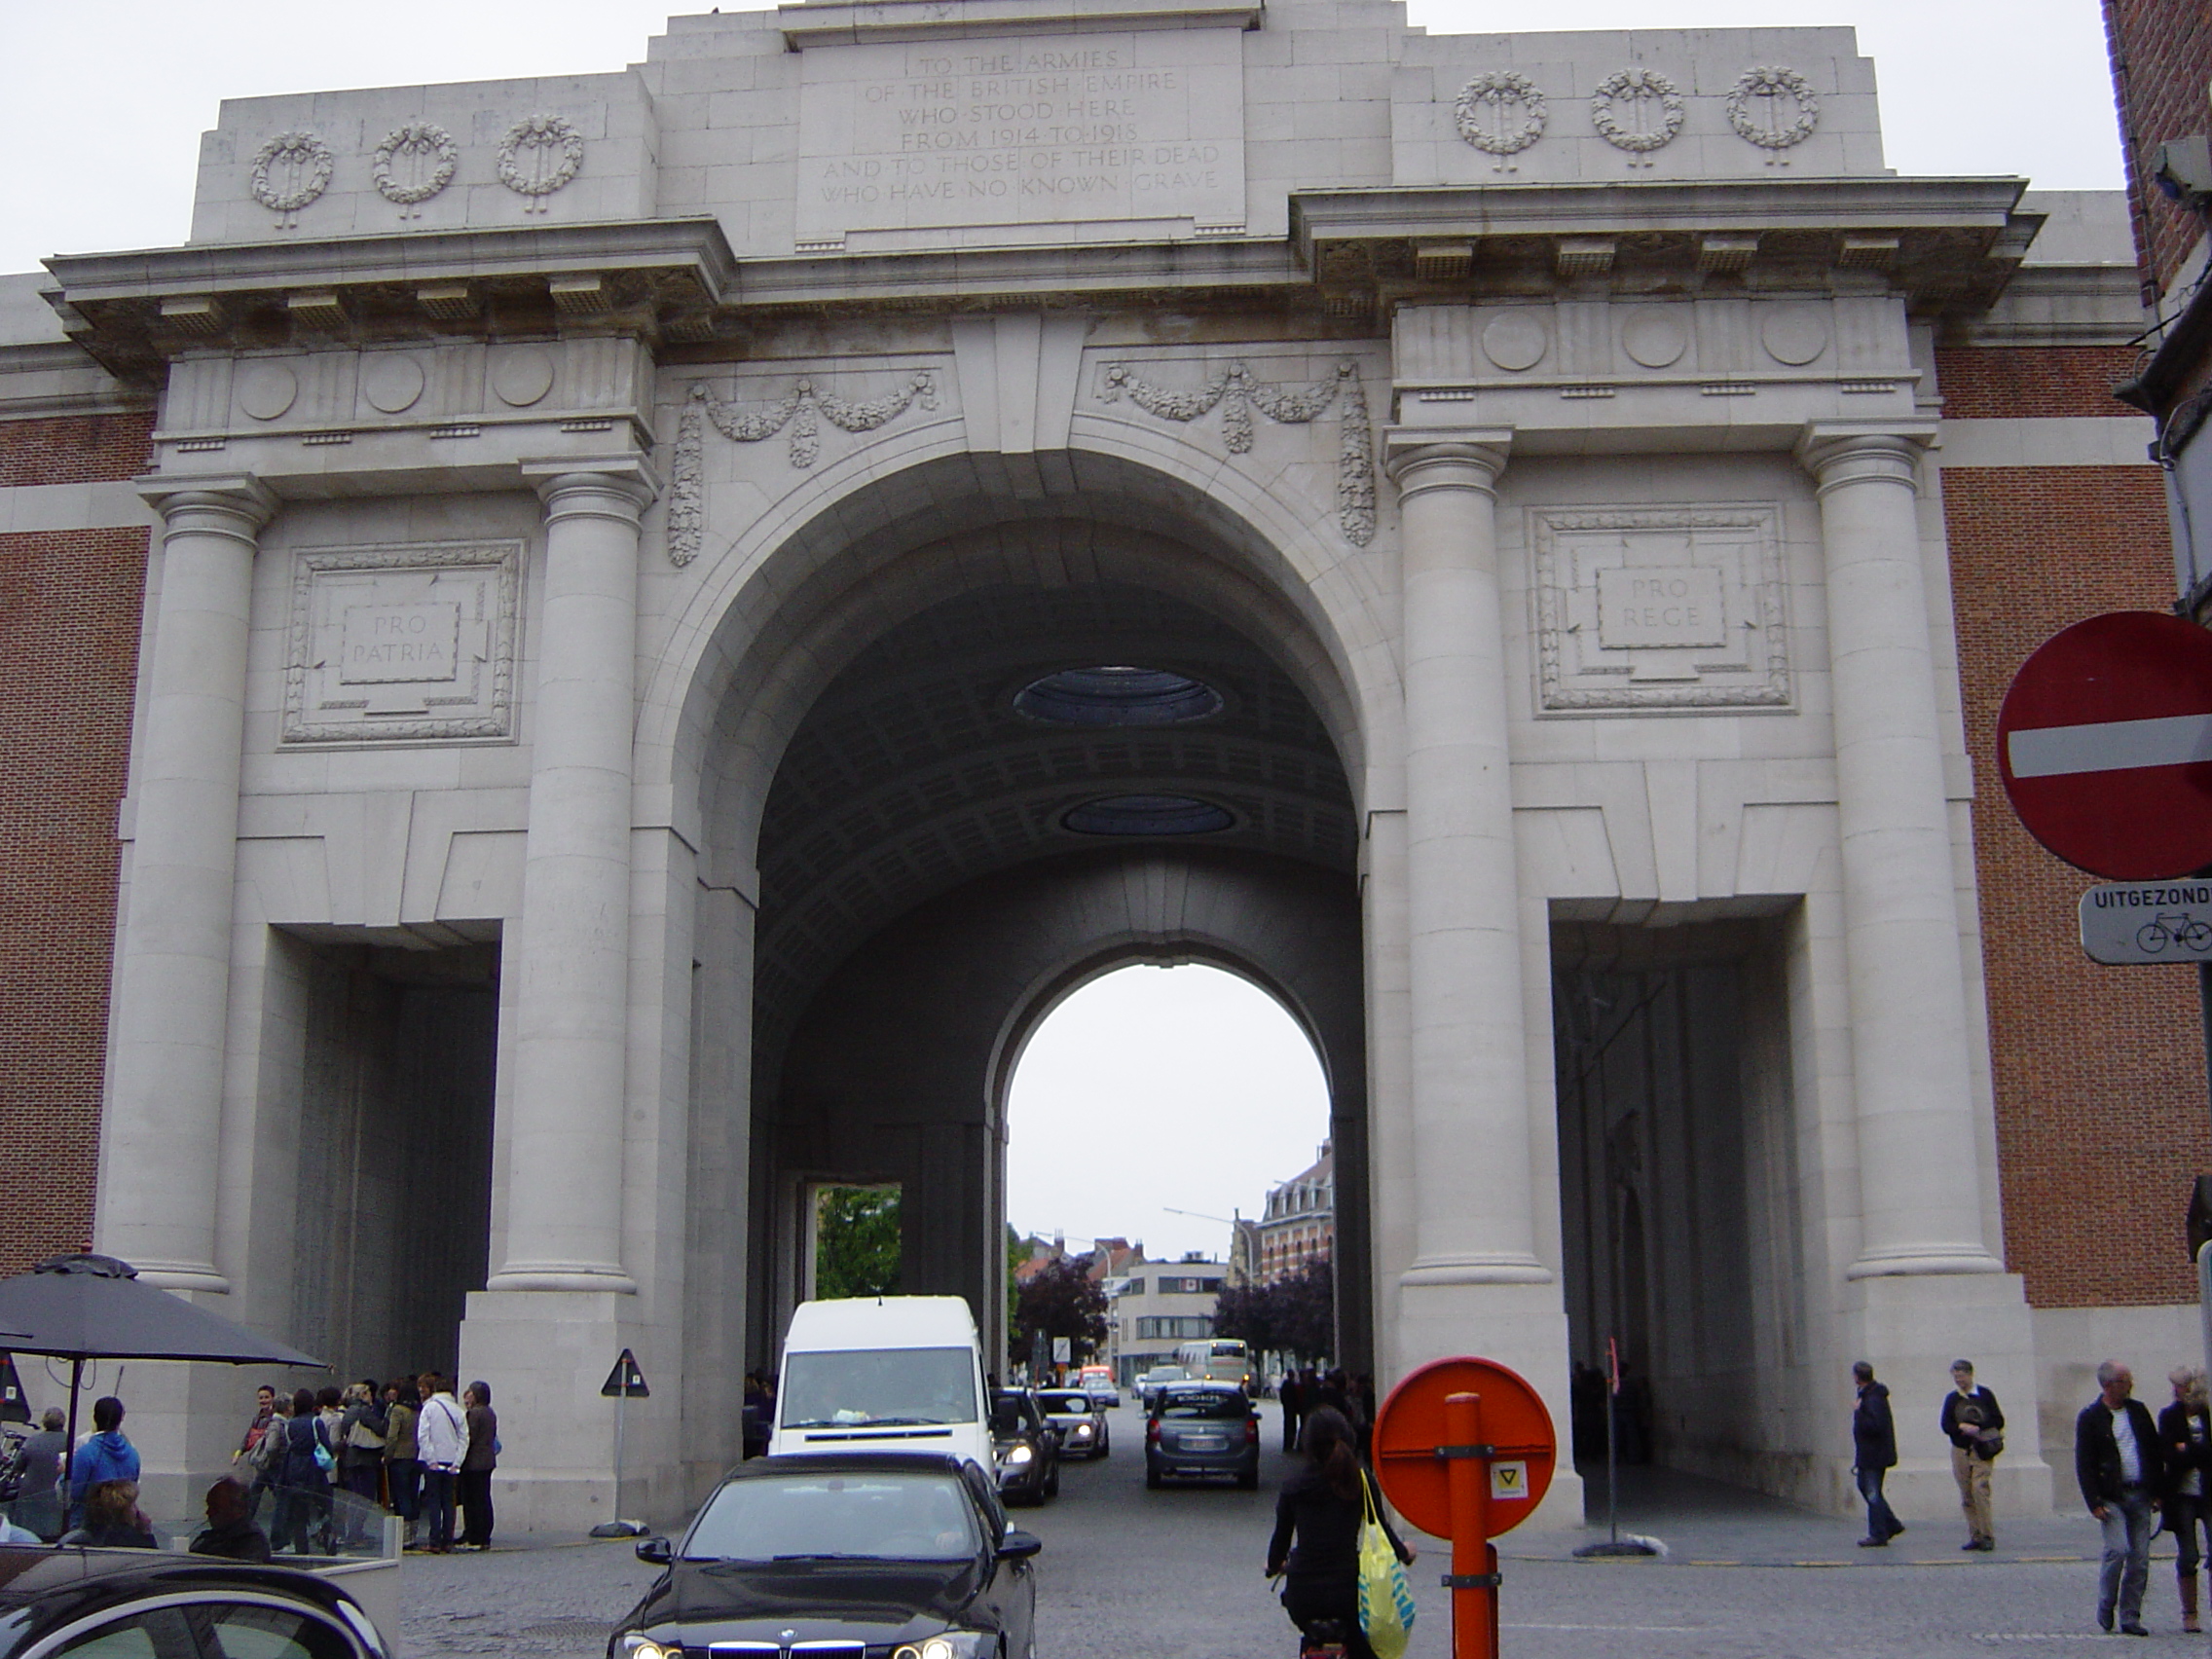 For the Australian Imperial Force, in spite of the events of 9th October, the Third Battle of Ypres was in the main a successful offensive and in which the Australians played a prominent part. The reputation of the Australians, as well as the New Zealanders and Canadians, increased further during the campaign and acknowledged by friend and foe alike. The loss was heavy at an average of 7,300 for each Australian Division, but about 700 lower than at the Somme the previous year. The 22nd Battalion had 162 men killed or died of wounds during the 3rd Ypres campaign. The Ypres Menin Gate Memorial to the Missing (photograph above) commemorates more than 54,000 men of all Commonwealth nations, except New Zealand, who died in the Ypres Salient and have no known grave, including 76 men from the 22nd Battalion. Every night at 8pm buglers from the local fire brigade play the Last Post to remember those that fought and died. The Tyne Cot Cemetery, the largest Commonwealth cemetery in the world, is located on the site of the Broodseinde attack and the advance of the 3rd Australian Division.
 FIRST WORLD WAR TIMELINE