
 Background
The Battle of Messines in June 1917 was a preliminary operation to take the high ground of the Messines-Wytschaete Ridge that ran to the south of Ypres, and a necessary precursor to the main Ypres offensive (3rd Battle of Ypres, or Passchendaele) that British Field Marshal Haig had long been in favour of. The historic city of Ypres was pivotal, not just for the defence of the Allied held channel ports, but was also the gateway to attack and force the German Navy out of the Belgian  ports of Ostend and Zeebrugge that were the base for a flotilla of small submarines that operated within the German remit of ‘unrestricted’ submarine warfare and were a constant menace to the Allied cross-channel shipping. With the failure of the French at the Chemin des Dames and the British held to a stalemate at Arras, the forthcoming Ypres campaign had now become the main focus for the Allied armies on the Western Front.
Given the strategic importance of this area, preparations had begun in 1915 with the commencement of mining operations from the British lines under the German front line system. A total of 26 mines were constructed by the British, Canadian and the 1st Australian Tunnelling Company (Hill 60 and Caterpillar) along the layer of blue clay to positions deep under the German front line. Suspecting the British tunnelling efforts, the Germans dug their own shafts for counter-mining, but only the mine at La Petit Douve Farm was discovered and was subsequently flooded and abandoned. In the chambers at the end of the mines 450 tons of ammonal explosives were placed – the largest 95,000lbs – ready for zero hour.
Since the Battle of Arras in April 1917 the British had established a sophisticated artillery plan and mode of execution. Supported by the Royal Flying Corps for improved observation, 2,230 densely packed guns and howitzers (a gun for every 7 yards of front) bombarded the German trenches, cut wire, destroyed strong-points and conducted counter-battery fire against 630 German artillery pieces, using 3,561,530 shells in the week prior to the attack. For the infantry they would be advancing behind what was now a well-developed creeping barrage, with the assistance of dozens of the newer and more reliable Mark IV tanks as well as aircraft from above. However the  infantry would be meeting a determined enemy that had established in this part of the battlefield a checkerboard of concrete blockhouses (captured blockhouse, photograph left) above ground from which the garrison could quickly appear once the barrage had past and set up their machine guns. In some cases the blockhouses contained loopholes through which they could fire their machine guns directly.
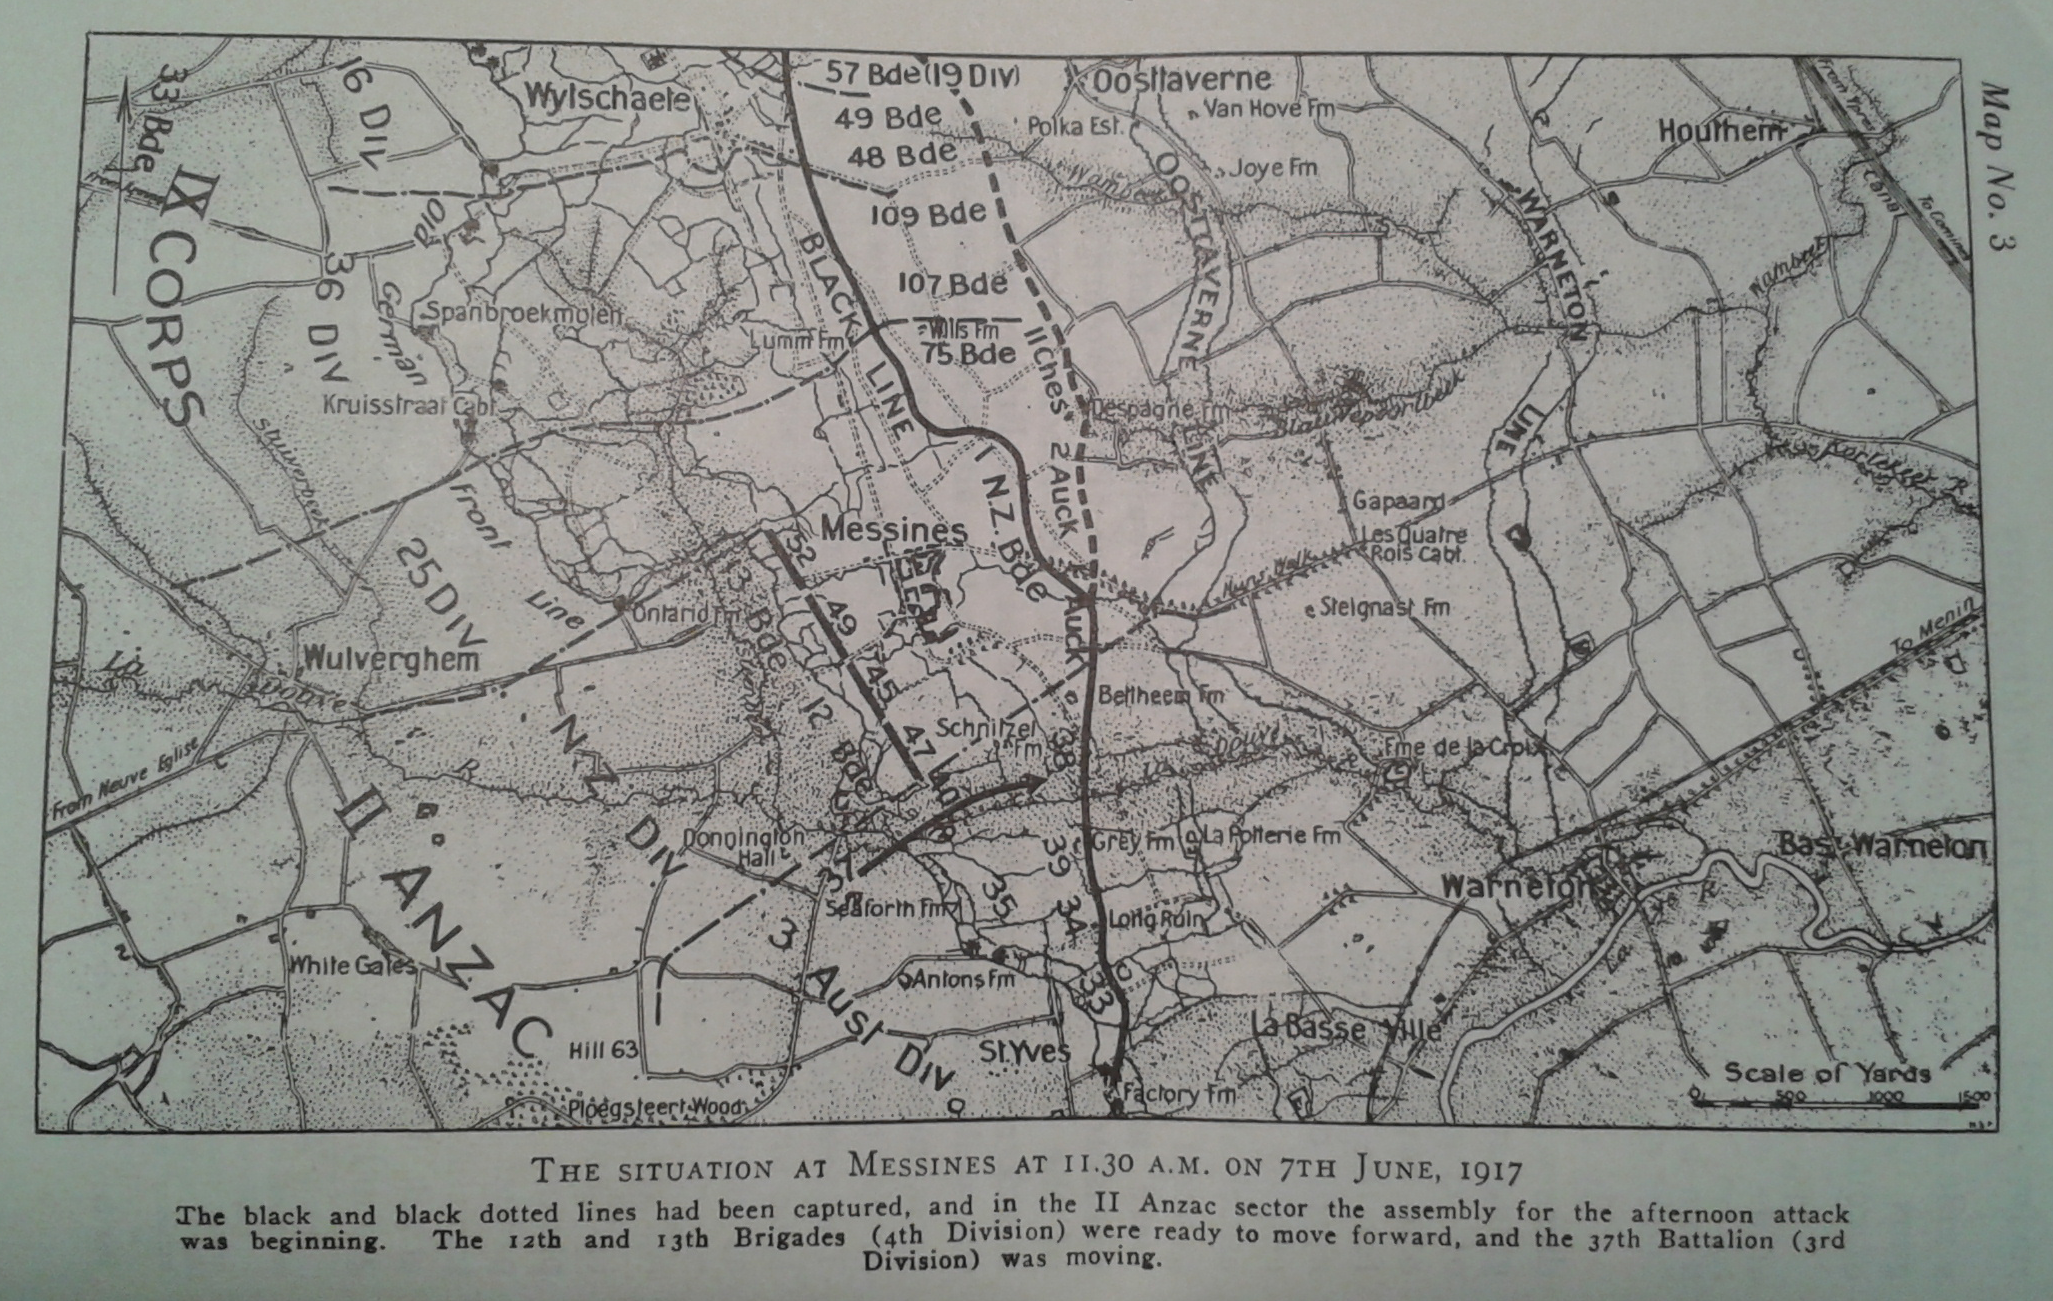
The 10 mile frontage of the attack for General Plumer’s Second Army was to be attacked by three British Corps (X, IX and II Anzac), with the first objective being the German second line on the ridge, otherwise known as the Black Line, and the second objective being the Oosttaverne Line, or Green Line on the reverse slope of the ridge. General Godley’s II Anzac Corps would be on the right of the offensive in the vicinity of the villages of Wytschaete and Messines and consisted of the British 25th Division on the left, the New Zealanders in the middle (in front of Messines village), and the 3rd Australian Division on the right slope of the ridge and what would be the right flank of the whole operation. The 4th Australian Division would also be called into action in the second wave pushing through to the Oosttaverne Line. For General Monash’s 3rd Australian Division, which had hitherto been in England training since its arrival in the summer of 1916 before moving to the nursery sector of Armentieres in November, the Battle of Messines would be their introduction to the Great War.
Combat
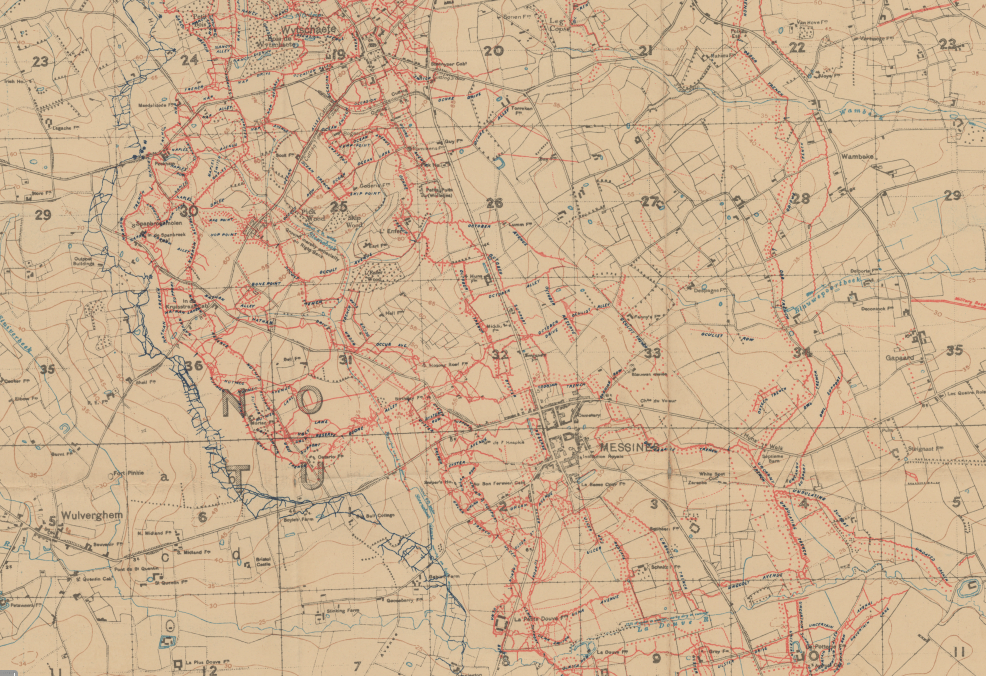 Shortly after 11pm on the 6th June 1917 the eight attack battalions of the 3rd Australian Division left their camps and billets and began their move to the front. In and around Ploegsteert Wood the infantry were coming under German artillery fire including gas, high explosive and incendiary shells. At least 500 men in the wood had been affected and put out of action, many from the effects of gas. For the others the efforts of having to proceed and carry while wearing their gas marks meant that they arrived at the jumping off line exhausted. As a result of the enemy bombardment, at zero hour the last companies of both the 9th and 10th Brigades were just reaching their assembly positions [see above right, and click link for geo-referenced Trench Map reproduced with permission of the National Library of Scotland]. At 3.10am on the 7th June 1917 a number of the big guns began to fire and at that moment the first of the great mines exploded. Within the following few seconds the Messines – Wytschaete Ridge erupted from right to left as another 18 huge mines in sequence were detonated, causing an explosion so loud that it could be heard in London. The mines blew vast craters as
  much as 300 feet in width and 50 -70 feet deep, but the resultant craters and rims did cause obstacles for the attackers and split the advance. Under the resultant covering dust cloud, the devastation caused by the mine explosions and the tremendous barrage it enabled the assaulting companies to make easiest gains yet experienced by the Australians in the war. The surviving local German garrison was entirely stunned and shocked by what they had just witnessed and endured. Upon entering the enemy trenches behind their creeping barrage the attackers came across many a broken man cowering and thus resistance was light. At this stage the only resistance of note was to the 33rd Battalion on the far right ofthe attack where 1804 Pte J Carroll (photograph right), having rescued a comrade attacked and captured a machine gun, killing its crew in the process, and for this and subsequent bravery during the German bombardments was awarded the Victoria Cross. At 5am the barrage lay on the second line and the attacking troops of the 9th and 10th Brigades pushed forward close to their own shell-bursts. By this time the Germans had regained some organisation of their defence and when the barrage lifted the men of the advancing 34th and 39th Battalions to the south of the Douve River came under machine-gun fire. Eventually the machine-guns were overcome and the two battalions dug in on their final objective in preparation for the expected German counter-attack. To the north of the river the 38th Battalion pushed on, capturing German field guns as they went. Here on the right the task of fortification began while to the north of the Douve river the 38th Battalion pushed on, capturing German field guns as they went. By 5.15am, having quickly overcome slight opposition in front of them, II Anzac Corps – the 3rd Australian Division along with the New Zealanders to their
 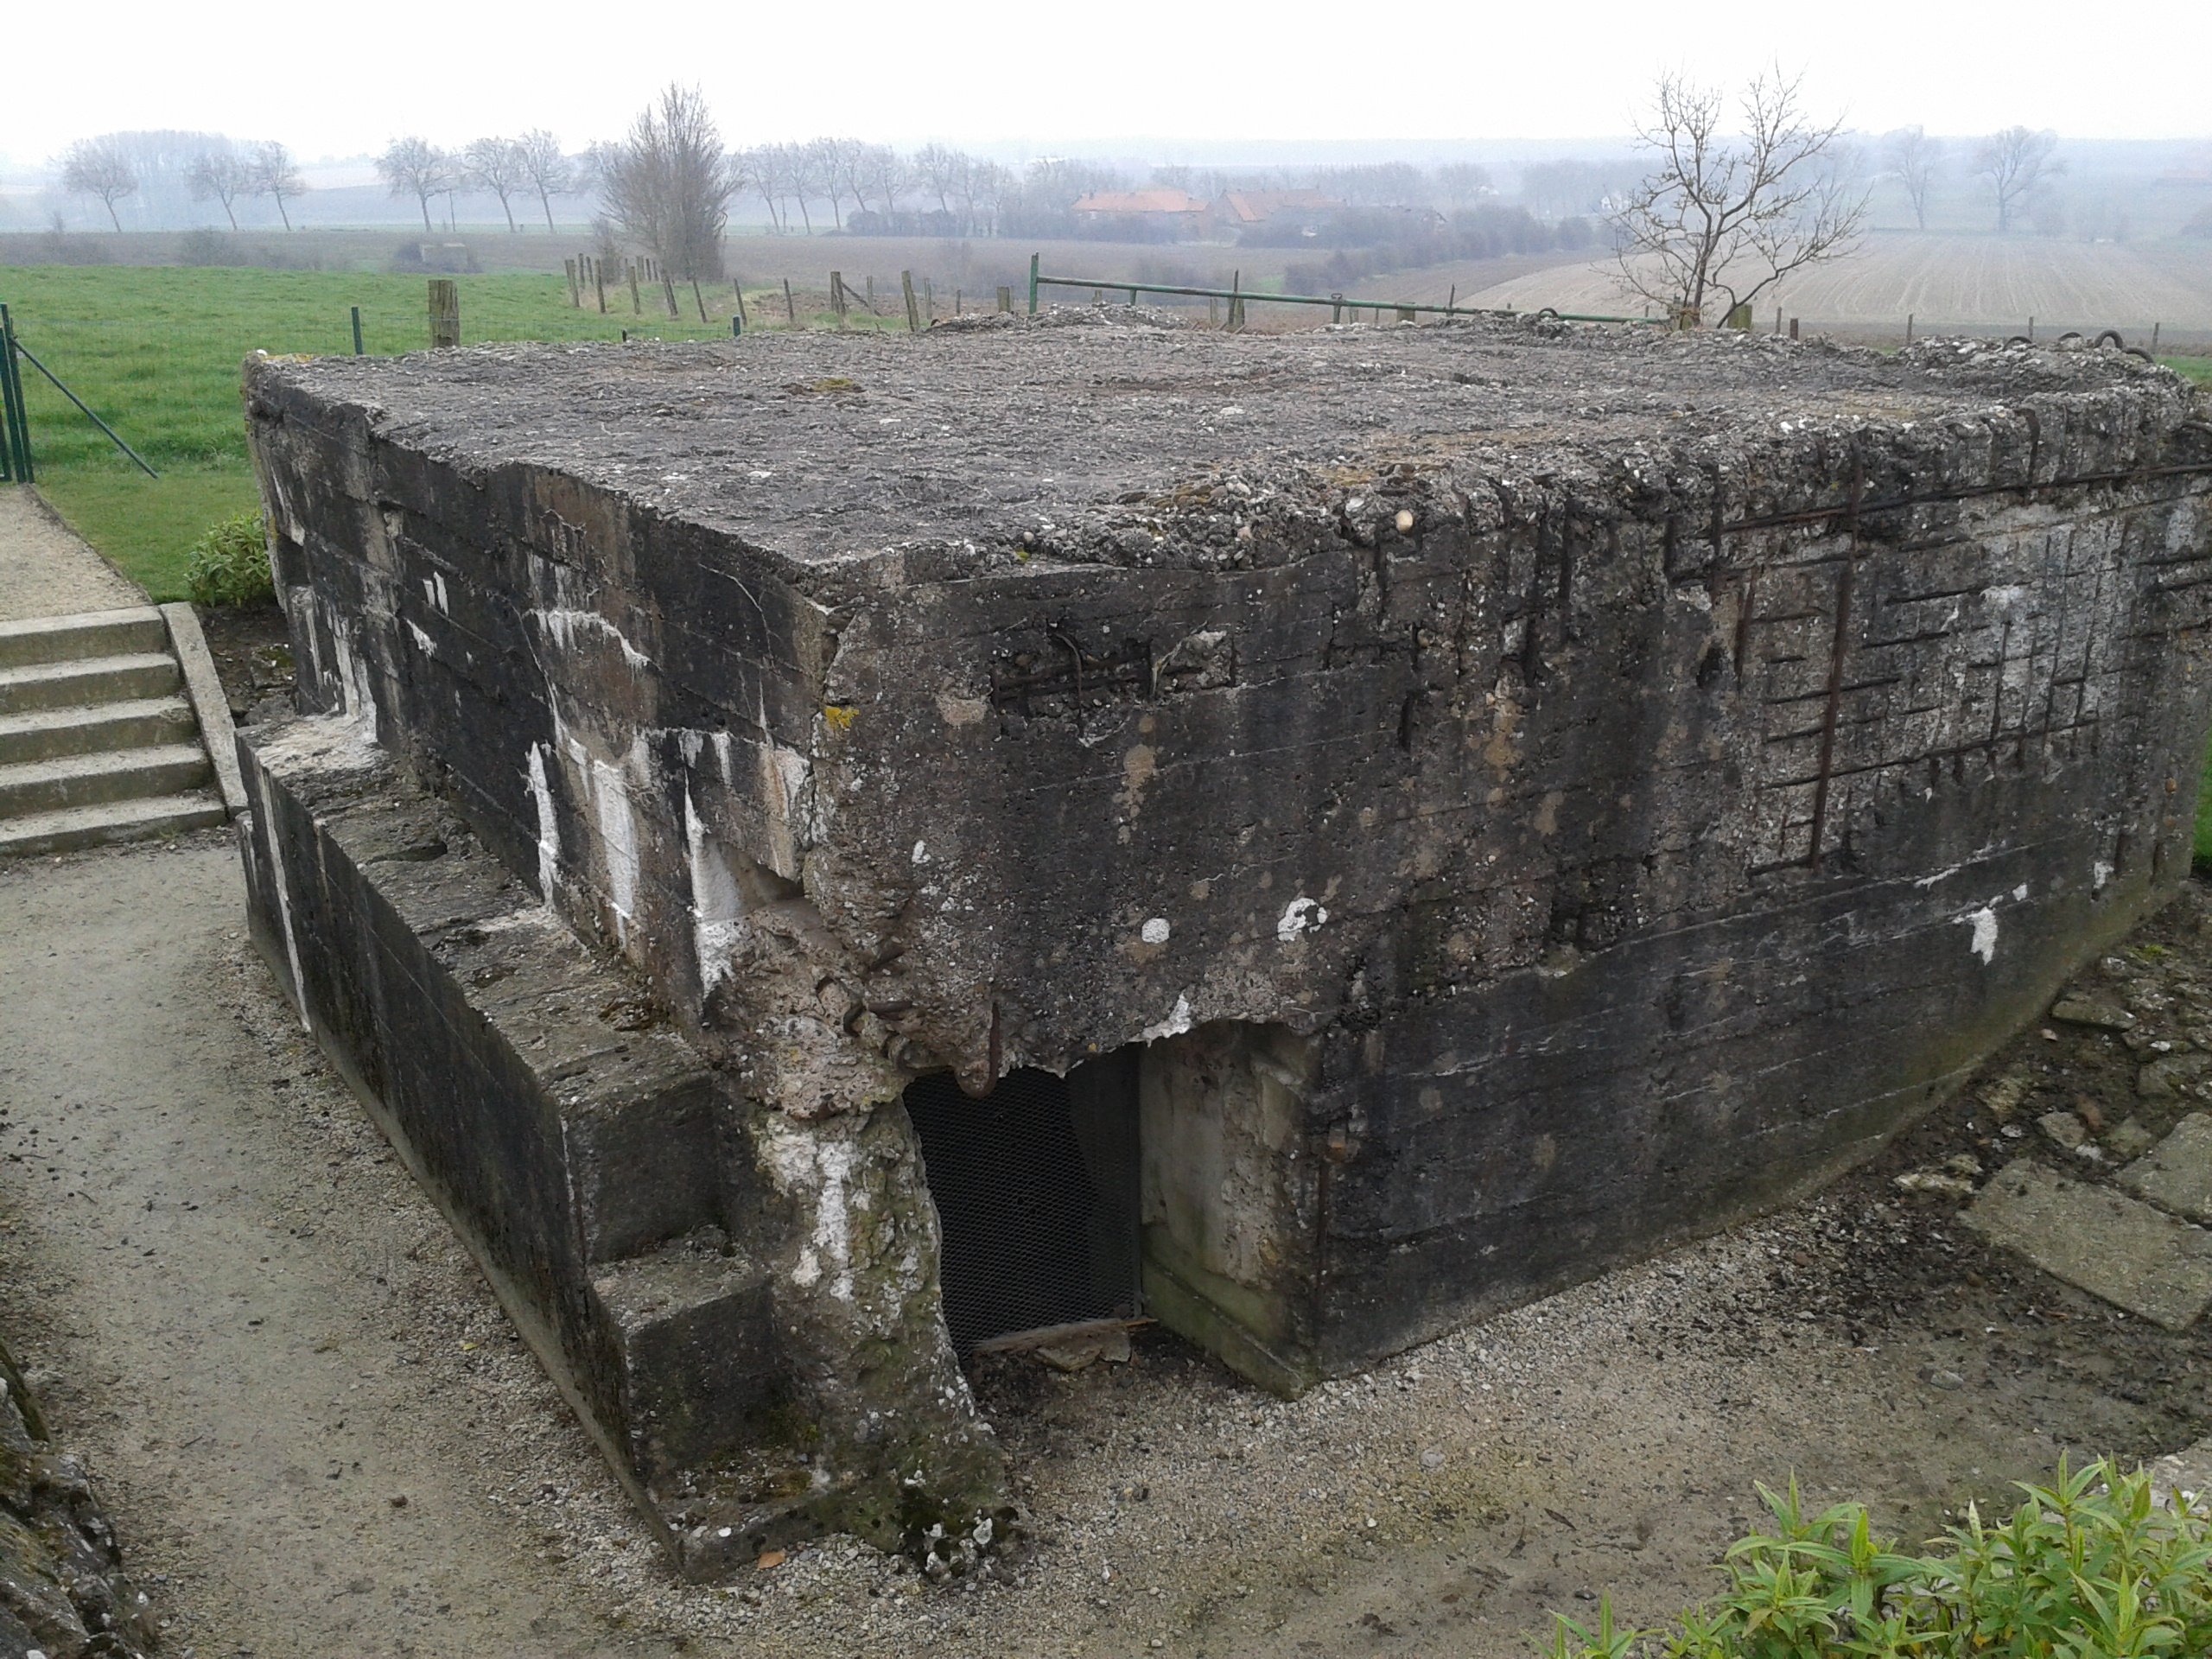 north and the British 25th Division – had taken the Black Line on the crest of the Messines Ridge and thus completed its part of the main phase of General Plumer’s plan. By 9.30am following digging of an utmost urgency, only short gaps in the new trench remained between the companies. [Photograph of a German blockhouse situated towards the top of the ridge in the NZ sector, now within the New Zealand Memorial Park. The 3rd Australian Division attacked to the left in this photograph].
Just before 11am the two attacking brigades of the 4th Australian Division began to make their way forward for the afternoon attack, having to pass a German barrage towards the jumping off point. As the 12th Brigade infantry began to arrive at the forward position word came through that the attack had been postponed for two hours on account of a check in the advance in the north – IX Corps had further to advance – meaning that the attacking battalions now in sight of the Germans had to seek shelter in shell holes. The 13th Brigade, although halted when the news of the postponement was received, also had to pass through a heavy barrage when near the crest, the barrage a consequence of a pending German counter-attack. As the Germans began their counter-attack the British artillery increased its fire and the forward posts of the New Zealand and 25th Division opened with heavy rifle and machine-gun fire and by 2.30pm what was the main German counter-attack in this battle was repelled.
 At 3.10pm the barrage for the next phase to the Oosttaverne Line began and the 37th, 45th and 47th Battalions advanced close to the barrage, the latter battalion behind three tanks that would lead the way. Unlike the disaster that fell upon the 4th Australian Division at Bullecourt two months previous, these tanks were of a later model with improved protection and greater reliability and did their job, helping the inner flanks of the 47th and 45th to seize the first trench and take 120 prisoners. The attack then moved to the main objective, the Oosttaverne Line which contained a mixture of trenches, hedges and concrete blockhouses that concealed and protected the German machine-gunners. This was the first time that the Australians had encountered these ‘pillboxes’ en-masse, a form of defence structure favoured by the Germans in Flanders due to the waterlogged nature of the ground rendering the construction of protective dugouts difficult. The taking of these blockhouses often required the infantry attacking from the rear supported by rifle grenadiers keeping the defenders under cover. It was during an attack on a deadly machine gun from a loop-holed blockhouse that Capt. Grieve (photograph below right) of the 37th Battalion was awarded the Victoria Cross. To the north of the 37th the 45th and 49th Battalions met intense resistance and suffered a high number of casualties particularly amongst its officers.
 With the Oosttaverne trench taken the next task was to take the support trench some 200 yards away, but now without the support of the tanks. In many places the support trench did not exist but its defence was mounted from hedges and farm buildings. This open country warfare now posed a different problem with the advanced troops losing touch with their flanks. On the extreme left of the 13th Brigade the British 33rd Brigade on its left was missing, so Capt. Maxwell of the 52nd Battalion led his whole company left and took the whole frontage objective of the flanking brigade. The other battalions seeing the 52nd deviate naturally began to swing more to the north-east and as a result a widening gap opened between the 12th and 13th Brigades. However by sunset the final British objective had been won along practically the whole of the battle-front, and with a speed beyond any other major achievement by the British Army in France thus far.
On the right the 37th and 47th Battalions could see the enemy forming up in the trees for a counter-attack, and when it began the Australians poured heavy fire into the advancing Germans. Shortly after the advance a barrage started up, but this was from British guns to the rear putting down a defensive barrage that at first landed behind the Australians and then on top of them. Many were killed by their own shells, leading others to retreat back to the line held by the New Zealanders, leaving the previously won objective abandoned. A similarly chaotic scene was occurring on the left, a result of the cautiousness of General Plumer to repel the expected counter-attacks by placing a heavy barrage in front of the previously won lines, but not knowing where the forward troops were.
 In the early hours of the following morning General Godley ordered the retaking of the ‘ground vacated’. At 3am the 44th (3rd Div.) and the 48th Battalion (4th Div.) began their advance and were able to retake the position in the Oosttaverne trench with relative ease, though a section of the line in the Blauwepoortbeek valley remained in German hands, part protected by a blockhouse. With the Australians now the dominant force, this ended the enemy’s counter-attacking activity in the Australian sector, though their artillery put down a heavy bombardment both on the Australian new lines and to the rear where new trenches were being dug. On the 9th June, on the south flank of the battlefield the 9th and 11th Brigades pushed forward patrols either side of the Douve river to set up forward posts but both met with stiff resistance. Farther north the 13th Brigade’s night attack down the Blauwepoortbeek was beaten back with enemy fire coming from the blockhouses and defences. At 10pm on the following night the 50th and 52nd Battalions attacked to the north of the Blauwepoortbeek with a view to enter the Oosttaverne trench and bomb south into the valley. The 45th Battalion to the south of the valley again launched a bombing attack but, as previously, failed on account of the machine guns located in the impeding blockhouse. The 45th Battalion had bravely entered into the battle in greater strength than any other Australian battalion, but came out the weakest having lost 16 Officers and 552 men. However with their position unsustainable the German garrison holding the front posts at Messines withdrew to the Warneton Line, three quarters of a mile to the rear.
Outcome
German General von Kuhl described the battle as one of the worst tragedies of the war. For the British the Battle of Messines was not just a military victory but demonstrated the impressive success of a co-ordinated effort namely the mining operation, the benefits of an overwhelming bombardment with effective counter-battery fire and creeping barrage, effective air observation, use of tanks, efficient transportation of materials and relatively swift evacuation of the wounded. For the Australians it was a welcome turnaround in the lack of confidence that they had in the British High Command particularly following Bullecourt, at last seeing an operation that was well planned and executed, not witnessed since the evacuation of Gallipoli eighteen months previously. The battle also saw a disciplined and well fought entry of the 3rd Australian Division into the war.
 However and as often seen during the war, this victory came at a heavy price for the Australians. The comparative severity of the fighting on the southern flank is shown in that of the 26,000 British casualties incurred in the battle, more than half occurred in the II Anzac Corps sector, of which the New Zealanders suffered a total of 4,978 casualties. The three Brigades of the 3rd Australian Division had 112 Officers and 4,010 other ranks as casualties, with the 35th and 36th Battalions the most heavily affected. The two Brigades of the 4th Australian Division lost 108 Officers and 2,569 other ranks, with the 45th and 47th Battalions of 12th Brigade suffering the most of all the Australian battalions involved in the battle. For these battalions of the 4th Australian Division this would put further strain on them having been the only one of the four divisions of I Anzac Corps to be pressed into action and missing the well-earned post-Bullecourt rest
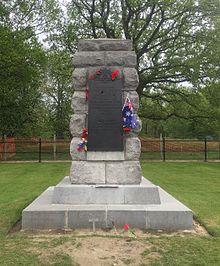
  currently being enjoyed by the 1st, 2nd and 5th Australian Divisions. In addition and at the far northern end of the battle, it is estimated that thirty tunnellers of the 1st Australian Tunnelling Company (photograph above of the Tunnelers monument, situated by the railway line between the two craters) were killed during the construction and defence of the Hill 60 and Caterpillar mines (photograph left of the Caterpillar Crater to the south of the railway line).
The Battle of Messines was thus the successful preliminary operation that Field Marshall Haig wanted, i.e. the clearing of the high ground and flank prior to the great thrust that was to happen at Ypres. Unfortunately for the Field Marshall the German High Command knew of the British intentions, and prepared accordingly.
Published as ‘news’ 100 years on to the day, follow the 22nd Battalion on the project website and via Facebook and Twitter
 FIRST WORLD WAR TIMELINE
1914 1915 1916 1917 1918 1919
