
 In addition to the Infantry Units within the Australian Imperial Force during the First World War, new units were being formed during the re-grouping and re-organisation in Egypt following the end of the failed Gallipoli campaign. By March 1916 many men had been re-assigned to these new units, and in this section a short description (with links for more information) is provided about these units together with a listing of those men from the 5th/22nd that were re-assigned at some point during their active service.
At the end of this section is also a short description of other parts of the Australian armed forces during the First World War, namely the Light Horse, Australian Flying Corps and the Royal Australian Navy.
Artillery Brigades
 Artillery and its effective use proved to be one of the most decisive weapons during the First World War, with about one in five of the front-line troops serving in the British Army being in the Artillery. For the Australians each of the five AIF Infantry Divisions had its own artillery comprising of three Artillery Brigades per Division, containing twelve x 18 pounder guns divided between its three Field Artillery Batteries, and one Howitzer Battery containing four x 4.5 inch howitzers. In addition each Division had a Howitzer Brigade again with four x 4.5 inch guns. In January 1917 the artillery was reorganised with each battery increasing to six guns, but with the Brigades in each Division reduced from three to two. The generally
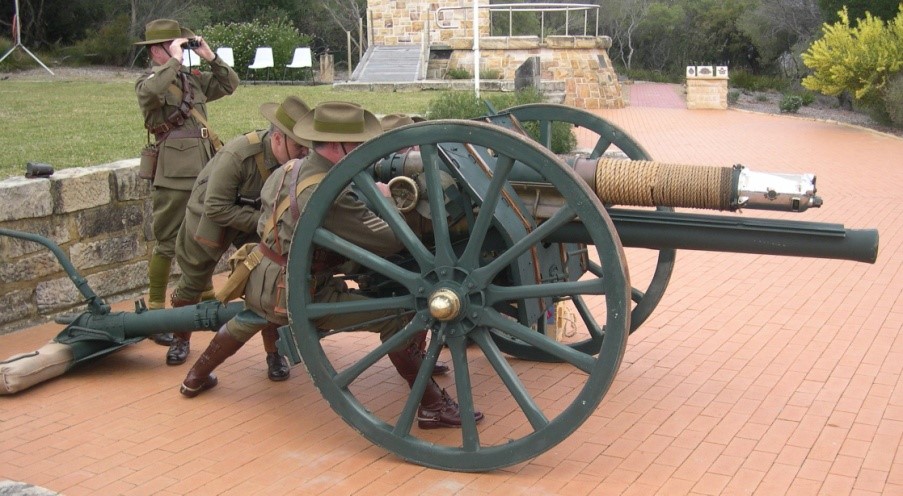
 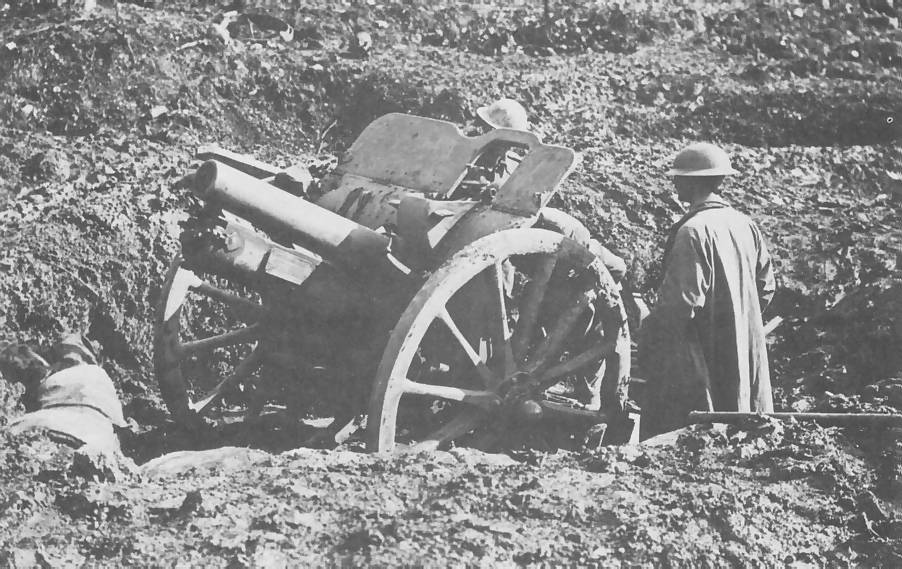 horse drawn 18 Pounder (pictured above) was the main field artillery weapon employed by the British Army, and the mainstay of the Australian Divisional artillery during WW1. Similarly the 4.5 Howitzer (pictured left) was the standard field or ‘light’ howitzer. Both guns calibre and hence shell weight were bigger than the German or French equivalents. The majority of the heavy artillery units supporting the Australian divisions during WW1 were British, although two Australian heavy batteries were raised from the regular Australian Garrison Artillery. These were the 54th Siege Battery, which was equipped with 8-inch howitzers, and the 55th with 9.2-inch howitzers.
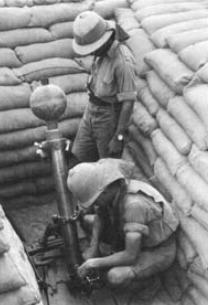 Within the Artillery were Trench Mortar Batteries. Each of the five Divisions had one battery containing four heavy 240 millimetre mortars firing 152lb bombs, plus three medium trench-mortar batteries firing spherical 60lbs bombs with short iron handles – commonly known as ‘plum puddings’ (pictured right), and twenty-four light trench mortars. Men for the heavy and medium trench mortar batteries were obtained by calling for volunteers from the artillery. Additionally within the infantry, each brigade was given two four-gun batteries containing the simple and rapidly firing light trench mortar Stokes gun.
5th/22nd transfers to Trench Mortar Batteries:
2407 Pte STEVENS; 2422 Pte THOMAS; 2454 Pte WHITE; 2463 Pte BAKER;
Machine-Gun Companies
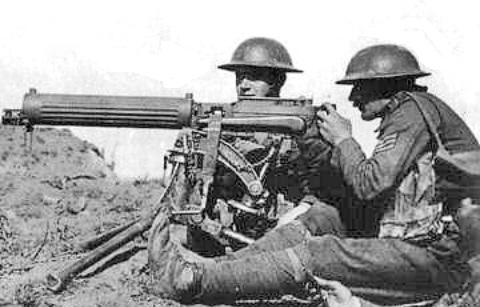 With the development of the air-cooled automatic Lewis Gun, these lighter machine guns were deployed in the infantry units, with four guns per battalion. As a result the heavier water-cooled and tripod-borne Vickers machine guns (pictured right) were taken from the infantry and allotted to newly formed machine-gun companies, with one Machine Gun Company per Brigade. For the AIF training and restructuring in Egypt in early 1916, the new machine-gun companies were easily formed by transferring the old regimental machine gunners to these new companies.
5th/22nd transfers to Machine Gun Company:
Pioneer Battalions
 During the First World War Pioneer Battalions were formed to conduct military works requiring for their construction less expertise than the engineers but more skilled than the infantry. For the AIF training and regrouping in Egypt in early 1916, five pioneer battalions were thus created, one for each of the Divisions. To provide the nucleus for the Pioneer Battalions General Birdwood proposed to break up the mining battalion arriving from Australia with the rest being formed from volunteers from the infantry. Some divisional commanders saw this as a way to get rid of their troublesome men but many were astute such as the 6th Brigade’s Gellibrand who carefully picked the best and most qualified men. As a result the capability and reputation of the Australian Pioneer Battalions soon rose and were seen in many places as akin to the more skilled engineer battalions in the British and American armies.
The primary role of pioneer units was to assist other parts of the army in tasks such as the construction of field fortifications including trenches and dugouts, military camps, bridges and roads. With the exception of emergencies the Pioneers were based in camps or billets behind the front-line trenches, moving forward during the day or night for their allotted task.
5th/22nd transfers to Pioneer Battalions:
2nd Lieutenant KILDUFF; 2333 Pte GIBSON (Killed in Action); 2373 Pte SMITH; 2389 Pte SEDDON; 2392 Pte SLOSS (Killed in Action); 2406 Pte SAUNDERS; 2408 Pte SPICER; 2416 Pte STEVENSON; 2418 Pte SKEEHAN; 2421 Pte TEMPLE; 2436 Pte THIRLWELL; 2466 Pte COX; 2475 Pte MYERS; 2479 Pte WILSON; 2506 Pte Jones;
Tunnelling Companies
 The ability to break through enemy lines using a full frontal assault was proving to be a challenge for all sides during the First World War, and so the creation and mining of tunnels with explosives beneath enemy lines, or counter-mining to destroy enemy tunnels, was regularly used both in Europe and in Gallipoli. The northern European countryside still shows the striking evidence of this type of warfare, such as the huge Lochnagar crater blown on the first day of the Somme, which probably had as much a deep psychological impact on the soldiers in the trenches as much as the actual results from the blowing of these mines. For the tunnellers too this was a terrifying form of warfare with constant dangers of being heard, counter-mined and buried within these chambers.
 In response to the first use of tunnelling and the exploding of mines by the Germans in December 1914, the British created in excess of 20 Tunnelling Companies together with three Canadian, one New Zealand and three Australian Companies. Mining was used on a large scale at Messines in June 1917 when 19 mines containing hundreds of tons of ammonal explosives, were blown all along the ridge under the German trenches prior to the British infantry attack, including the Hill 60 (53,000 pounds of ammonal) and Caterpillar (70,000 pounds) mines dug by the 1st Australian Tunnelling Company. During the digging and defence of these tunnels it is estimated that about thirty Australian Tunnellers were killed. After Messines mining became less important as the war moved into a more fluid phase in 1918 first with the German Spring Offensive and then the Allied final and decisive breakthrough in the late summer of 1918. The tunnelling troops were then primarily used for other tasks which they were being used such as construction work, underground tunnels and dugouts for the infantry, helping to make liberated villages safe and dealing with explosive devices that had been left behind.
5th/22nd transfers to Tunnelling Companies:
2392 Pte SLOSS; 2406 Pte SAUNDERS; 2408 Pte SPICER
Other Specialist Units
Within the AIF other specialist units were formed. Not required at Gallipoli in 1915 due to the inhospitable terrain, Motor Transport Units were sent to the Western Front, becoming the first units of the AIF to serve there. The motor transport re-joined I ANZAC Corps when it reached the Western Front in 1916. Australia also formed six railway operating companies, which served on the Western Front. Specialist Ordnance Units included ammunition and mobile workshops units formed late in the war, while Service Units included supply columns, ammunition sub-parks, field bakeries and butcheries, and depot units. In addition there were the medical staff – see Hospitals for more in-depth coverage.
5th/2nd transfers to Other Specialist Units:
2454 Pte WHITE; 2461 Pte LAMONT
Other branches of the Australian Armed Forces during World War One
Light Horse Regiments
In addition to the Infantry Divisions listed above, which contained the bulk of the fighting force, Australia provided mounted infantry in the form of Light Horse Regiments. During the First World War there were 15 Light Horse Regiments in 5 Light Horse Brigades. They were particularly suited for scouting and quick manoeuvre, and as result were primarily used for the Egypt (Sinai) and Palestine Campaign. During the Gallipoli Campaign the 1st, 2nd and 3rd Light Horse Brigades were sent to Gallipoli without their mounts as reinforcements to the infantry. The 13th Light Horse Regiment and one squadron of the 4th Light Horse Regiment served on the Western Front.
Australian Flying Corps
Established in 1912, the Australian Flying Corps (AFC) was the branch of the Australian Army responsible for operating aircraft during World War I, and the forerunner of the Royal Australian Air Force (RAAF). Units were formed for service overseas with the AIF and saw action initially in the Mesopotamian Campaign then later in Palestine and France. In addition, a training wing was established in the United Kingdom.
The corps remained small and by the end of the war four squadrons had seen active service flying alongside and under the British Royal Flying Corps. A total of 880 officers and 2,840 other ranks served in the AFC, of whom 410 served as pilots and 153 served as observers. Casualties included 175 dead, 111 wounded, 6 gassed and 40 captured.
Royal Australian Navy
At the outbreak of the First World War, the Royal Australian Navy stood at 3,800 personnel and consisted of sixteen ships, including the battlecruiser Australia, the light cruisers Sydney and Melbourne, the destroyers Parramatta, Yarra, and Warrego, and the submarines AE1 and AE2. The light cruiser Brisbane and three destroyers were under construction, and a small fleet of auxiliary ships was also being maintained. Expansion during the war was limited, with the RAN growing to include thirty-seven ships and more than 5,000 personnel by 1918. The RAN’s losses during the war were modest, only losing the two submarines AE1 and AE2, whilst casualties included 171 fatalities – 108 Australians and 63 officers and men on loan from the Royal Navy, with less than a third the result of enemy action.
 FIRST WORLD WAR TIMELINE