
 Background
Through the early months of 1917, the 22nd Battalion as part of I Anzac Corps had been cautiously advancing forward in the Bapaume region as the German Army made its strategic withdrawal to the Hindenburg Line. Alternating between the front line and reserve during March with the  other battalions of the 6th Brigade, trench to trench attack practice intensified in early April in expectation of being ordered into the great Arras Spring 1917 offensive planned to commence on 9th April from Vimy in the north to Bullecourt in the south (see map, courtesy of Australians on the Western Front 1914-1918). At this time I Anzac Corps was located in General Gough’s British Fifth Army facing the Hindenburg Line opposite the German salient of Bullecourt and Queant, and it would be against this re-entrant that the four AIF Divisions would be tested to the full.
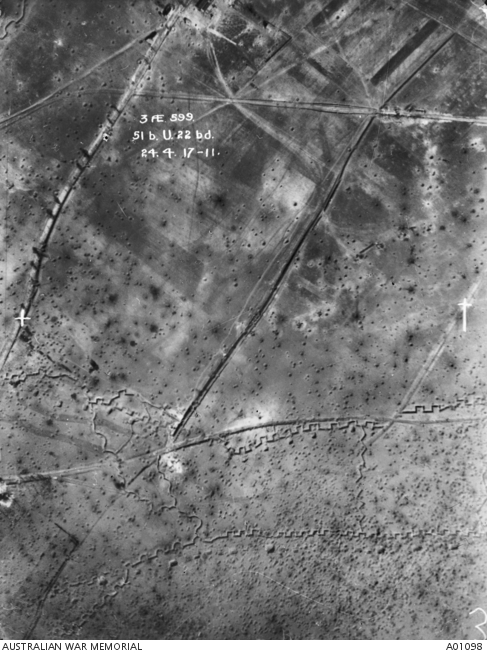
The Hindenburg Line was a formidable defensive system built on ground specifically chosen by the Germans, with intersecting arcs of machine gun fire and shell proof dugouts to withstand losses from the preceding barrage and with easy access and exit for their garrison. Bullecourt was a key defensive position for the Germans where the line bent or pivoted (photograph below showing at the bottom two trenches of the Hindenburg Line bending south to the right and in front of the village of Bullecourt). Furthermore German intelligence had learnt of the impending attack and by whom and as a result the Kaiser had hand-picked the defending battalions to repel the attacks by the Australians.
 Two days after the start of the Arras offensive the AIF 4th Division attempted to take the Hindenburg Line just to the east of the small village of Bullecourt. The attack of 11th April 1917, or First Battle of Bullecourt, had serious failings and the Australian Commanding Officers Generals Birdwood and White expressed their concerns to Gough but in vain. Despite initially taking the two German trenches known as OG1 and OG2 (named after their resemblance to the Pozieres defensive system), the 4th and 12th Brigades had to withdraw with the loss of 3,000 men. Shortage of time ahead of the attack for the artillery to cut the deep wire entanglements, over reliance on the new but untested tank to cut a path through the wire and without artillery support during the advance, a planned deep penetration on a narrow frontage, a shortage of bombs and ammunition to hold back the German counter-attacks, plus poor communication with the artillery to provide a defensive barrage were all factors that contributed to the failure and from which the commanders would need to address for any subsequent attack. In addition there was also the danger of attacking a re-entrant with fire pouring onto the attacking infantry from three sides.
Preparation
 The 2nd Australian Division duly relieved the battered 4th Australian Division and on the 14th April the 22nd Battalion took over the front line on the left of Noreuil extending from (map right) U.27.d.7.4. to C.4.b.6.8. with the 5th Brigade on the right flank and British 168th Brigade on left. The front line was a railway embankment with the village of Bullecourt beyond. [Click on link for geo-referenced Trench map reproduced with the permission of the National Library of Scotland]. On the following day the Germans launched a major attack with fourteen battalions against the thinly spread 1st Australian Division in front of Lagnicourt. Although the village and the attack lay beyond the right flank of the 22nd Battalion it was in range of the Lewis Gunners, including L/Cpl Tourrier who estimated that his gun accounted for 40 Germans and became (as reported by Bean) ‘the envy of the battalion gunners’. A party of one German officer and eleven other ranks did attempt a raid on one of the Battalion’s posts, shooting dead the sentry 5111 Pte Winter, but Lieut. Gawler kept the attackers at bay until help arrived from the dugout and the attackers were duly defeated. For his courage and gallant conduct Lieut. Gawler received a Military Cross. The German attack, despite penetrating a mile and a half behind the Australian forward positions and at one stage capturing 36 artillery pieces, was defeated with the loss for the attackers of 2,313 casualties. On the 19th April the 22nd Battalion was relieved by the 25th Battalion and went into Divisional Reserve at Favreuil. During this short stint on the front-line the 22nd Battalion had suffered 7 killed and 29 wounded, plus 19 sick.
 By the 20th April 1917 – the original date for the second attack at Bullecourt – an intense bombardment of Bullecourt had virtually destroyed the village. In addition and as a result of repeated delays to the attack General Smyth of the AIF 2nd Division was able to plan and rehearse the operations with the thoroughness for which there had never been such an opportunity in the history of the AIF. In this next attack the AIF 2nd Division decided not to rely upon the tanks to clear the wire but on an effective artillery bombardment beforehand followed by a creeping barrage behind which the infantry would closely follow (click on image to see artillery barrage map showing the objectives for the attack and time of lifting to the next line). One of the other major lessons from the first attack was to make sure that enough supplies particularly bombs would be made available to hold back the expected German counter-attacks launched using their effective elastic defence strategy. Thus rehearsals not just how to take the trench, including the use of new Bangalore Torpedoes and less high-tech mats for crossing the wire, but more importantly how to hold it were being prepared.
Thus for the 22nd Battalion along with the seven other battalions of the 6th and 5th Brigades that would be executing the next attack they carried out many days of battle practice at Favreuil. On 23rd April Capt. IP Stewart, Adjutant of the 22nd Battalion, issued the operation memo for the attack (with amendment 1st May) and which would also provide the template for their rehearsals as follows:-
 22nd Battalion will attack (leap frog principle) the Hindenburg Line in co-operation with 24th Battalion on our right and 185th and 186th Brigades on our left.
The attack will be launched from a marked line about 500 yards north of the Railway Embankment and parallel to the enemy trench. The Battalion will attack in four waves, 25 yards between waves. First wave will be formed up on J.O. tape with remaining waves at 10 paces distance by zero -30.
The composition of the waves (proposed) as follows:
 1st wave (yellow): 2 Platoons A Coy 2 Platoons B Coy
2nd wave (white): 2 Platoons D Coy 2 Platoons C Coy
3rd wave (white): 2 Platoons D Coy 2 Platoons C Coy
4th wave: 2 Platoons A Coy 2 Platoons B Coy
The first wave will carry and clean up enemy front trench (OG1) at Zero +16 pushing two special parties to the left. The second wave will pass through the first trench and carry Support Trench (OG2) at Zero +33 and clean up, pushing spe cial party to left. The third wave will consolidate the above 1st objective by passing through and forming a line of Posts about 150 yards in advance north of enemy support trench at Zero +33 and establish a Strong Post. The fourth wave will occupy 2nd objective at Zero +1.40, special care being taken to mop up Sunken Road on left flank and to establish communication with 186th
After taking Front Line A Coy will detach 2 special flank parties to establish connection with 185th Brigade via enemy 1st Trench and Support Trench, composition: 2 Rifle Bombers and 1 carrier; 4 Bombers and 2 carriers, with 2 reliefs for Bombers held in readiness; 2 Bayoneteers; 1 Lewis Gun and 4 men; 1 Stokes Mortar and detachment will assist the party. After taking Support Line (OG2) D Coy will detach one similar  special flank party to establish connection with the 185th Brigade on left via enemy Support Trench (OG2).
The Light Trench Mortars of the 6th ALTMB will accompany the 2nd wave. Each Company will supply Ammunition carrying parties of 12 men for one mortar.
Two guns from 6th Machine Gun Coy will accompany 4th wave for action against the Factory and NW trenches as well as enfilade of Road from Hendecourt. These guns will be in readiness to move to our left to enfilade Boundary Road on the west.
Lifts of barrage: 1st objective Front Line Trench Zero +16; 1st objective Support Trench Zero + 33; 2nd objective Sunken Road Zero +1.40.
Dress – Battle Order, blanket rolled in waterproof sheet attached to belt. All Officers taking part in the attack will be dressed exactly the same as the men. Sticks are not to be carried. All entrenching tool handles will be tightly tied with string to the scabbard before leaving Camp. Rations and water – 24 Iron Ration and unexpended portion of current days ration to be carried in haversack and water bottles filled. Bombs will be carried as follows: Bombers and Rifle Bombers – 10 bombs each; Carriers – 24 bombs each; others – 6 bombs each. Four ‘P’ Bombs will be carried in each Platoon for mopping up Dugouts. Dugouts will only be attacked with ‘P’ bombs under an Officers instruction as it is not desired to destroy any that may be suitable for our occupation. 170 rounds SAA will be carried by each man. Four sandbags will be carried by each man. Tools in proportion of 1 pick to 5 shovels will be carried by 25% of men. 1st and 2nd waves will each carry 20 mats for crossing wire. All waves will carry wire cutters. Four pigeons will be carried by 3rd
Carrying party of 1 Officer and 24 other ranks per Coy will be furnished and they will move with the waves to which allotted (mats, SAA, Lewis Gun magazines, Bombs)
Signalling Officer will arrange for prompt establishment of telephonic communication between Coy and Btn HQ
First wave will take charge of prisoner sent back from forward positions and supply necessary escort. Prisoner with escort not exceeding 10% will be sent to Brigade HQ via Battalion HQ. Fullest use to be made of them for the return of the wounded.
Throughout the advance, when waves halt the utmost use of all available cover should be made. All ranks to be thoroughly conversant with what is expected of them and what their objective is. Colours may be worn by the various waves to ensure that men of a wave are kept together, and will enable men who have become inadvertently mixed with wrong waves to be detected.
 The other attacking battalions were issued with similar memos of operation. The order of attack (click on map right, courtesy of Webmatters, to expand for detail) for the 6th Brigade saw the 22nd Battalion to the left of the 24th Battalion, both providing four waves. Behind the 22nd and 24th respectively were the 21st Battalion and 23rd Battalion, providing the next four waves in similar formations. These 5th, 6th, 7th and 8th waves when passing through OG2 would dump two bombs per man which would then be passed to either flank to supplement the Battalion dumps.
Combat
Preparations had been good, and at no other time were the rehearsals as complete then as at Bullecourt. By the end of April and with the first warmth and signs of Spring, the fighting strength of the 22nd Battalion was 33 Officers and 842 other ranks. At 7pm on the evening of 2nd May 1917 the 22nd Battalion moved to a gully in rear of the front line, to the right of Bullecourt, with an attacking strength of 21 Officers and 618 other ranks, the remainder proceeding to the Divisional Details Camp. The men rested before being awakened and moving forward beyond the railway embankment to the jumping-off tape. As the formations filed over the embankment to form up on the JOT the moon light revealed them to the enemy and a barrage opened up causing casualties.
 Zero hour was fixed for 3.45am on 3rd May 1917 with the 5th Brigade to right, the 6th Brigade in the centre and the 185th Brigade of the British 62nd Division on the left. The moon had provided some light earlier in the night, but the 10 minutes immediately preceding zero hour it was intense darkness. At zero hour the artillery opened up, bayonets previously sheathed to save reflecting in the moonlight fixed and the advance in waves began towards the enemy line at U.22.d.6.0. to U.23.c.2.0. [Click on link for geo-referenced Trench map reproduced with the permission of the National Library of Scotland – note trench map is dated September 1917 i.e. after the battle, so London Support = OG1]. Very little distance had been traversed across No-Man’s Land
  before a concentration of shells, minenwerfers and machine gun bullets fell upon the Battalion. Given the position of the 22nd on the left of the 6th Brigade it had the perilous task to advance at almost point blank range to the Germans garrisoning the eastern side of Bullecourt, and as a result caused its casualties to substantially exceed those of any other of the battalions engaged in this Second Battle of Bullecourt. As Capt. Gorman later described in the History of the Battalion, the intensity of the machine gun fire was not equalled in any of the 22nd Battalion’s other experiences during the war. In addition one of the German batteries was throwing its shells short just in front of the German line opposite the centre of the 22nd, splitting the advance (illustrated image above, CEW Bean) with the right entering the trenches with
  the 24th, but the greater part of the left fell behind the barrage and found groups of Germans manning the parapet and pouring rapid fire and bombs into the men. Many of the Battalion fell in No-Man’s Land and at the German wire, including Capt. Hogarth (‘C’ Company, 2nd in Command of the 22nd Battalion, photograph left), Capt. Slater, and with Lieut. Fraser being shot as he approached OG1. For many of the others on the left they were pinned down by fierce rifle and machine-gun fire.
With the 21st Battalion following on behind also suffering heavily, the survivors of all eight waves pushed forward no longer in systematic formations but what was now becoming across the battlefield a blending of the waves and indeed battalions. On the extreme left the 22nd Battalion encountered severe resistance and did not completely attain their objective in OG1, and to their left the 62nd Division had failed to progress. In this critical position they received enfilade and frontal fire but established themselves in shell holes just short of their objective. The right and main body followed closely on the barrage and finding the wire well destroyed gained the German line, but there was considerable opposition and then commenced a bombing action which lasted 24 hours.Capt. Kennedy upon reaching OG1 with a fraction of the men and turning left to make good the position was met by German bombs. A bomb fight followed in which the 22nd won 200 yards of trench. For the following waves tasked with taking OG2, those that moved over the open ground were fired upon by the German machine gunners, but the two trenches were linked by a number of cross trenches that provided safer passage. Lieut. Greig pushed on with his wave up one such trench to OG2 and likewise turned left and with Lieut. Braithwaite, MC, (wounded in both arms) and Lieut. Thwaites began to secure the objective and a long drawn out bomb fight ensued. Supported by Stokes Mortars of the 6th Light Trench Mortar Battery and the Lewis Gunners pushed back the Germans, but only to another dugout. A party led by 520 Cpl O’Neill with Sgt Arblaster of the 21st rushed the strong-point, but the Germans were fighting stubbornly and none but the wounded  were found in the dugout. Posts were established in front of OG2 in preparation for a frontal counter-attack with the Lewis Guns sweeping the open ground. Here 2nd Lieut. Scammell was shot and killed by a sniper while firing from a shell hole beyond the German second line, as was 378 Sgt Garbellini (photograph right) in charge of a post in OG2.
The four following waves in conjunction with the other battalions continued the advance to the second German Line from where the success signals were fired at 4.26am. Within the first two hours the 6th Brigade had established itself in both the first and second systems of the Hindenburg Line and for some distance further forward. On its left (British 62nd Division) the German positions were entirely maintained. On its right (AIF 5th Brigade) all but a portion of the first German trench was still in the enemy’s hands. With communication and the ability to act quickly and decisively key to success, Major-General Gellibrand had critically established his partially protected forward headquarters behind the railway embankment by the Central Road. Witnessing the withdrawal and failure of the 5th Brigade on the right and the precarious nature this would leave his right flank, Gellibrand called forward his Reserve and HQ Officers to lead reformed units of the 5th Brigade and to push on again. One such officer, 2nd Lieut Griffin of the 22nd Battalion, was called forward to the Brigade HQ dugout when a shell landed close by and he was killed instantly.
At 8am the situation was most critical, as the Brigade was hemmed in and supplies limited. By midday some successes had been made on the flanks, but the Battalion was subject to more counter-attacks, with the supply of bombs diminishing against the continued counter-attacks. The Central Road that had divided the two attacking Brigades was now the vital line of communication forward to supply the OG1 and OG2 trenches. Fortunately for the 6th Brigade on the left of the road the partially protected nature of this road afforded some cover from fire coming from the east. For the men this was in now every sense a brigade not battalion battle where men of all four battalions were fighting side-by-side and often joined in one bombing party.
 Throughout the day German counter-attack followed counter-attack, thirteen in all, with Capt. Kennedy and his handful from the 22nd involved in bomb fights in OG1, but the situation of ammunition became serious. One carrying party of thirty under Lieut. Filmer (photograph left) was reduced to just four when he led its remnant to the objective. Within a few minutes and looking over the trench Lieut. Filmer himself was shot and killed.
As casualty rates amongst the Battalion were running high the work-rate of the stretcher barriers was exceptional, and the casualties among the stretcher-bearers was also becoming heavy. For many of the wounded they had to make their own way back. One such man was 4584 Pte Griffin who having been wounded when alongside Capt. Hogarth at the German wire crawled into a shell hole where he stayed for 16 hours, after which under cover of darkness he crawled away and escaped back to his lines.
By evening the enemy, despite being hand-picked battalions with specialist training, had been beaten to a standstill. That night and completing by 4am the 1st Brigade relieved the 6th Brigade (22nd Battalion by the 3rd Battalion), and for the next 24 hours the Battalion rested by the railway embankment before moving in small parties to the sunken road between Noreuil and Longatte. Owing to the severity of the losses, the Battalion was now acting as a Company, with each Company as a Platoon, and then performed carrying parties to the front line.
The operation memo issued in the days leading up to the attack called for all ranks to know their objective and role. To help comprehend the focus, dedication to duty and bravery of the men a glimpse into their extraordinary feat can be seen in the citations for the gallantry awards presented to men from the 22nd Battalion at Bullecourt, including:-
 Lewis Gunners: 323 L/Cpl Aimers, 2438 L/Cpl Tripp, 5691 Pte Wilton, MM – Lewis Gunners in face of severe shelling and Machine Gun fire, supporting bombing action. L/Cpl Aimers wounded but remained at duty; 6080 Pte Friend, MM – taking over a Lewis Gun from a casualty and kept down enemy snipers who were picking off our wounded; 1187 Cpl Tourrier, MM – in charge of a Lewis Gun during a bombing attack on an enemy strongpoint. Sole survivor of his team, was severely wounded whilst working the gun single handed; 4723 Pte Hughes, MM – established his gun in shell hole well in front of captured position so as to enfilade a sunken road used by the enemy and prevent movement of their reinforcements; 5056 L/Cpl Merson, MM – taking Lewis Gun into exposed position on left flank and inflicted heavy casualties on the enemy in their counter-attacks. Running short of ammunition he went from shell hole to shell hole in search of magazines at the same time bringing back wounded men to his position and dressing their wounds.
 Bombers: 4984 Pte Bodsworth, MM – remaining at work despite being wounded as he bombed towards the 62nd Division; 398 L/Cpl Heffernan, MID – organising bombing parties; 4162 Sgt Millar, DCM – took command of several groups whose officers were casualties and carried out a series of most valuable bomb attacks; 5660 Pte Ross, MM – repelling a bombing attack while the remainder of his section became casualties while wounded until arrival of support.
 Rifle Bombers: 530 L/Cpl Young, MM – silenced an enemy Machine Gun and drove back superior numbers and established a block on the left flank.
Carriers: 1634 CSM Werrett, MID – rations and organising carrying parties; 4669 RSM Cadwell, DCM – supervising supply of ammunition and bombs under heavy fire before becoming severely wounded; Lieut. Gorman, MC – supplying troops in taken trenches despite being severely wounded.
Runners: 4670 Pte Carroll, 5075 Pte Penman, 636 Pte Martin, MM – passing orders down the line in captured trenches.
Signallers: 1060 Sgt Hughes, 641 L/Cpl Moore, MM – in charge of signallers, and maintaining communication; 2nd/Lieut Wicks, MID – as Battalion Signalling Officer, severely wounded while leading a cable burying party.
Leaders: 610 Sgt Hayes, 753 Sgt Watkins, MM – in command of their platoons, took charge in clearing out the trenches, organising the defence and establishing advanced posts; 520 Cpl O’Neill, MM – leading his section after being wounded; Capt. Alderson, MC – led his Company to the assault with a courage and determination that inspired those under his command; 2nd Lieut. Burrage, MC – cool and energetic officer; Lieut. Braithwaite, MC – in leading his men into the enemy trenches, twice wounded, continued in consolidating position and leading bombing parties against the enemy strong posts; 4199 L-Cpl. Riley, MM led a mixed party to and secured the second objective after all his officers had become casualties.
Outcome
 “The Battle of Bullecourt occupies a unique place in the Battalion’s annals. For no other struggle had the preparations been so complete, the rehearsals so thorough, or the general organisation so apparently perfect. Yet within a few minutes of its commencement, the combat developed into a pell-mell of violent hand-to-hand struggles, where the 6th Brigade met the flower of the German Army, and beat it into quiescence.” Capt. E.Gorman, MC, ‘With the Twenty-Second’, (photograph right, courtesy of LWH collection).
Learning from the defeat of the first battle in April, the Second Battle of Bullecourt was well planned, rehearsed, resourced and well executed, all factors leading to its success (click here to read the 6th Brigade report). However the casualties rates during this battle were very high, and the worst day for the 22nd Battalion in the entire war. Despite all of the preparations, plus the resourcefulness and bravery of the Australian soldier, this was always going to be a precarious operation given the nature of the defensive system that they were attacking, on top of which they had met a foe that exuded similar traits of toughness and bravery. Of the 21 officers and 618 other ranks that entered the battle, the 22nd Battalion had lost in 24 hours sixteen officers and 422 other ranks of whom over fifty percent were killed or missing – 165 killed or died of wounds according to the Commonwealth War Graves Commission records. No other battalion lost so heavily in the battle, and overall the 6th Brigade lost 58 officers and 1,422 other ranks.
 Many of the 22nd Battalion have no known grave and are commemorated on the Villers-Bretonneux Memorial. One of the original Bullecourt missing was 4802 Sgt J.White (photograph left). However in 1994 the local farmer whilst ploughing across the Bullecourt battlefield came across the remains of John White, who was recovered and then later laid to rest in the Queant Road Cemetery with full military honours and in the presence of his daughter. Read this moving story and see the photographs on the Australians on the Western Front 1914-1918 website.
Having been withdrawn from the front-line, the 22nd Battalion made its way to Bouzincourt where it stayed for a month in this pleasant village regrouping and training. The 22nd arrived there on the 17th May 1917, the same day that the British 173rd Brigade walked into the ruins of Bullecourt with the Germans having retired. Thus ended the Second Battle of Bullecourt and the focus for the British and their Australian Divisions would soon be shifting north and to the Ypres salient.
 FIRST WORLD WAR TIMELINE