
 Background
With the cessation of the 1916 Verdun and Somme offensives and the onset of winter, plans were being made by the newly appointed Commander-in-Chief General Robert Nivelle for the Franco-British 1917 Spring offensive. Nivelle called for a massive French offensive on the Chemin des Dames ridge in what would be the Second Battle of the Aisne, an attack he hoped so decisive to bring an end to the war in 48 hours. This attack would be supported by a British diversionary offensive on a 20 mile front to the east of Arras between Vimy in the north and Bullecourt in the south (see map below, courtesy of Australians on the Western Front 1914-1918). Although not delivering the breakthrough for the Allied Armies, the 1916 campaign did have a draining impact on the German Army, and General Ludendorff expecting a resumption of hostilities in the Spring decided to withdraw the German Army back to a defensive line of their own choosing with deep dugouts, thick wire, and impenetrable fields of interlocking fire. On 24th February 1917 the Germans, to the surprise of the Allies, strategically withdrew to the newly built Hindenburg Line from which it would defend attacks, thereby holding their position while their U-boats took the fight to the British and to systematically erode their ability to wage war.
 The German withdrawal to the Hindenburg Line – which to the observing Australians resembled the OG1 and OG2 trench system of defence used at Pozieres – was well executed, making the advancing British and I Anzac Corps to proceed with caution through the calculated use of the chain of villages in front of the Hindenburg Line, as well as sunken roads as strong-points and ambush traps. As a result the progress to the Hindenburg Line was slow thereby reducing the available time that the artillery could be in position to start the softening up bombardment of the defensive positions before the main assault. In addition the geography of the land meant that the field artillery upon arrival would lie in exposed valleys running perpendicular to the Hindenburg Line making it vulnerable to observation and counter-artillery strike. As part of General Gough’s Fifth Army, I Anzac Corps would be participating in the Arras offensive on the far right or southern flank of the front, immediately to the east of the small village of Bullecourt, with the British 62nd Division to their left and attacking the village from the west. The lack of available preparation time also meant that there would not be enough time to dig a ‘jumping-off trench’ therefore the infantry would be attacking across open land. For the Australians this meant attacking over open ground at a re-entrant between German held Bullecourt and Queant with enemy fire coming from in front, the left and from the right. Furthermore Australian commanders Birdwood and White’s concerns were compounded that for the first time in the war their infantry would be going into battle with the new but so far unproven weapon of the Heavy Machine Gun Corps – the tank – which would be given the responsibility of clearing the way through the wire instead of waiting for an adequate bombardment by the artillery.
Combat
First Battle of Bullecourt
At dawn on 9th April 1917 the British First and Third Armies launched their great offensive at Vimy and Arras respectively. It had been prepared by a massive artillery bombardment greater than that at the Somme, and the infantry advanced more effectively under a creeping barrage. The attack succeeded in most of the areas and at Arras success was almost complete, taking the first two defensive systems. For the Canadians at Vimy Ridge this was the first time their four divisions fought together as a unified force and despite heavy losses this victorious day would be seen as key in their evolution from dominion to an independent nation. With early reports of the success coming through and 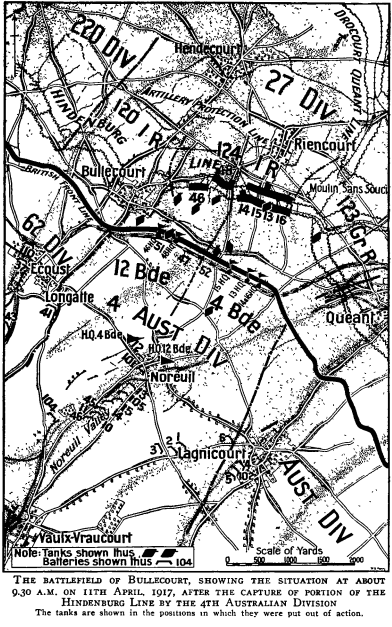 having received a bullish representation from the commander of the 11 British tanks, despite the doubts given by Birdwood and White, Gough gave the order for the attack to be conducted by the 4th Australian Division in the I Anzac Corps sector to begin at dawn on 10th April. At 4.15am the attacking battalions of the 12th and 4th Brigades were in position at their tapes and assembly positions, but there was no sign of the tanks that would be leading them. Lying out in the snow, the two Brigades would be easily seen between Bullecourt and Queant once dawn arrived. At 5am the message arrived that the ‘stunt is off’, and those lying on the jumping-off tapes simply rose and walked back as Bean described ‘without formation like a crowd from a football match’. However communication between the 4th Australian Division and the British 62nd Division was lacking and the British pushed on with their attack but without support were forced to retire suffering some 162 casualties.
 At 4.45am on the following day, 11th April 1917, the 4th Brigade on the right sector moved forward, the first waves having to cross 700 yards, and the supporting battalions 1,200 yards from the railway embankment. [Click on link for geo-referenced Trench map reproduced with the permission of the National Library of Scotland]. Half-way across the infantry crossed a gentle crest and into sight of the Hindenburg Line, overtaking the slow moving two remaining tanks (of the six that were promised) as they approached the wire. Having been alerted by the aborted attack of the previous day German flares began to illuminate the snow-covered battlefield, and German batteries in Bullecourt and Queant were firing from either side into the approaching Australians, with rifle and machine-gun fire sparking on the massed wire ahead. Major Black, DCM, DSO of the 16th Battalion found a big gap and managed to take the first trench (OG1),
  but many had become casualties by the wire. Bombing the dugouts forced the Germans out and about sixty were taken prisoner. Moving on to the second objective (OG2) the wire appeared uncut and defended in strength, and as he pushed on Major Black (photograph right) was shot and killed. Following on behind Captain Murray of the 13th Battalion joined the 16th, who were now starting to enter OG2 through a number of saps which joined the two trenches. On the left of the 4th Brigade, the 14th Battalion followed by the 15th Battalion met with similar conditions, and with the one tank left far behind were met with withering fire as they reached the wire. OG1 was seized but again the German second line was heavily defended, but despite this OG2 was taken. By 5.30am the 4th Brigade had achieved its objectives in taking OG1 and OG2, but crossing open country in daylight to the third objective of Riencourt was seen by the officers of the 13th and 15th to be futile, particularly given the lack of tanks, loss of men and lack of bombs and ammunition.
For the 12th Brigade on the left, only one tank passed over the jumping-off trench but it was severely delayed such that the leading 46th Battalion still lay there as the light of dawn started and the protective artillery bombardment stopped. This thirty minute delay was deadly to the attacking 46th with fierce fire coming from Bullecourt. The centre and left managed to pass through the broken wire and took OG1 and became engaged with a bombing fight on their flanks when the 48th Battalion arrived before moving on to the again heavily defended OG2. Having taken their section of OG2 the 48th began bombing towards the 4th Brigade. By 7am the 4th Australian Division had seized practically all of its objectives in the Hindenburg Line, and the leaders began to consolidate their position. By this the time all the tanks had been knocked out of action, but the position in the Hindenburg Line could be maintained if enough bombs and ammunition could be brought forward and if the artillery was able to place an effective defensive barrage.
 The flanks of the 4th Brigade were engaged in beating off determined bombing attacks by the Germans, until the supply of Mills bombs ran out and a barricade was built. Although the position seemed secure, communication, replenishment of supplies and removing wounded to the rear was difficult with German machine-guns sweeping the open ground. At about 10am and preceded by a severe bombardment the Germans began a heavy counter-attack from all directions against the captured positions – up both trenches against both flanks of both brigades and from the front both over open ground and down Emu Alley. The Australian protective bombardment was ineffective, falling too far ahead believing the attackers were at the third objective of Riencourt, and with the supply of bombs falling the situation was becoming serious. However the Lewis gunners were preventing the Germans crossing open ground and the fighting was entirely confined to the trenches.
With the situation now desperate the order was given to save destruction or capture that the men should withdraw. With bombs now scarce the men of the 4th Brigade began their rear-guard action, but to retreat the men had to run the gauntlet back through the wire with machine gun fire covering the open ground, and in some parts the order came ‘every man for himself’. By 11.45 the whole of the 4th Brigade’s position had been re-taken by the Germans and took all who were sheltering in the trenches or shell-holes, particularly the wounded, prisoner.
The situation for the 12th Brigade was similarly precarious. The right flank of the 46th Battalion gave way as the Germans bombed their way forward taking many prisoners, and with the collapse of the 46th in OG1, the Germans were now behind the 48th in the forward trench. By 12.25, and a full hour after every other battalion had withdrawn, the 48th also began to retire, as observers noted with a typically Australian deliberate but nonchalant gait. Many were killed or wounded in the withdrawal. By mid-afternoon and once intentions on both sides were known, the German and Australian stretcher-bearers worked out in the open retrieving the wounded, with the Germans taking in those of their enemy that were close to their wire. When the snow began to fall at 6pm and fearing a renewed attack the Germans called a cease to the collection. Nevertheless throughout the night and for several days afterwards odd survivors crawled or were helped back to the railway.
 Despite the failure of the tanks, the 4th Australian Division had taken the hitherto impenetrable Hindenburg Line, but with the failure of its supporting artillery the German machine gunners had closed the path to the rear hindering the re-supply to the forward battalions and created a hazardous gauntlet which the retreating wounded and men had to make to affect their escape. The six and a half battalions of the 4th Australian Division lost over 3,000 officers and men, of whom 28 officers and 1,142 men were captured, much the largest number of Australians taken by the enemy in a single battle. The 4th Brigade took the brunt with 2,339 casualties of the 3,000 engaged. For the Germans this battle was regarded as a major success. Not only had they saved what would have been a grave position of having their flank turned on the Arras front, but morale which had been low was restored plus the confidence on how to defeat and defend against tanks was increased. During the battle the Germans had 749 casualties, a relatively light number considering the losses by the enemy. For the British, instructors afterwards used Gough’s plan for Bullecourt as an example of how an attack should not be undertaken, namely attempting a deep penetration on a narrow front, and that at the head of a deep re-entrant, plus over-reliance upon the untested tank to destroy the enemy wire instead of artillery.
Lagnicourt
 Sandwiched between the two British Army Bullecourt offensives came the German ‘spoiling’ attack on 15th April 1917 when before dawn the German XIV Reserve Corps mounted an attack on the whole front of the 1st Australian Division and the right company of the 2nd Australian Division in front of Lagnicourt. [Click on link for geo-referenced Trench map reproduced with the permission of the National Library of Scotland]. Due to the broad nature of the frontage, the Australians in their isolated posts had to beat back the enemy by Lewis gun fire and by Mills bombs. As with Bullecourt ammunition was becoming a major issue and messengers shot down as they attempted to make the journey back to the rear, often by German snipers that managed to encircle and enfilade their positions. German infiltration also meant that the forward field artillery batteries were being threatened and orders were given to withdraw their breech blocks and dial sights and retire. The guns of all four batteries of the 2nd Brigade were abandoned, followed shortly by three batteries of the 1st Brigade. By 5.30am the Germans had penetrated a mile and a half behind the Australian forward positions, however with the arrival of daylight the task of the defenders became easier and were able to pour relentless Lewis gun and rifle fire from the rear defensive positions into the now faltering Germans, caught between the defensive barrage falling to their rear and the advancing Australians.
 The attack was a failure, particularly as the Germans threw four times the amount attackers against the thinly spread 4,000 Australians holding the line, and did not disrupt the preparations for the next Allied attack at Bullecourt. For the Allies it also demonstrated the virtues of defence in depth. In defeating this attack the I Anzac Corps had suffered 1,010 casualties of which approximately 300 were taken prisoner. The Germans suffered 2,313 casualties, and despite having been temporarily in possession of 36 artillery pieces, 31 were back in Australian operation later that afternoon (photograph showing one of the destroyed guns
Second Battle of Bullecourt
If the First Battle of Bullecourt was an attempt to break the German line, then Second Bullecourt became part of the British High Command strategy of a sustained wearing down struggle to assist the French fighting further south on the Aisne. As a prelude to the second phase British artillery began an intense bombardment of the village, which by 20th April – the original date for the attack – had been virtually destroyed. Repeated delays to the attack meant that General Smyth of the 2nd Australian Division was able to plan and rehearse the operations with the thoroughness for which there had never been such an opportunity in the history of the AIF, including mock attacks on nearby practice villages, and the experimental use of Bangalore Torpedoes to clear the wire.
 For the attack scheduled for 3rd May 1917, the 2nd Australian Division and the British 62nd Division to their left had three objectives: first the Hindenburg‘OG1’ and ‘OG2’ Lines; second the Fontaine-Moulin Sans Souci road; and third the advance on Riencourt and Hendecourt (map courtesy of Webmatters). [plus click on link for geo-referenced Trench map reproduced with the permission of the National Library of Scotland]. The 62nd, which would attack the village of Bullecourt itself, would be supported by ten tanks in the attack while the Australians, given their experiences three weeks earlier, elected to attack without them. The battalions would form up on tapes 500 yards from the German line, much closer than before, and the infantry would advance under the protection of a creeping barrage. The advance would also be supported by unprecedented ninety-six Vickers machine guns. Also, learning lessons from the failed 4th Australian Division attack, greater effort was made to ensure sufficient ammunition and supplies went forward with the troops, and large supplies of rifle-grenades carried forward to counter the longer range of the German stick and egg bombers. The weakest and most dangerous part of the plan, a consequence of attacking a re-entrant, was to fall on the 6th Brigade attacking to the east of the German defences amongst the rubble of Bullecourt. Crucially Brigadier-General Gellibrand (photograph below) moved his 6th Brigade HQ forward to the railway embankment, practically on the front line, to be as close as possible to his attacking battalions.
 Australian engineers and their protective patrols had been in No-Man’s Land since 10pm the previous night laying the tapes to mark the jumping-off line. From 2.30am the infantry of the 5th and 6th Brigades had started to move across the railway embankment in their eight wave formations to their jumping off positions, but light from the now sinking moon and a searchlight from Hendecourt sweeping the open ground picked out movement and brought a barrage from trench mortars onto the Australian forward positions. The Germans also threw down a precautionary ten minute barrage at 3.32 on the railway embankment, as with other preceding mornings, but by this time the leading battalions were mainly ahead of this shelling. At 3.45am the British barrage began along the front, from Lagnicourt in the south to Vimy in the north. With the opening of the British barrage bayonets were fixed and the advance began with the first waves led by the 22nd Battalion on the left and closest to Bullecourt, then the 24th, the 17th and with the 19th on the far right, and then followed by waves of the 21st, 23rd, 18th and 20th respectively.
Despite the practice and rehearsals the attack did not start well for the 5th Brigade on the right and a halt in front of the German line to allow the barrage to lift proved fatal and the German defenders, despite the barrage, manned the parapet and poured fire into stalled attack. With many of the officers at their head being killed, confusion set in and spurious orders given to retreat. By now the following waves were catching up and becoming intermingled and they too retired. Isolated groups managed to get through to OG1, but they were quickly bombed out and back to the road. The 6th Brigade fared better and the 24th and 23rd on the Brigade right had the welcome protection of the half sunken Central Road protecting their right flank, and Lewis gunners firing from the hip were able to silence many of the defenders enabling them to reach the wire with little loss. Upon the lifting of the barrage on OG1 the attackers were able to suppress the enemy garrison before they were able to appear from their dugouts, and pushing right went as far as possible along the trench before setting up a defensive barricade. The three following waves of the 24th and those of the 23rd passed over OG1 and when the barrage on OG2 lifted this too was  taken, some 30 minutes after the start of the attack. For the 22nd Battalion and 21st on the left, progress was far more hazardous as they had to pass at point-blank range of the German garrison on the east side of Bullecourt village, which despite extra suppressing fire from trench mortars and machine guns, poured in heavy fire into the attacking waves. A fierce bombing struggle ensued for OG1 and OG2 on the left of the attack, while on the right of the 6th Brigade the next waves were readying themselves for the attack towards the 2nd and 3rd objectives. Capt. Maxfield (photograph left) of the 24th Battalion advanced with the barrage and with 30 men reached and took the second objective at 5.34, just nine minutes later than planned and now 500 yards beyond the Hindenburg Line. However with the 5th Brigade not having taken their objectives, the position of Maxfield in the second objective was precarious, so a defensive flanking position was taken along the Central Road to protect the 6th Brigades right flank. Some of the right side of the 22nd and 21st linked up with Maxfield and began a flanking fight westwards towards Bullecourt. Thus two hours from the commencement of the attack the centre of the 2nd Australian Division had reached the second objective, but with troops barely sufficient to hold it the attack plans were altered to delay the move on the third objective and the artillery held its defensive fire to protect the forward 6th Brigade holding the second objective.
Under Gellibrand’s command and led by officers from his 6th Brigade, attempts were made by a reformed unit of the 5th Brigade to push forward on the right, and to the left by the 25th Battalion of the 7th Brigade towards the village of Bullecourt itself, but both failed. Meanwhile Maxfield was coming under pressure from a counter-attack to his front as well as on the flanks. Losses were mounting and Maxfield himself was wounded, and while heading back to the Hindenburg Line he was killed. About this time the 24th withdrew from the second objective and Gellibrand brought back the barrage to protect the troops in the Hindenburg Line.
By 2pm the 7th Brigade’s 28th Battalion came up along the Central Road carrying large supplies of bombs, and was tasked by Divisional Commander Smyth to attack the 5th Brigade’s earlier objectives of OG1 and OG2, thereby relieving the pressure on 6th Brigade having to hold back their flank. Each Company had been organised into four bombing squads, each comprising two bayonet men to lead the way, three throwers, three carriers and five rifle grenadiers. German defence in OG2 was stiff, but the Australians had success in OG1 pushing along some 450 yards, half of the 5th Brigade’s objective. Running short of bombs, the 28th was forced back to Central Road by the counter-attacking Germans, before attacking again and reaching the Noreuil-Riencourt Road. The Central Road was thus the vital link to the front for the carrying parties bringing their bombs to support the ceaseless bomb fighting. Time and time again, attack was followed by counter-attack, before finally the 28th and remnants of the 5th Brigade withdrew again leaving the 6th Brigade exposed. To the left of the road, the 6th Brigade garrison in both trenches amounted to just 300 men, with only 4 officers and 25 other ranks from the 22nd Battalion. They now found themselves alone in the Hindenburg Line through the night, faced  with an enemy on three sides. No rest was possible, nor could any man be spared to help the wounded back. The work of the stretcher-bearers of the field ambulances was unceasing and carried out in dangerous exposed country. In nine hours 1,800 wounded had been cleared from the main dressing station, including an unusually high percentage of severe cases. 30% of the Field Ambulance carriers became casualties themselves.
At 1am on the 4th May the first Companies of the relieving 1st and 3rd Battalions from the 1st Australian Division began to arrive in OG1 and OG2, and by 3am the remnants of the 6th Brigade was filing out of the trenches. While doing so the Germans suddenly counter-attacked and the 6th Brigade stood fast and helped the fresh troops beat off this attempt. The 6th Brigade had held on magnificently, and the four battalions reorganised as four  companies went into reserve. As Bean wrote, ‘the 6th Brigade’s achievements on this day had few parallels in the history of the AIF’. In the whole sixteen miles of battle from Vimy to Queant, theirs along with the Canadians on the far left at Fresnoy, had been almost the only success. Click here for the 6th Brigade Operation Report.
The position won by the 6th Brigade however was extremely vulnerable, connected to the rear by just the Central Road. The British 7th Division began an attempt to take Bullecourt on the left, but the village was extremely difficult to attack and resembled the conditions at Mouquet Farm with heaps of rubble concealing the deep dugouts from which the defenders could appear. For the 1st Brigade now holding the trenches it was their turn to try and bomb east and west along the trenches and to hold back the inevitable counter-attacks. By the end of the day the 2nd and 4th Battalions had managed to successfully bomb their way along 400 yards of the OG Lines. Through the night the 2nd Pioneers and working parties of the 6th Brigade dug communication trenches to strengthen the position, though by the following day the trenches of both sides had all but disappeared under a bombardment of such an intensity not seen since Pozieres.
Just before dawn on 6th May the Germans attempted another major counter-attack from the Moulin Sans Souci road this time supported by flame-throwers, and managed to push down to the Central Road. Once the flame-throwers had been neutralised, the shaken men of the 11th and 12th Battalions rallied and bombed their way back down OG1 and OG2. The Germans sixth and most dangerous general counter-attack had been beaten, and the 10th Battalion now took over the right. Given the difficulty of thrusting the right flank further eastwards orders were issued for this end of the Hindenburg Line to be finally barricaded off that night in its present position, with several bays beyond to be filled in and wire entanglements to be laid. At 3.45am on 7th May the 2nd Gordon Highlanders and 9th Devon Regiment of the British 7th Division attacked Bullecourt, supported by the 9th Battalion moving westwards with the twenty-four guns of the Australian field artillery providing enfilade fire. The Highlanders following the barrage seized the trench to the west of Bullecourt and began to bomb along it. At 3.58 the 9th Battalion started their bomb fight along OG1 and at 5.15 linked up with the forward party of the Highlanders. By night fall the flank posts of the Highlanders and the Australians interlocked and the left flank of the Australians was at last secure.
The 5th Australian Division were the next into the line, with the 15th Brigade supporting the next British attempt for the capture of Bullecourt on the 12th May. The OG2 attack was met with the customary desperate bomb fight between the two sides, with the 60th Battalion providing additional bombing squads, rifle-grenadiers and Lewis gunners. In the attack 186 Germans that were trapped in a deep dugout were taken prisoner. Junction with the British 7th Division was made and thus the northeast of the village was secure, though the Germans remained stubbornly in the southwest of the village causing serious losses for the British 91st Brigade. In the early hours of 17th May the British 173rd Brigade began an operation to take Bullecourt, but on entering the remains of the village discovered that the Germans were in the process of withdrawing and 40 were captured in the process of demolishing the dugouts. The British penetrated beyond the village and occupied OG2, north of which the Germans were found to be holding a line of posts. Thus ended the Second Battle of Bullecourt.
Outcome
By the standards of the Western Front the British gains of the first two days of the Arras offensive were spectacular and a number of significant points were captured, notably Vimy Ridge by the Canadians. In addition the offensive succeeded in drawing German troops away from the strategically more important French offensive at the Aisne. Despite these significant early gains, the British were unable to affect a breakthrough and the situation reverted to stalemate. By the end of the Arras offensive, the British had suffered more than 150,000 casualties and gained little ground since the first day. Any notion of this being a victory for the Allies was ultimately offset by the high casualties and the failure of the French offensive at the Aisne which in itself led to the damaging mutiny within the French Army. Overall the Arras offensive had very little impact on the strategic or tactical situation on the Western Front.
 For the Australians involved in the two flanking Bullecourt battles, the four AIF Divisions suffered approximately 10,000 casualties, of which there were 3,000 in the first and 7,000 in the second battle. One consequence of Bullecourt is that it further depleted the four AIF divisions now in the field and that it finally killed the notion of creating a 6th Division then forming in England. The two Brigades that suffered most heavily were the 4th Brigade (First Bullecourt) with 78 officers and 1,980 other ranks, and the 6th Brigade (Second Bullecourt) with 69 officers and 1,542 other ranks. The successful action by the 6th Brigade against difficult odds that had defeated the earlier attempt on the 11th April was an outstanding effort which according to Bean was not surpassed in the history of the AIF. Within the 6th Brigade the 22nd Battalion suffered the most with 16 officers and 422 other ranks as casualties, a high proportion either killed or seriously wounded.
Up against the AIF the German Army fought a determined and brave battle, and as mentioned previously, secured an important morale boosting victory in First Bullecourt. In the Second battle the Germans launched seven major counter-attacks against the Australians, and about a dozen smaller ones on the initiative of local commanders. Overall it is estimated that the Germans suffered 7,000 casualties.
 The ability of succeeding Australian Brigades to not only with-stand the determined attacks by the Germans but also to increase the foothold were being recognised by both the British and German High Commands on the toughness of the Australian infantryman, pitted as it was against the most stubborn of enemy that they had faced. However Bullecourt, more than any other battle, shook the confidence of Australian soldiers in the capacity of British High Command. The errors, especially on 10th/11th April were obvious to almost everyone. As with Pozieres, the odds of success were stacked against the men, but they succeeded through the sheer quality of their mettle.
With the cessation of the fighting at Bullecourt, attention shifted from the Arras sector further to the north to Flanders where since mid-1915, the British had been covertly digging mines under the German positions on the ridge at Messines. The attack in June would prepare the way for the main attack for later in the summer to remove the Germans from the surrounding high ground in the Ypres salient.
Today the actions of those involved in the two battles for Bullecourt in the Spring 1917 are commemorated at the Australian Memorial Park just to the west of the village, with the statue of the ‘Bullecourt Digger’ (photograph above) gazing over the countryside.
 FIRST WORLD WAR TIMELINE