
 Background
In mid July 1916, with the great British offensive on the Somme now into its second week and with losses mounting for little gain, orders arrived from British GHQ for I Anzac Corps in the Bois Grenier sector to ready itself for the move to the Somme. As part of AIF 2nd Division, the 22nd Battalion received orders to start the journey south on the 11th July 1916. Reveille was at 2am and following a four mile march along the canal, they reached St.Omer Station at 7.30am before boarding the train, passing through Calais, Boulogne, Etaples and on to Amiens. Upon detraining at Amiens the battalion had to march 10 miles back to the village of Ailly-sur-Somme, through which the train had just passed, and then to the billets at nearby Breilly.
 On the 20th July the 22nd Battalion marched from Puchvillers reaching Lealvillers just after midnight, where the battalion remained in billets for four days. Here the battalion was being trained and practiced in the evolving tactics of trench attacks with men getting close as possible to the barrage falling on the enemy lines and then rushing it when lifted. The barrage would then move to the second objective, set often close to the first, therefore providing both cover from a counter-attack to those at the first objective plus softening up the defences for attack by the next wave. At the same time the Germans had perfected their own barrages, put down a curtain to the rear of the men attacking and sometimes further to the rear hindering the movement of the reserve or supply-trains. While resting in the bivouacs outside of Albert the men of the 2nd Division would have witnessed a foretaste of what was to come with the ferocious barrage that lit up the night sky to the east as the 1st Australian Division began their advance on Pozieres just after midnight on 23rd July 1916.
Early on the morning of the 26th July the 22nd Battalion received orders and commenced its march to the line, and as there was no time to prepare breakfast the men had to march on empty stomachs. The route passed through the ruined town of Albert, and the leaning  statue of the Virgin hanging precariously from the steeple of the church. All packs were dumped, and fighting order was assumed. Circular tin discs, unpopular with the men, were issued to each man to be worn on their backs to facilitate spotting by observers and aircraft. In the fields around Albert, some of the AIF 1st Division’s battalions were sleeping. They had just emerged from the capture of Pozieres village, and their appearance recalled memories a previous meeting on Gallipoli when again the 2nd had relieved the 1st Division. Moving on through the notorious Sausage Valley with the deafening roar of the guns massed wheel to wheel, care had to be taken in passing to avoid injury from their ‘flash’. Here the men (photograph left) were issued with picks and shovels, two Mills Bombs each and two sandbags. Three gas alarms were sounded on account of gas shells in the Valley. They passed the Chalk Pit into hastily constructed trenches beyond the village of Pozieres. Late that evening the Battalion started to relieve the 6th Battalion.
Pozieres
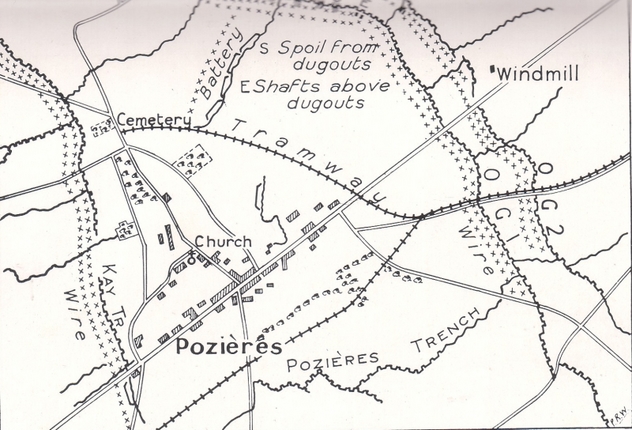
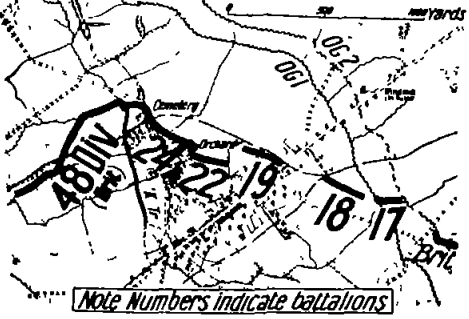 By 4.30am on the 27th July the relief of 6th Battalion at Pozieres (click link for geo-referenced trench map) was complete. C & D Companies occupied the front-line (C Coy location X.4.b.6.3. – X.4.b.2.6; D Coy location X.4.b.2.6. – X.4.a.8.8) and A & B Companies were in K Trench (A Coy location X.4.c.5.4 – X.4.c.4.9.; B Coy location X.4.c.4.9. – X.4.a.4.3.), supported in total by 8 machine guns. [Trench map reproduced with the permission of the National Library of Scotland]. To the left of the 22nd were the 24th Battalion (6th Brigade) and the 19th Battalion
 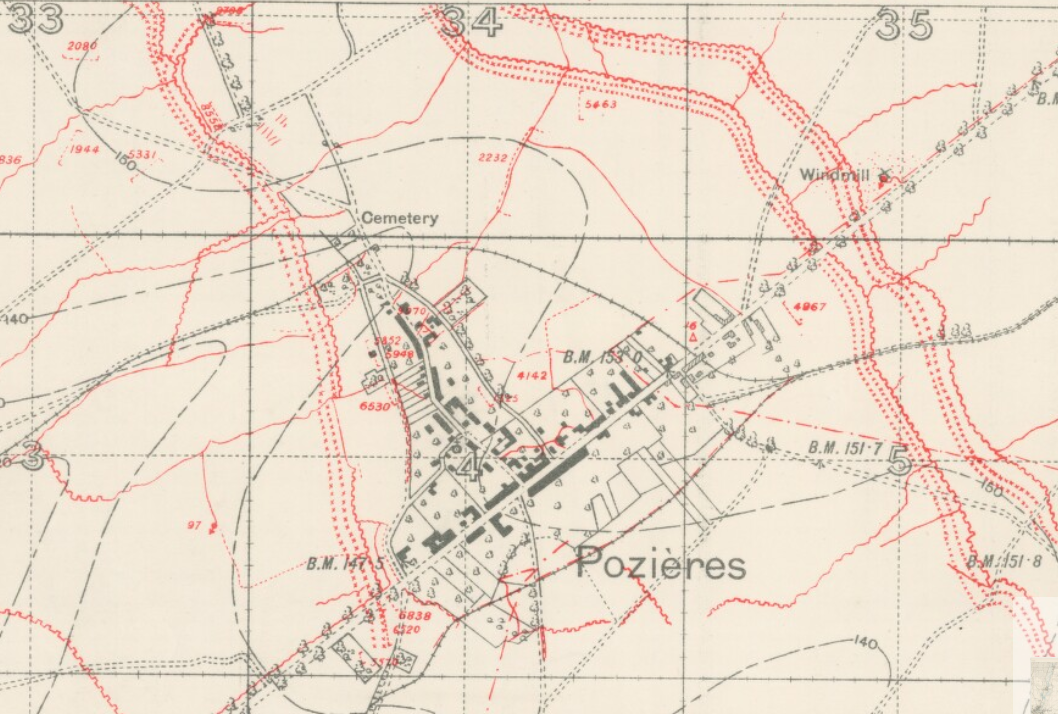 (5th Brigade) to the right. Enemy shelling commenced at 6.30am in response to our artillery fire, and although intense, was falling about 100 yards to the rear of the Firing Line. At 9.15am a small party was observed behind the enemy front line directly in front of C Company – the party was dispensed with our rifle fire. During the afternoon in front of the whole Battalion sector the enemy were seen moving along the trench.
In the support trenches B Company was being heavily shelled and experiencing heavy casualties, including all of its officers. Running south to north on the west side of Pozieres, K Trench received both frontal and enfilade fire and had no fire step. High explosive shells continually blew in the crowded trenches, and when one barrage lifted, another commenced. Gas shells added to the horror and for four days none slept. The ranging of the enemy artillery was also improving on the front line. At 9pm orders were received
 from Brigade to reconnoitre lines of approach for an attack and the condition of wire, which upon inspection had been cut in places and in rather poor condition. Casualties on that first day into the front line on the Somme were the heaviest endured by the Battalion since the start of the war and their arrival in Gallipoli: 2nd Lt Hart was killed, plus 19 other ranks; 5 officers were wounded, including Capt. Wiltshire, along with 129 other ranks. 19 other ranks were also missing.
At this stage in the war neither the Germans nor the British had adopted the system of defence in depth, therefore in the battle zone many more men were gathered than would be the case in two years. On these men an unceasing hail of shells took its heavy toll (photograph above). However as a result of the heavy casualties experienced the previous day, B Company was sent before dawn back from Pozieres to Sausage Valley, together with one platoon from each of the three other companies to reduce the overcrowding and risk of high casualties. The shelling throughout the day consisted of intense fire lasting about 15 minutes followed by periods of comparative calm.
During the night of 28th/29th July the 7th Brigade plus the 23rd Battalion of the 6th Brigade launched an attack. The 23rd had been successful but the failure of the 7th Brigade meant that the right flank was exposed so the support of D Company of the 22nd Battalion under the command of Major MN Mackay was provided, on the strong German trench system known as OG 1 and OG 2. D Company reached the German wire and with the few available shovels and entrenching tools was digging in, but due to the failure of the major operation was forced to withdraw. During the day 14 other ranks were killed; 1 officer 95 other ranks wounded; 2 other ranks missing.
 Throughout the day enemy shelling was fairly intense. The bombardment of the night of the 29th July onto K Trench, brought about in response to an Australian bombardment, was so intense that the relief of the 22nd by the 21st Battalion, which commenced at 10.30pm, could not be completed until dawn of the 30th. With the help of guides negotiating out of the forward position through thick fog, the Battalion then moved back to Sausage Valley. Thus saw the end of the first stint in the front line and the ferocious bombardment that all fighting in Pozieres had to endure. Pozieres being the only place where there was activity on the Somme battlefront at this time and as it was a salient, the Australians were attracting the unwanted attention of all available German guns firing from three sides. At 6.30am the 22nd Battalion had reached Sausage Valley where it stayed for the next five days to re-organise and ‘rest’ amongst all the noise (photograph above of Maj-Gen Gellibrand, Lieut. Smith and others from 6th Brigade having breakfast).
Although now not in the front line, the men from the battalion were still in a dangerous position as for the next few days they were conducting fatigues such as carrying rations for the 21st Battalion in the front line and having to negotiate the German barrage that was falling on the supply lines. Though the weather was hot, the dead could not be buried. The relentless shells killed, wounded and buried living and dead together. Through this inferno men worked and carried, or what to many seemed harder, waited in K Trench for a shell which was inevitably going to come upon them. No task was too dangerous to deter them, and when runners fell, two would quickly volunteer to replace them and a dice with death. To help replace the losses of the first stint on the front line, 157 other ranks mainly from the 9th Reinforcements reported for duty bringing the strength of the battalion up to 18 officers and 737 other ranks.
 As part of the objective to capture the Pozieres Heights ahead of the next major British offensive planned for mid-September, another assault on OG 1 and OG 2 had been decided upon, and on the night of the 2nd/3rd August the fatigues for 300 men of the battalion included the digging of a new Jumping Off Trench (JOT) to get closer and within 300 yards of the Old German lines. Later that day the battalion rested in Sausage Valley in preparation for a return to the front line and eleven 2nd Lieutenants were commissioned. Within forty-eight hours six were killed and three wounded.
 The 4th August saw heavy shelling once again throughout the day during which preparations were completed for an attack. In the afternoon orders were received from 6th Brigade to attack, the objectives being OG 1 (R.34.d.7.7. – R.34.a.9.1.) & OG 2 (R.34.b.6.0. – R.34.b.1.2.). [Click on link for geo-referenced trench map reproduced with the permission of the National Library of Scotland]. The attack on OG 1 and OG 2 was timed to commence at 9.15pm with B and D Companies to capture the first, and A & C Companies the second objective. At 5pm and in two minute intervals, platoons started to move from Sausage Valley and filed into
 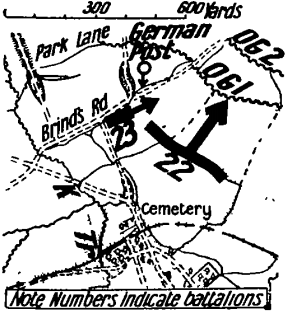 Dinkum Alley. Where the Alley ended was an open space which had to be crossed to reach K Trench, Tramway Trench (photograph left) or the new Jumping Off Trench. It was at the Tramway that A & C Companies were to wait until zero hour, and then pass through the JOT and on to OG 1 to OG 2. However the entry into Dinkum Alley had been observed by the enemy who put down a terrific barrage on it and its exit. The congestion was beyond description with other battalions including the 26th Battalion moving at the same hour, and a shout rang out telling C Company to halt – the 22nd heard the command and duly halted, not knowing that the command was for C Company of the 26th Battalion! Under bombardment confusion reigned. Up and down the Alley stragglers wandered and in the confusion men and hours were lost. Before the attack commenced, the companies had lost 20% of their strength to shell-fire. By 9.15pm when the attack barrage opened, only 30 men were in position, but by 9.30 Major Mackay signalled that all available men in D Company had arrived and the order to advance was given a minute later. The two companies that had been held up and formed the last two waves were feared lost, but they arrived at 9.46pm and moved forward to the attack, and towards the OG 2 second objective. Before OG 1 was reached, Major Mackay and 2nd Lieut Pritchard had been killed. There was not much hand-to-hand fighting in OG 1 itself as the barrage had killed or wounded most of the enemy there and smashed the entrenchments, and within a few minutes the objective was securely held by the attackers. A & C Companies pushed forward to OG 2 which was not a well organised line of defence and after successfully taking it started to dig in. The 7th Brigade had linked up on the right but the left which swung back to OG 1 was unprotected and raked by machine gun and artillery fire.
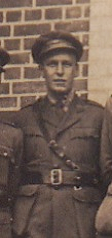 With the dawn came a German barrage and a counter-attack. Men scrambled onto the parapet and fired at them but nowhere did the line break. On the unprotected left the attackers came within bombing distance, but were unable to break into the trench, suffering approximately 75% in casualties. Casualties for the battalion however were heavy, particularly from shelling and snipers who had crept forward to cover the attack. It was by one of these that Capt. Curnow was killed. Every officer in OG 2 was now a casualty except Lieut. Rodda (photograph left, courtesy of LWH collection). It was in OG 2 that 1635 Pte Weston won his DCM, when having been shot through the head and despite his wounds clung to a Mills bomb that had had its pin removed until it was taken by comrades. To his DCM was later added the Russian Cross of St. George. All through the day the shelling continued without ceasing and dead and wounded lay in heaps together. At times the trench hardly held a single unwounded man. Later, German stretcher-bearers and Australian worked side-by-side and collected those that were still alive. The attack was very successful and all objectives attained, with about 150 prisoners taken. During the operations on the 4th/5th August the 22nd Battalion suffered heavily with 26 officers and 625 other ranks becoming casualties, of whom 238 were reported killed or missing. In spite of stubborn fighting the line held and on the evening of the 5th/6th the remnants of the 22nd were relieved by the 24th Battalion and moved back to Sausage Valley, and next day to Tara Hill.
 Thus began a period of respite, of which most of it was on the march. From Tara Hill the battalion moved via Albert and Warloy to Berteaucourt (photograph left of the 6th Brigade marching from Pozieres, being watched by 2nd Brigade about to start their second tour). At Vadencourt Wood a halt to the march was called. On one side the battalion lined the road, and on the other side a portion of the AIF 1st Division returning to the battle, as His Majesty King George V drove by, having expressed his appreciation of the good work carried out by the 6th Brigade. For the next eight days re-organisation took place, and the training of Lewis gunners, trench mortars and other specialists, plus bayonet fighting.
Mouquet Farm
On the 22nd August orders were received for the Brigade to move forward for another attack, and moving via Albert and Tara Hill the 22nd Battalion re-entered Sausage Valley and acting as Brigade reserve carried out various duties: 100 men making roads in Mash Valley to the north of the Albert-Bapaume road; 12 men as permanent dump guard; and 200 men under Capt. Cull lived among the Chalk Pit and carried bombs and rations forward from the dump positioned there. B Company who were first employed on the road building, were later attached to the 21st Battalion for the impending attack on Mouquet Farm.
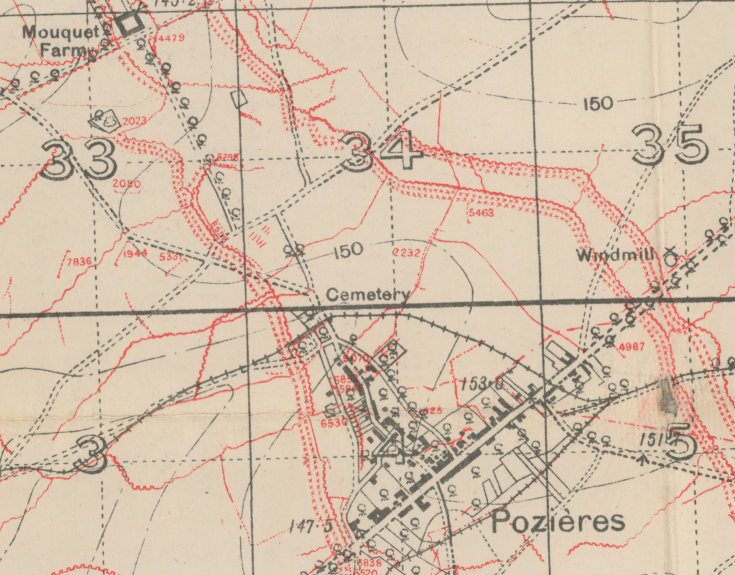
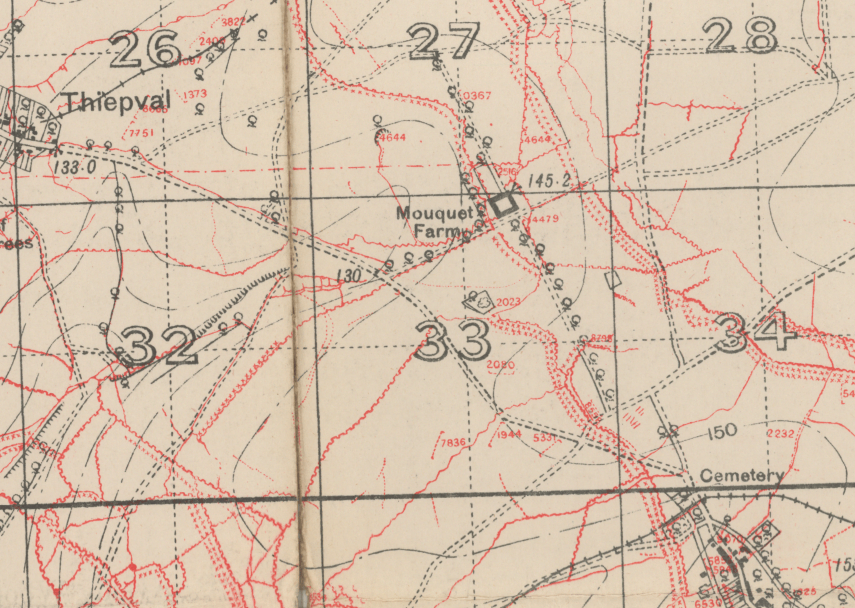 Since the 8th August and following the capture of the Pozieres Heights, the focus had now shifted to the northern flank of the Pozieres salient with the intended capture of the German strong-point of Mouquet Farm and for the proposed flanking attack north towards Thiepval. [Trench map reproduced with the permission of the National Library of Scotland]. During this period successive battalions of the 4th & 1st Australian Divisions had attempted to take the position, but progress had been small and costly, as around the farm there was a system of cleverly constructed tunnels and dug-outs, of which the attackers knew nothing until the enemy appeared in these positions and attacked the flanks.
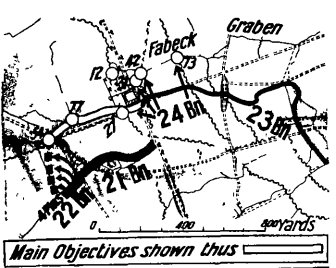 On the 26th August it would be the turn of the 22nd Battalion to take part in an attack on Mouquet Farm, in a supporting role to the attacking battalions. [Click on following link for geo-referenced map reproduced with permission from the National Library of Scotland). B Company of the 22nd Battalion had been assigned to protect the left flank that would be dropped off, platoon by platoon, to provide flank protection to the 21st Battalion. Major-General Gellibrand of the 6th Brigade had chosen to attack at dawn, and at the zero hour of 4.45am under a good barrage, B Company began to take up positions on the left in shell holes, but they soon became exposed and at a risk of being outflanked as the 21st Battalion had veered too much to the north-east, and as result a nest of German gunners caused heavy casualties. Capt. Smith was killed, and Lieut Cumming penetrated the objective with the handful of men that had survived the enemy fire and fought a bombing action until he was severely wounded, but unable to regain the Australian lines was taken prisoner for the rest of the war. As in OG 2 of the 5th August, Lieut Rodda was the only unwounded officer and he assumed command of the company. Hostile artillery was now heavily shelling the main attack and the attackers met with stubborn resistance from the cunning tunnel defences, and the 21st was attacked from the rear. Not only were their losses heavy but they were unable to clear the ground of the wounded. B Company survivors maintained their allocated flank until relieved at 2am on the 27th August.
Mouquet Farm would not be taken until a month later following a frontal attack at Thiepval, rendering the whole flanking attack via Mouquet Farm a failed, futile and costly exercise.
In the early hours of the 27th August the 22nd Battalion was relieved by the 14th Battalion of the 4th Brigade, and organised as two companies marched in pouring rain to the outskirts of Albert, where billets were found for the night. The following day and showing signs of fatigue the battalion marched to Warloy and kits were collected from the dump. On the 5th September, after two days at Gezaincourt, a short march brought the battalion to Doullens where it entrained for the more tranquil north, and the Battalion’s first visit to Belgium.
Outcome
 The 22nd Battalion had thus taken part in its first full-scale offensive during the First World War and as expressed in a letter home by Major Mackay before he was killed, ‘our chance to prove ourselves has come at last – not for my part that I have been eagerly looking forward to it – but now that it has come I trust we may all prove ourselves worthy of the name of our troops made for Australia in their landing at Anzac’. Leading from the front Major Mackay was killed as the 22nd within the 6th Brigade attack, successfully seized the OG 1 and OG 2 objectives and with them the Pozieres Heights now paving the way for the next major British offensive on the Somme planned for mid-September and eastwards towards Flers – Courcelette.
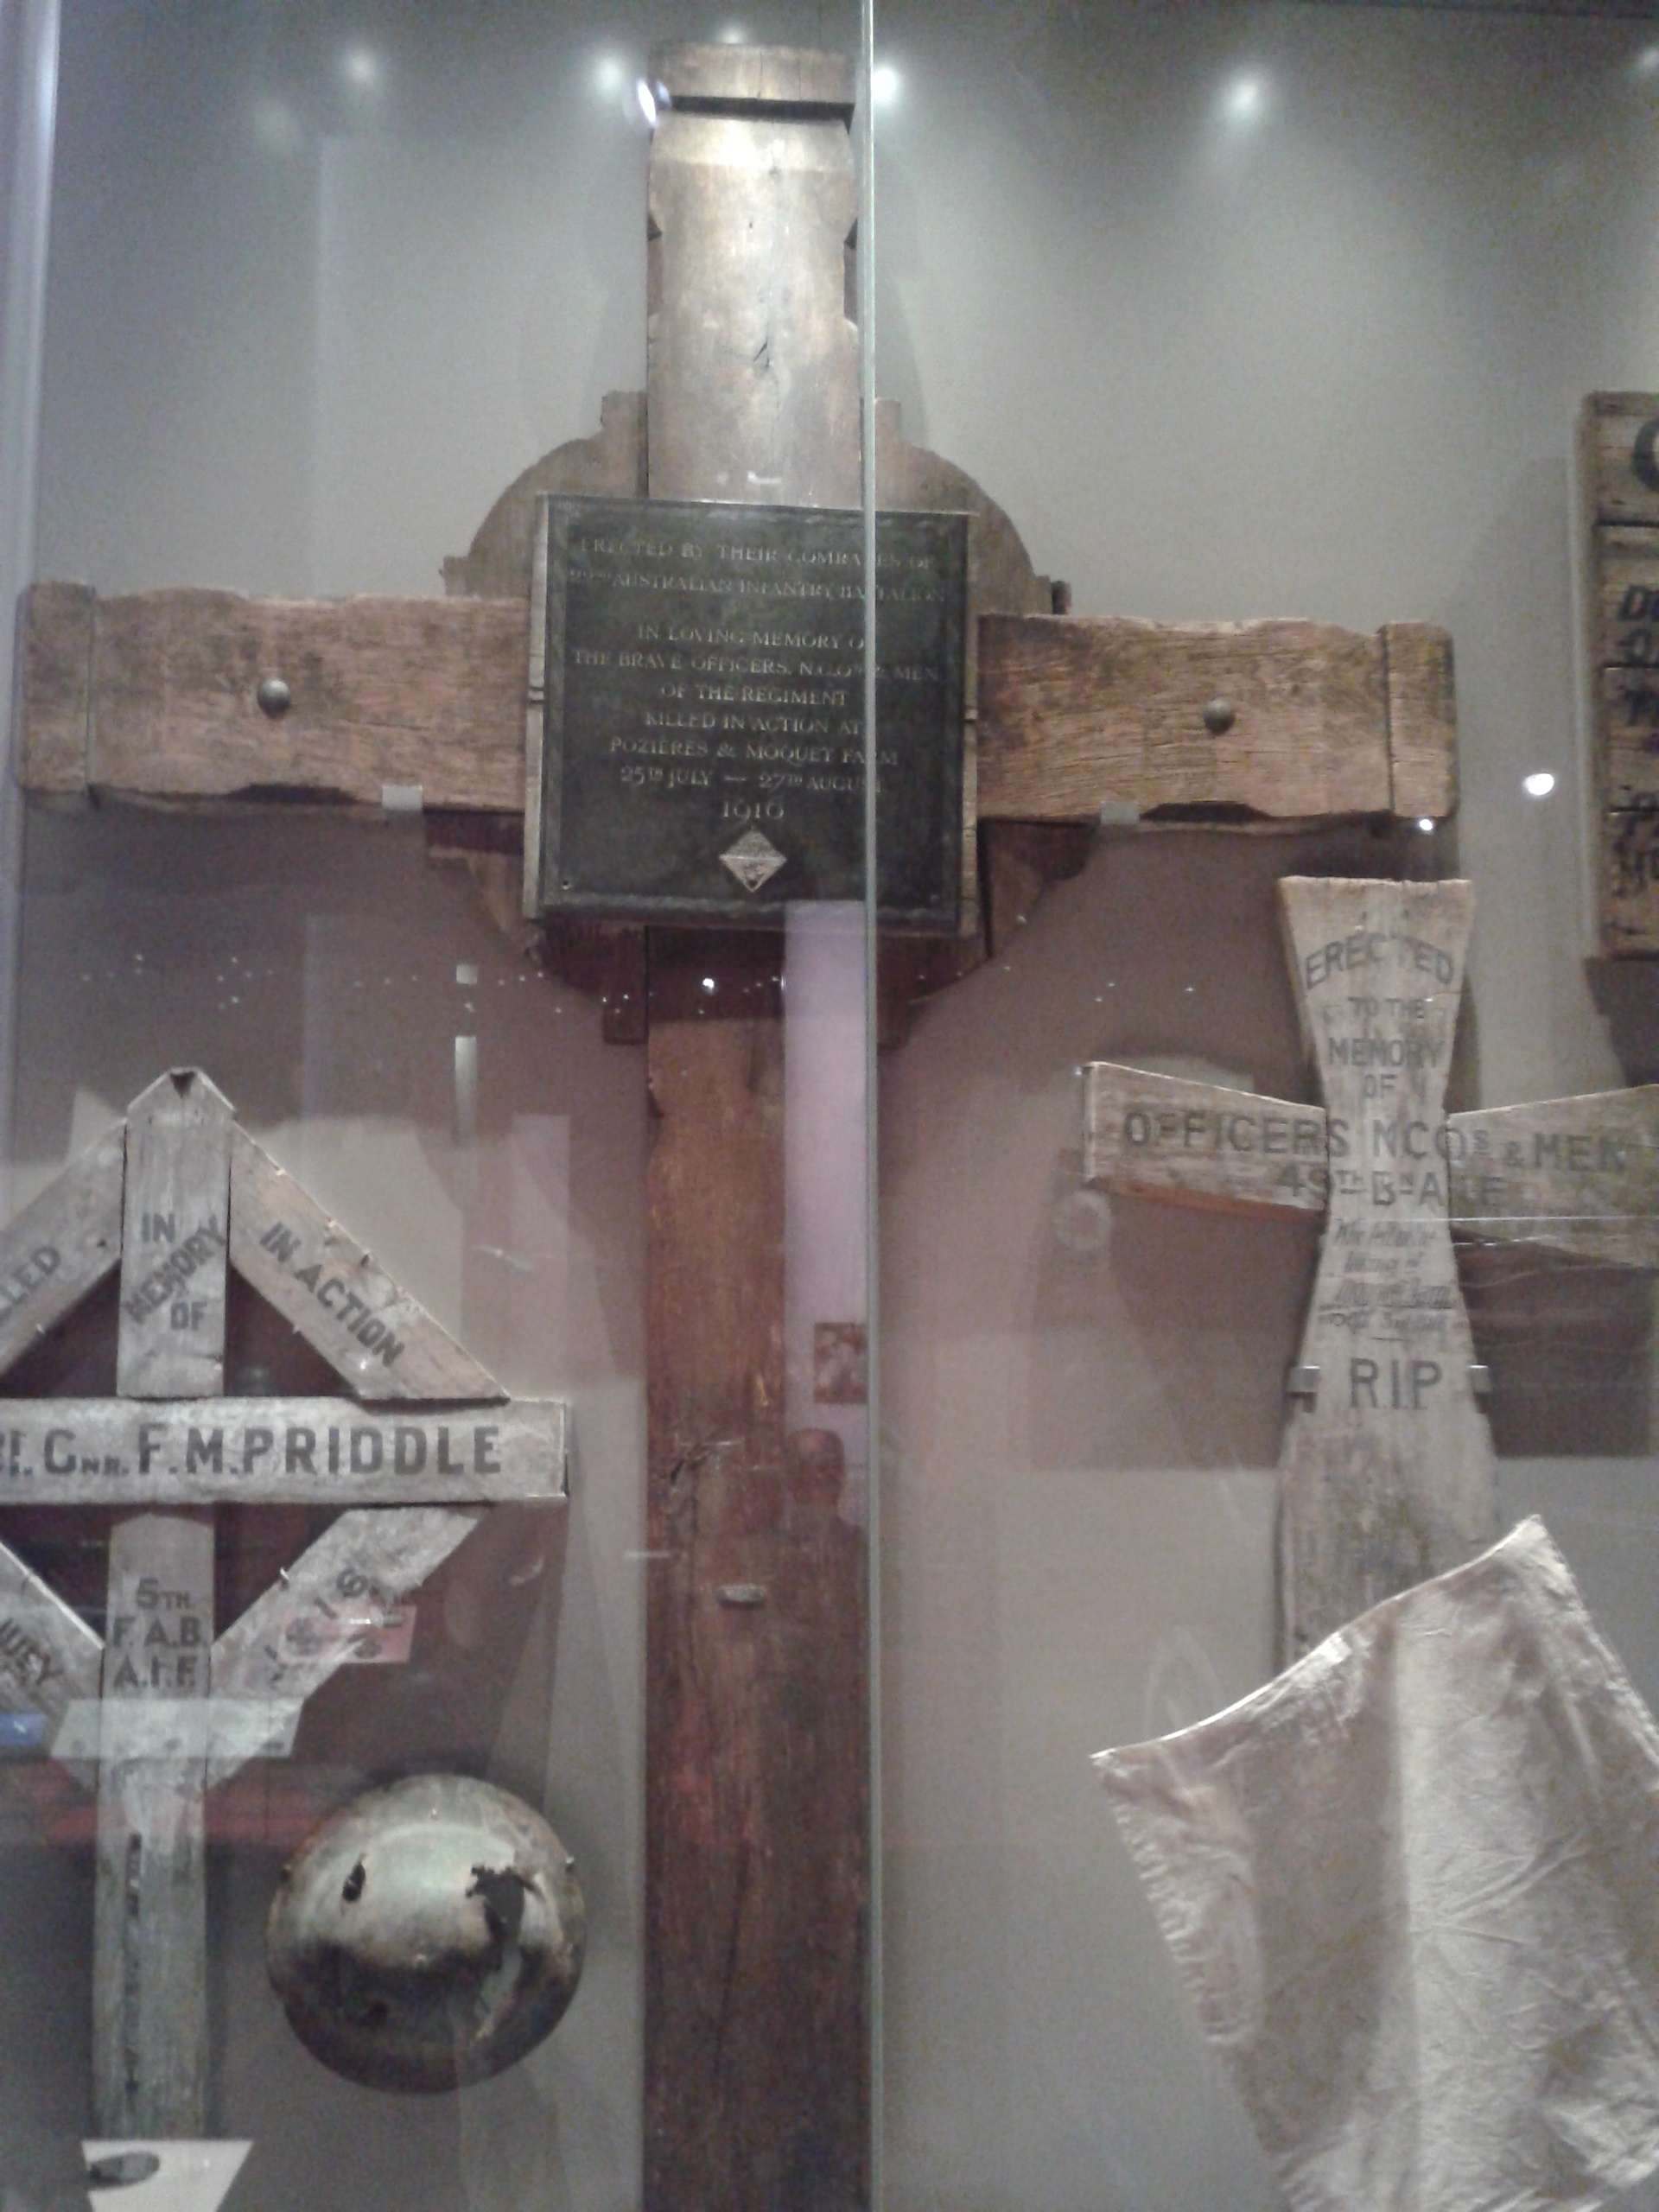
This success came at a heavy price and as Captain E. Gorman wrote in the history of the 22nd Battalion ‘in Pozieres sleep more of our Brigade than in any other spot in France’. The casualty list of the 22nd was the heaviest in the 6th Brigade, with the battalion losing 33 officers and 763 other ranks as casualties, and according to the CWGC records 219 men having been killed during the two tours in July and August. After the fighting the 22nd Battalion erected a wooden cross ‘in memory of the brave officers and men of the regiment killed in action at Pozieres and Mouquet Farm’, the cross (photograph above) now an exhibit within the Australian War Memorial, Canberra. From our 5th/22nd focus group, fifteen men died during the fighting at Pozieres, with a further 51 men wounded, therefore 43% of this cohort became a casualty in their first major battle.
 In addition to the physical damage, through the relentless bombardment which completely erased the village of Pozieres from the landscape, many a man would succumb to shell shock that would see them suffer terribly. The work of the stretcher-bearers was unceasing, frequently having to carry the wounded through the German barrage falling on the communication lines and having to bravely venture into No-Man’s Land following an attack. During one period of 2 hours, the battalion stretcher-bearers carried out 126 men. It should come as no surprise therefore that many of the battalions recipients of gallantry awards during the fighting at Pozieres and Mouquet Farm were stretcher-bearers and scouts. One such stretcher-bearer and bandsman was 1069 Cpl Tucker (photograph left), who having been awarded the Military Medal on 29th July was killed in action at Mouquet Farm on 26th August 1916.
The battalion was not alone in its high casualty rate, with I Anzac Corps suffering 23,000 casualties at Pozieres and Mouquet Farm. The following weeks would see the Australians move north to the quieter sector around Ypres where the process of regrouping and assimilating the reinforcements and returning wounded into their units would take place. In six weeks the AIF and the battalion would be returning to the Somme, the heat of summer and the dust of Pozieres being replaced by the rain and mud at Flers, about 2 miles further forward from where they had left.
 FIRST WORLD WAR TIMELINE