
 Background
 At a meeting at Foch’s headquarters on the 24th July 1918 with the Commanders-in-Chief of the Allied forces – Haig, Petain and Pershing – the decision was made that the turning point had been reached and now time to go on the offensive across the front. The offensives must come as a surprise, and should follow as much as possible soon after the previous one to keep the enemy stretched and unable to effectively manipulate his reserves. The attack at Amiens would come first, not just because of the flat terrain that suited both the tanks and cavalry, plus being at the junction between the British and French forces enabling both to be engaged, but on no other part on the battlefield was the morale so high as that of the Australians on the Somme, and been so dominant over the enemy for four months as a result of their continuous peaceful penetration operations. However the Australians had been in the line and forward area first stopping and then harassing the Germans since April, and although not exhausted most brigades were reporting that the men were in need of a decent rest to face any major future effort. The Canadian Divisions on the other hand had largely been in reserve, rested, up to full strength and being kept back for the pending offensive. It would be the two
  Dominion Corps that would spearhead the attack with four divisions each, supported by two divisions of the British III Corps (58th & 18th Divisions) on the left flank north of the river Somme and three divisions of the French XXXI Corps on the right flank south of the Luce. The Fourth Army’s attack would be supported by 432 fighting tanks, the first wave moving with the infantry on the fringe of the creeping barrage, though none could be spared for Debeney’s XXXI Corps. Fresh tanks, plus all those that survived the first stage would then move on to the second objective in most cases ahead of the infantry endeavouring to suppress enemy positions and with the infantry mopping-up. In the exploitation or third phase the only tanks participating would be the Mark V Star Tanks carrying extra Vickers or Lewis gun crews. In addition the Cavalry Corps would be supported by two battalions of Whippet light tanks. The Fourth Army’s artillery would be increased to 2,000 guns, half of which were 18-pounders at a rate of one gun per 22 yards of front to be attacked. Once the guns in the creeping barrage had finished their task they would move forward with the advancing forces for the next phase. As it was known that the Germans had spent little time on their defences it afforded the luxury of two-thirds of the heavy guns to be employed in counter-battery work. In the air the British had 800 planes available and the French 1,104, many employed in dropping phosphorous bombs to raise smoke screens. The cavalry would be used by punching through the Canadians and taking the third objective, the old Amiens defence line, before looking to exploit further with the whippets.
 On the 7th August, the day before the battle, Lieutenant-General Sir John Monash (photograph right) delivered a message to all the troops under his command:
To The Soldiers of The Australian Army Corps
For the first time in the history of this Corps, all five Australian Divisions will tomorrow engage in the largest and most important battle operation ever undertaken by the Corps. They will be supported by an exceptionally powerful Artillery, and by Tanks and Aeroplanes on a scale never previously attempted. The full resources of our sister Dominion, the Canadian Corps, will operate on our right, while two British Divisions will guard our left flank. The many successful offensives which the Brigades and Battalions of this Corps have so brilliantly executed during the past four months have been the prelude to, and the preparation for, this greatest culminating effort. Because of the completeness of our plans and dispositions, of the magnitude of the operations, of the number of troops employed, and of the depth to which we intend to over-run the enemy’s positions, this battle will be one of the most memorable of the whole war; and there can be no doubt that, by capturing our objectives, we shall inflict blows upon the enemy which will make him stagger, and will bring the end appreciably nearer. I entertain no sort of doubt that every Australian soldier will worthily rise to so great an occasion, and that every man, imbued with the spirit of victory, will, in spite of every difficulty that may confront him, be animated by no other resolve than grim determination to see through to a clean finish, whatever his task may be. The work to be done tomorrow will perhaps make heavy demands upon your endurance and the staying powers of many of you; but I am confident, in spite of excitement, fatigue, and physical strain, every man will carry on to the utmost of his powers until his goal is won; for the sake of AUSTRALIA, the Empire and our cause. I earnestly wish every soldier of the Corps the best of good fortune, and glorious and decisive victory, the story of which will echo throughout the world, and will live forever in the history of our homeland.
JOHN MONASH
Lieut.-General
Commander Australian Corps
Combat
Somme 1918

For the start of the great Amiens 1918 offensive Lieutenant-General Monash’s Australian Corps lined up on an 8km frontage with its left boundary on the river Somme and its right the railway line. Their objectives were first the Green Line, some 3km from the start and including the German artillery line, then the leap-frogging battalions would push on another 4.5km to the Red Line and then the last phase was the 1.5km advance to Harbonnieres and the Blue Line. The infantry brigades started their approach at different times, with the units of the 2nd & 3rd Australian Divisions destined for 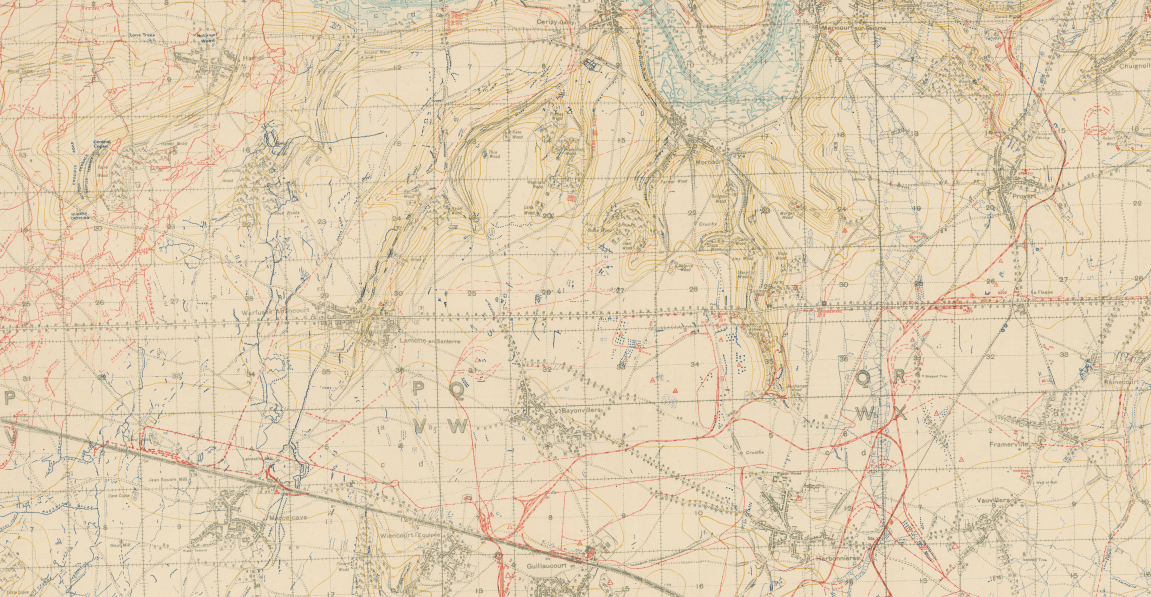 the first objective passing through those of the 4th & 5th Australian Divisions that were detailed for the second and third objectives. At 3am with the forward attacking units now in position a heavy mist covered the ground and with the approaching dawn it was difficult to see more than 20 yards. At 3.50am the drone of aeroplanes flying over the German front to be attacked were heard, and with engines throttled down, only the Australians close to where the tanks were passing were aware of their steady progress forwards. [Click link for geo-referenced map reproduced with permission from the National Library of Scotland].
At 4.20am the main 2,000 British guns as well as those of Debeney’s First French Army farther south started almost as a single crash. As Bean recalled nearly every man lit a cigarette as all along the line the companies of the attacking brigades rose and moved forward. Leading the way were the scouts or ‘beaters’ pointing out hostile posts to the tank crews, followed by the main body of the leading battalions each on a two company front strung out in successive lines of tiny columns, each a section of 6-8 men in single file, but in the mist which was now thickened by the dust keeping the formations became a challenge.
 On the 2nd Australian Division right the 7th Brigade ran into some unexpected effective wire entanglement when nearing Card Copse just to the north of Marcelcave, with concentrated German machine gun at this point. The 28th Battalion, with 2nd Lieutenant Gaby, VC, and 26th Battalion on the far right found gaps and with the arrival of the tanks all resistance was ended. Assistance was then given to the Canadians on their right that were encountering resistance in Marcelcave south of the railway line. To the north the 17th and 18th Battalions of the 5th Brigade passed on either side of Warfusee before entering the village from the north and south, bombing cellars and routing German headquarters out of their dugouts. To the left and on the 3rd Australian Division front the 9th Brigade took Accroche Wood and the 11th Brigade advanced on the southern side of the Somme. With the fog hanging thick the attackers were often on the Germans before they realised and many surrendered without a shot being fired. The 42nd Battalion advancing along the southern edge of the River Somme had to struggle through mud, weed and undergrowth but the scattered German posts could only fire blindly and were easily captured. When the fog began to rapidly clear both the 2nd & 3rd Australian Divisions were approaching their first or Green Line objectives, and with this the tanks along with the foremost parties struck out and went for the strong points of resistance that they could now see. By now the infantry with the tanks in support also began to encounter and over-run German batteries. Throughout this opening phase there was hardly any stubborn resistance, with the fog helping to conceal the advance, and where the tanks appeared most of the Germans were terrified. As for the German artillery it had been so smothered by the British counter-batteries and by the fog that its reply was negligible and caused only minor loss, chiefly to the leap-frogging 4th & 5th Australian Divisions. The advance was the most bloodless ever made the Australian infantry in a great battle – one Company of the 42nd Battalion had no casualties. At 8am the mist lifted like a curtain, and looking from the high ground north of the Somme both British and Germans on the hills could observe the first units digging in and the leap-frogging battalions, the artillery, tanks and cavalry all moving forward across open countryside as the breakthrough had been achieved.
 At 8.20am, simultaneously with the Canadians to the south, the 4th & 5th Australian Divisions moved through as phase two to the Red Line began. This time the infantry would not have the support of the creeping barrage but would have the tanks leading the way plus a number of field artillery brigades (photograph left) which had come forward. To the right of the Australians the Canadians were facing stiffer resistance as they were faced by the German 117th Division, a completely fresh and one of the most battle-worthy division in the German Army, plus utilising the defensive obstacles provided by the villages of Wiencourt and Guillaucourt. By far the most difficult task on the Australian front fell to the 4th Brigade on the far left by the Somme river as the British 58th Division had difficulty in clearing the flank on the Chipilly Spur high ground north of the river and German guns were able to pour fire down onto the advancing Australians, tanks and the artillery being brought forward. Ferocious short range artillery duels ensued, but the German guns could not be supressed. Of its four battalions it was the 16th Battalion tasked with taking the final objective that had the toughest task.
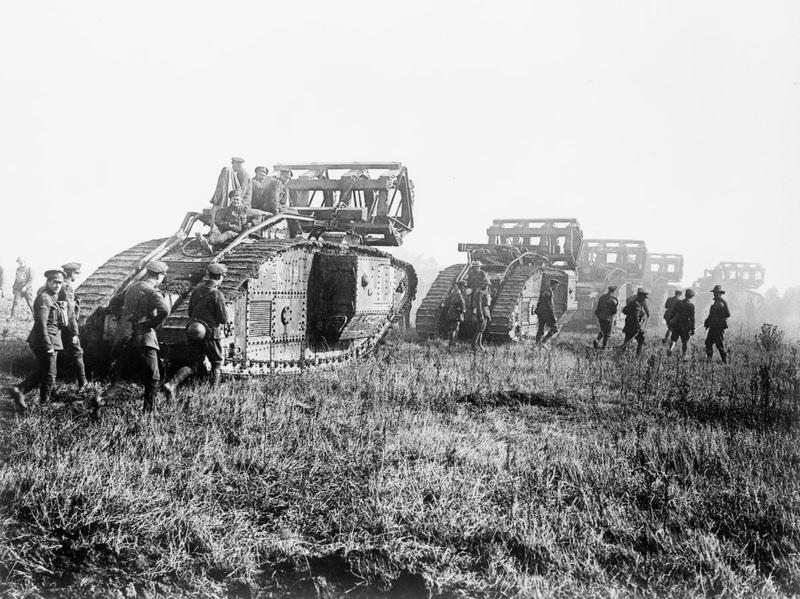
 As the infantry readied itself for the third phase to the old Amiens Line, British Armoured Cars and Whippet Light Tanks (photograph right) along with the Cavalry were seen ahead causing havoc in what was now the German headquarters and transport area, often catching the enemy unaware until machine guns opened up. Including in the capture was the 11 inch railway gun (photograph below showing the war trophy now at the Australian War Memorial, Canberra). Except on the northern and southernmost flanks on the Australian Corps front, the furthermost planned objective had been reached by 1.30pm and by 3pm news was coming in to Monash that the Canadians and the French to the south were about to do the same.
 Much has been written about the success of the battle down to the integration between the various fighting elements. However the experience of the great majority of the troops throughout the day was that not only aeroplanes, tanks, armoured cars, cavalry, artillery and machine-guns working in unison, but so too the pioneer parties remaking the roads or helping the artillery over the trenches, engineers building bridges, fixing wells, providing sign-posts, the transport with working materials, and the quartermasters with food and drink all came up precisely when needed.
The Australian Corps took over 7,000 prisoners, the Canadians took some 6,000 prisoners and the French 3,500 (photograph below right of German Prisoners of War). Total German losses were estimated at 30,000 and over 300 guns were also captured that day, whereas the British, Australian (2,000) and Canadian were around 9,000 for the gain on average of 11kms across the front. General Ludendorff attributed the Allies success on this ‘the black day (der Schwarz Tag) of the German Army in the Great War’ to the failure of the German soldier’s morale. Six or seven divisions had been completely broken, with bodies of men surrendering to  singles troopers, and retiring troops shouting ‘you’re prolonging the war’ at the reserves that went through them. Many German regimental historians explain the Allies success as due to tanks, but by far the biggest factor was surprise plus another was the mist. Another major difference between this and previous battles was the ability to exploit success behind the enemy lines before reserves could be brought up by for the first time the effective use of the cavalry and the motorised armoured cars.
The night after the great battle was quiet and efforts turned to digging and fortifying ahead of any German counter-attack. Rawlinson informed his three corps commanders that the effort for this day would fall to the Canadians thrusting south-east in the direction of Roye alongside the French to their right. The cavalry was tasked in gaining the objectives of the Canadian Corps. As the Australian Corps frontage increased with the Canadians moving south-east, the 1st Australian Division newly arrived from Belgium would be inserted through the 5th Australian Division’s right. On the Australian northern flank the 1st Battalion sent a small party across the Somme river, to assist the 2/10th Battalion London Regiment in dislodging the Germans from the Chipilly Spur while the 131st American Regiment attacked higher upon the ridge. When they got there they found Chipilly abandoned and the guns gone. The attacks of both the 9th & 10th August were not as well planned or co-ordinated as the opening day, and hence resulted in greater casualties. For the Australians they would be attacking without tanks as few had survived the attack on the 9th, and the reserve 13th Tank Battalion had been given to the Canadian Corps whose task was the vital one.
 Marshal Foch having been impressed by the progress so far and the success of the French to the south urged a continuation. Field Marshal Haig continued to press the general attack on this the fourth day however he was now having doubts as he expected German reserves to be soon impeding progress here as the attacking forces came across the old trench lines and wire entanglements of the French sector in 1916. As a result his thoughts were now turning to his Third and Fourth Armies further north. The Australian role on the 11th August was for the 1st Australian Division (10th Battalion photograph left) to continue swinging up the flank for the Canadians on the right at Lihons, while the 2nd Australian Division on their left was to straighten the line and complete the objectives of the previous day. A halt was called to the Amiens offensive which enabled Lieutenant-General Monash to re-organise his Australian Corps, now holding a frontage of 16,000 yards as a result of the right flank that had been hugging the railway diverging away from the river Somme, plus having taken over the ground north of the river. To help the stretched Australians General Rawlinson temporarily placed the British 17th Division under Monash.
 The next week was occupied by local or ‘peaceful penetration’ operations conducted by the front line units to straighten the front and to dispose of a number of strong points, small woods and village ruins which as long as they remained in enemy hands were a source of annoyance. The attitude of the Germans was alert but not aggressive, and that he showed every desire to stand and fight. There was no indication of any intention to withdraw out of the great bend in the river, a point corroborated from the statements from the
  steady toll of prisoners being taken. By the 15th August the 6th Brigade had pushed forward and reached Hill 90 on the outskirts of the old trench system at Herleville [click link for geo-referenced Trench Map, reproduced with the permission of the National Library of Scotland]. By this stage the 6th Brigade, particularly the 22nd Battalion, was severely depleted in its strength following the successful attack at Ville-sur-Ancre in May and the heavy gas bombardments of the previous month. Despite protestations from Battalion Headquarters, orders were given that the 6th Brigade would attack Herleville, now held by an elite German Guards Division, at dawn on the 18th August 1918. The three attacking companies of the 22nd Battalion in the centre of the attack could muster only 90 infantrymen between them and from the outset came under heavy artillery and machine gun fire. Only a small section of the objective was taken and by the end of
  the attack the 22nd Battalion had lost 60 of its 90 men, many gallant men that had been fighting with the Battalion since the initial days at Gallipoli. By the time of their withdrawal the 22nd Battalion was down to a fighting strength of just 70 men. Five days later on the 23rd August 1918 and as part of the now broader British and French offensive to the north and the south, the 1st Australian Division along with the British 32nd Division under Monash’s command, supported by a creeping barrage, full artillery engagement, tanks and aircraft attacked. Herleville was captured as the line advanced a further 2,400 yards, with over 3,000 prisoners and guns taken, including a huge 15 inch railway gun that had been bombarding Amiens.
Mont St. Quentin

By the 29th August 1918 the great bend in the river where line of the Somme now flowed south to north had been reached and all three divisions in the Australian Corps south of the Somme stood upon the high ground sloping down to the river looking past Peronne and as far south as St. Christ (map top right courtesy of Australians on the Western Front, and click on link for geo-referenced Trench Map reproduced with permission of the National Library of Scotland). To the north of the river the 3rd Australian Division kept in step reaching Suzanne, Vaux, Curlu, Hem and Clery. The last two days of the advance led the Australian Corps across the maze of trenches and debris of the 1916 campaign. The weather was unfavourable, there  was little shelter plus the Germans fought a determined withdrawal all leading to the line brigades reaching the Somme in a very tired condition. Later that day Lieut.-Gen. Monash called a conference with his Divisional commanders at Proyart to discuss the next phase, the crossing of the Somme and the taking of Mont St. Quentin. In preparation for the attack against Peronne the 2nd Australian Division sent its reserve 5th Brigade to cross the river at Feuilleres, to pass through the area in front of the 3rd Australian Division and to secure a bridge head on the Clery side of the river opposite the Ommiecourt bend. The 5th Brigade found part of the village of Clery occupied and the trench system to the east still held in strength, however after determined fighting the 5th Brigade reached its allotted destination with only slight casualties but capturing seven machine guns and 120 prisoners.
 The German 2nd Army had from the 8th August been battered and the troops trying to halt the advance of the Allied forces were often a jumble of units inter-mixed with complete divisions from reserve. Once such reserve division was the 2nd Prussian Guards Division, one of the finest at Ludendorff’s disposal that was ordered to occupy the key position of Mont St. Quentin (photograph left) and to hold at all costs. For the defence of Peronne just to the south, the enemy called for volunteers of hand-picked men from different Regiments to man the ramparts which surrounded the town. Dozens of machine gun were posted in vantage points from which the approaches could be swept. All over the river flats ran line upon line of barbed wire entanglements, a legacy of the 1916 fighting, much of which was still intact. Furthermore the infantry would be attacking without the aid of Tanks, the losses of the previous weeks now having taken their toll, nor had there been time to bring an appreciable quantity of heavy guns forward.
 The advance by three battalions of the 5th Brigade, with an average of just 330 men per battalion, of the 2nd Australian Division began at 5am on the 31st August 1918, with the 19th, 17th and 20th Battalions yelling and making as much noise as possible to make it appear that their numbers where much greater than they actually were. The ruse worked resulting in the surrender of many of the enemy lying out in their advanced positions, and a nest of seven machine guns was rushed and taken without any loss. The centre (17th) and left (20th) Battalions gained a footing in Feuillaucourt and on the main hill but the progress of the 19th Battalion on the right was stopped by heavy machine gun fire from St. Denis. This was the site of a ruined sugar refinery and lay on the main road between Peronne and Mont St. Quentin, and the defenders held out to the last. The 17th Battalion had by 7am passed through the ruins of Mont St. Quentin village and had crossed the main road when it received a strong counter-attack while it was recovering from the initial assault causing it to withdraw across the road to an old trench system to the west. The 19th Battalion beat off five successive counter attacks inflicting severe losses upon the enemy though suffering themselves 380 casualties.
 The 6th Brigade, some 1,334 strong, had been ordered to cross the Somme and move up behind the 5th Brigade in readiness to carry the attack and take possession of the remainder of the main Mont St. Quentin spur. Passing over the line won the previous day the 6th Brigade assault in the rain carried it well over the crest of Mont St. Quentin. Pte Mactier of the 23rd Battalion was killed while silencing machine guns that blocked the way for which he was posthumously awarded the Victoria Cross. Sgt Lowerson of the 21st Battalion led a charge that overcame the centre of resistance on the left flank, and Lieut. Towner of the 7th Machine Gun Company provided continuous covering fire for which both men were awarded the Victoria Cross. Ferocious hand to hand fighting took place, with the bayonet to the fore and as a result very few enemy prisoners were taken that day. After two attempts the summit of the Mont was taken and with it a commanding position over Peronne and the land to the east. The 7th Brigade moved forward into support thereby relieving the 5th Brigade from front line duty. Just to their south on the 5th Australian Division front the 14th Brigade had crossed the river at Clery besides the 6th Brigade and the 53rd and 54th Battalions assaulted with a direct attack against Peronne. Many belts of wire had to be struggled
  through before crossing the moat and taking the western half of Peronne. Cpls Hall, Buckley (posthumously) and Pte Currey were all awarded the Victoria Cross. During the day the Brig-Gen. Elliott’s 15th Brigade made spirited attempts to cross the river and to co-operate from the south but suffered a number of casualties in the process. The following day the 15th Brigade succeeded in putting the 58th Battalion across the river and this assisted the 14th Brigade to mop up the remainder of Peronne. Later the rest of the 15th Brigade and two battalions of the 8th Brigade were also involved in the fighting, during which St. Denis and the brickfields were taken.
The loss of Mont St. Quentin was a major factor in the Germans deciding to retreat from the area and as a result the high ground of the Flamicourt Spur fell to the attackers from the British 32nd Division fighting within the Australian Corps. Meanwhile the 3rd Australian Division had continued to push up the Bouchavesnes spur in a north-easterly direction helping to consolidate the position around Mont St. Quentin during which Pte Cartwright (33rd Battalion) and Pte Weathers (43rd Battalion) were awarded the Victoria Cross. To their left the British 74th Division within III Corps pushed forward and further on again north the British Third Army having crossed the old Somme 1916 battlefields was now approaching the Canal du Nord over a wide front.


By the night of the 3rd September Monash’s Australian Corps had achieved all its objectives set since the launch of the offensive four days previously, and resulted in the award of eight Victoria Crosses (click on link or photograph above to read more), the most in any single Australian action during the Great War. During the offensive the Australians had suffered some 3,000 casualties but had taken 2,600 prisoners. General Rawlinson referred to the operation as the finest single feat of the war, with many of the congratulations falling to Major General Rosenthal’s 2nd Australian Division (photograph right of the 2nd Australian Division monument, Mont St. Quentin). “The capture of  Mont. St. Quentin by the Second Division is a feat of arms worthy of the highest praise. The natural strength of the position is immense and the tactical value of it, in reference to Peronne and the whole of the system of the Somme defences, cannot be over-estimated. I am filled with admiration at the gallantry and surpassing daring of the Second Division in winning this important fortress, I congratulate them all with my heart.” Rawlinson.
The Hindenburg Line System
The Somme that had been a focal point for so many years had been crossed and now attention was turning to the enemy’s last line of defence, the Hindenburg Line. However on the Australian Corps the river still caused a great obstacle and for many days in early September the area was a mass of activity in fixing, strengthening or rebuilding bridges and crossing points to enable the Allied machinery of war to move eastwards. Most of the Engineer Field Companies, three of the five Pioneer Companies, both Tunnelling Companies and all the Army Troop Companies laboured in relays night and day. Peronne itself was now becoming a bottleneck, at times resembling central London at peak traffic time.
 On the 13th September 1918 General Rawlinson called a conference of his three British Fourth Army Corps Commanders – Butler (III), Monash (Australian) and Braithwaite (IX) – at Assevillers to discuss the next series of operations that would take the great Hindenburg Line system comprising the Hindenburg Outpost Line (or Hagricourt Line), the main Hindenburg Line, the support or Le Catelet Line and finally the reserve Beaurevoir Line (map above right courtesy of the DVA Anzac Portal, and click on following link for geo-referenced trench map reproduced with permission of the National Library of Scotland). The first phase, the taking of the
 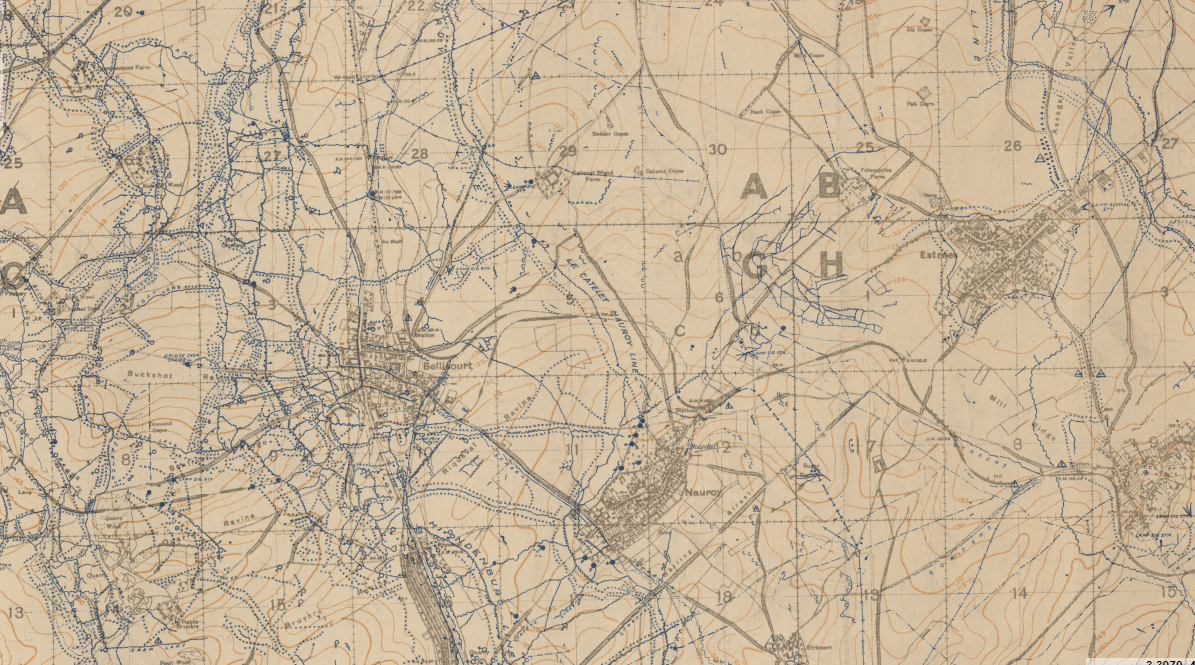 Hindenburg Outpost Line, would be made in conjunction with the British Third Army to the north and the French to the south. After the successful manoeuvre battle at Mont St. Quentin the attack on the Hindenburg Outpost Line would revert back to being a set-piece battle similar to that of the 8th August, though this time there would be just eight tanks supporting the Australians. In order to compensate for the lack of tanks Monash arranged to double the machine gun resources by bringing up complete machine-gun battalions from the 3rd and 5th Australian Divisions, giving a total of 256 Vickers Machine Guns on a frontage of 7,000 yards to deliver a dense machine gun barrage that would advance 300 yards ahead of the infantry. Also to try and trick the enemy Monash ordered the creation of dummy tanks (photograph below left), clearly visible to the enemy, to give the impression that there were many more tanks about to attack, thus hastening the defenders abandoning their positions.
 The 1st & 4th Australian Divisions attacked at 5.20am with two Brigades and with the exception of Grand Priel Woods in front of the 3rd Brigade no serious opposition was encountered. Under the devastating creeping artillery and machine-gun barrage the first ‘Red Line’ objective across the Corps front was taken by 10am, putting the Australians in possession of the old British front line of March 1918, but still some 1,500 to 2,000 yards from the Hindenburg Outpost Line. Sgt Sexton of the 13th Battalion took out a field gun and several machine guns for which he was awarded the Victoria Cross. Major General Glasgow’s 1st Australian Division pushed on without pause and by nightfall had overwhelmed the garrison of the Hindenburg Outpost Line along its front. Major General Maclagan’s 4th Australian Division also fought its way forward to within 500 yards of that line, but the troops exhausted from crossing difficult terrain and in full view of the enemy, were ordered to rest. Advantage was taken to advance the artillery, and at 11pm the 4th Australian Division again attacked and after severe fighting also captured the whole of the objective trench system, during which Pte Woods of the 48th Battalion rushed a post and held off a counter-attack earning him the Victoria Cross. A great victory had been achieved with relatively little loss. The 1st Australian Division, attacking with 2,854 men suffered 490 casualties in total whereas the 4th Australian Division had 532 casualties from a strength of 3,048. Over 4,200 prisoners were taken in addition to the large numbers of enemy killed or wounded, plus the Corps captured more than 80 guns that had been abandoned by the German Army. By the evening of the 23rd September the last of the 1st & 4th Australian Divisions had been relieved by what were now the only two American Divisions remaining in the British zone, the 27th and 30th Divisions numbering 50,000 men in total. The Second American Corps came under Monash’s Australian Corps command. [Photograph above of the 4th Australian Division Monument at Bellenglise].
 On the 26th September Monash held a conference to discuss the attack on the main Hindenburg Line which at this section of the front lay on the eastern bank of the St. Quentin canal, constructed in Napoleonic times to link the Somme and the Scheldt rivers, and hence creating a formidable natural barrier. In the Australian Corps sector the canal passed through a 5km tunnel at Bellicourt (photograph left) which afforded the Germans with shell-proof accommodation, and on top was well protected with multiple belts of wire and pillboxes. Monash decided that the best chance of success and less risk was to attack across the ‘land bridge’ over the tunnel. The attack planned for the 29th September would in part start from territory previously attacked by III Corps on the 18th September that had yet to be captured, and this task was given to the 27th American Division for the following day. That night an intense artillery action began against the German positions on the Hindenburg Line in preparation for the main assault in three day’s time. Included in the bombardment was the use of a newly developed ‘mustard gas’ targeted at the German living quarters, occupied defences and approaches. At 5.30am on the 27th September the 27th American Division carried out their attack under a barrage and aided by tanks. The main objectives were the trench system about Quennemont and Gillemont Farms. The attack by the battle-green Americans failed to take its objectives, and although many men made it to the German trench line they became surrounded until relieved by the Australians two days later. The failure appeared to be down to over eager troops rushing on and not ‘mopping-up’ correctly – a lesson learned the hard way by the British and Australians in 1916 and 1917 – and as a result it compromised the artillery plan for the main assault two days later. Monash succeeded in getting General Rawlinson to provide additional tanks out of Army reserves to place on the 27th Division front to bring the infantry up to the barrage.
 The battle lines for the Australian Corps had the two American divisions, the 30th Division on the right with the 60th Brigade leading and the 59th Brigade forming a defensive southern flank in case IX Corps failed to cross the canal, and the 27th Division on the left attacking with the 54th Brigade and with the 53rd Brigade providing a defensive flank for XIII Corps. For the exploitation phase the 5th Australian Division (8th & 15th Brigades attacking, with 14th Brigade in support) on the right and the 3rd Australian Division (10th & 11th Brigades attacking, with 9th Brigade in support) on the left. The total frontage was 7,000 yards with the first phase to be conducted under a barrage and the second, by the Australians, open warfare to the Beaurevoir Line. The day broke with familiar mist and at 5.50am
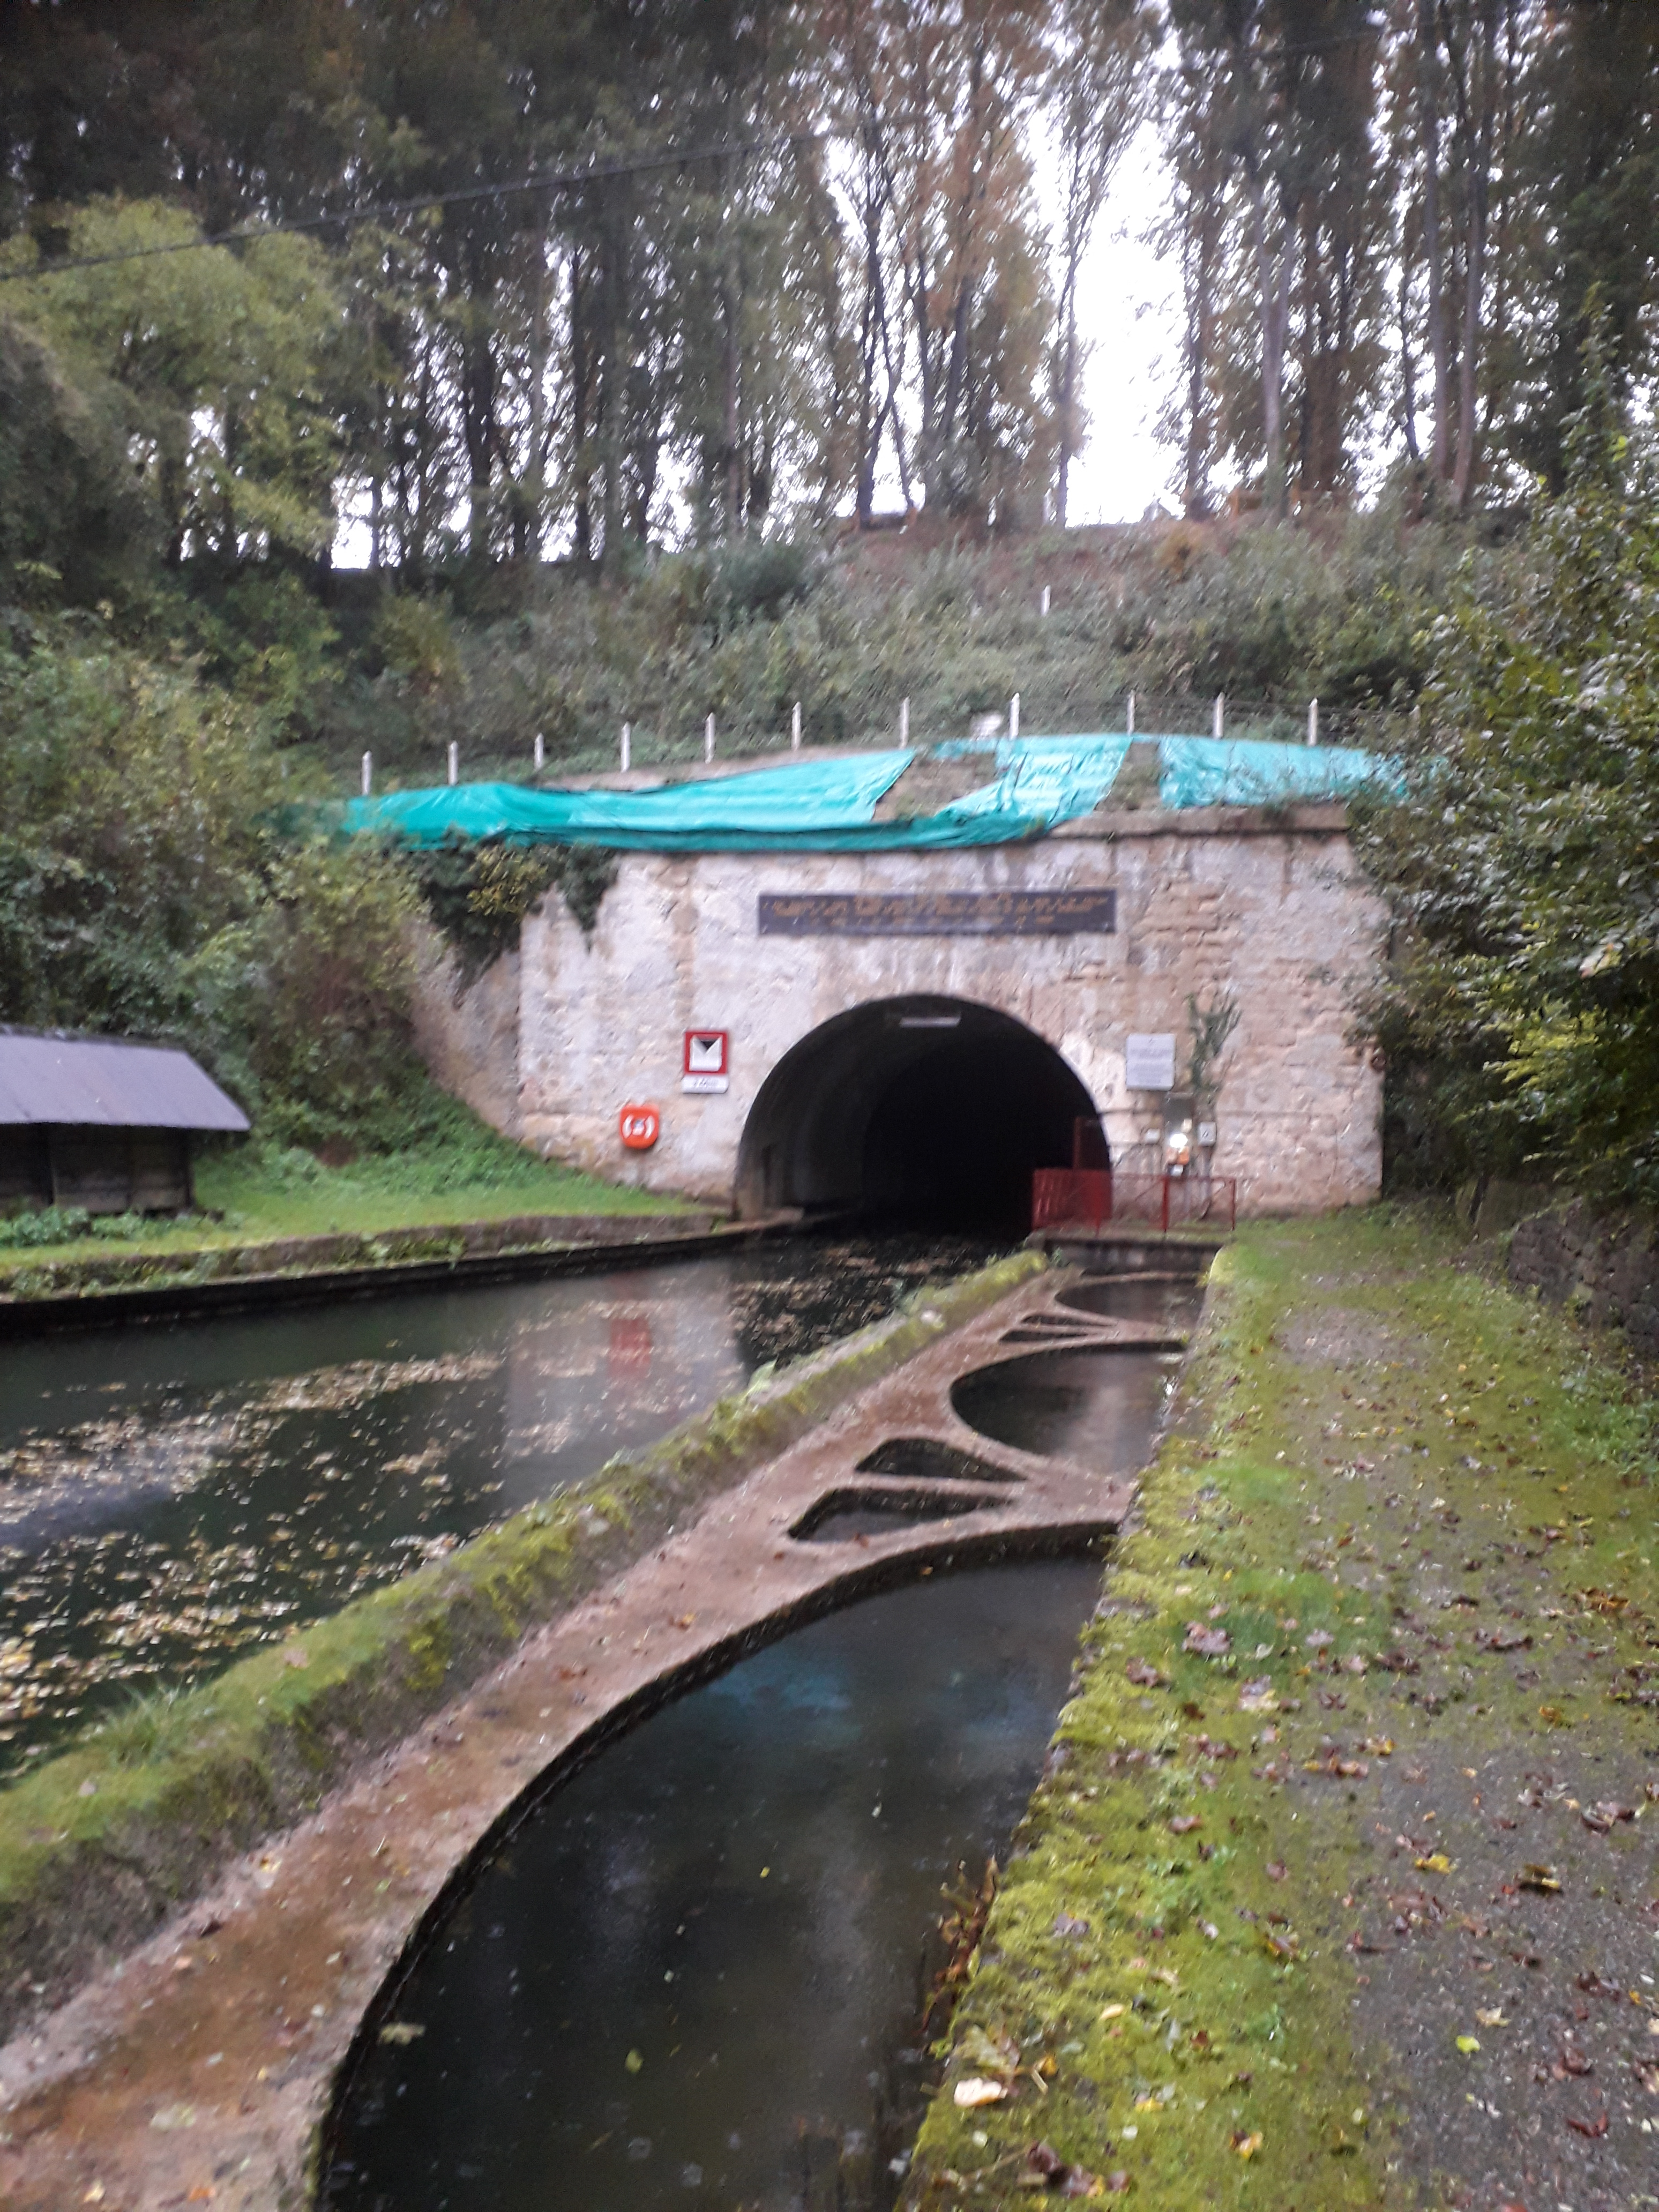
  the attack was launched. Quite early in the day excellent news came in that the 46th (North Midland) Division within IX Corps had skillfully crossed the canal at Bellenglise / Riqueval (photograph of the bridge and canal taken October 2019), thereby relieving pressure on Monash’s right flank. The initial reports coming in from the Americans leading in the Australian Corps were also encouraging, but at the time that the Australians were due to cross the first objective (at 11am, the Green Line which lay on the Le Catelet Line) messages started to arrive that the both the 5th & 3rd Australian Divisions had been held up. Once again, having reached the villages of Le Catelet and Gouy, it appeared that the Americans had failed to properly mop-up, though another factor was that many of their officers – already few in number for the size of their units – had become casualties. To the south the American 30th Division was making better progress and Bellicourt was reached, though here too Germans appeared from underground between the Americans and the 5th Australian Division. In spite of hard fighting in the face of vigorous defence the 5th Australian Division cleared away the opposition taking Bellicourt. By 2pm the 5th Australian Division had advanced through Nauroy and had passed the Le Catelet Line in that vicinity. However the 3rd Australian Division was only part across the canal and to the north still in the vicinity of the American start line, the 10th & 11th Brigades now intermixed with the Americans. Major Wark of the 32nd Battalion received the Victoria Cross for picking up and reorganising a considerable number of Americans he found there along with securing the help of a tank to break through. Pushing on and heading south-eastwards Major Wark was surprised to see British troops from the 4th Leicester’s (46th Division) that had managed the extraordinarily
  difficult crossing of the canal, seizing bridges before they could be blown up. The south entrance to the tunnel (photograph right) was now in Allied hands, but the north still in German. As a result Monash had to amend his plans abandoning the objective of taking the whole Hindenburg Line in one day. Any concern that the enemy might launch a concerted counter-attack against his vulnerable troops astride the canal soon dissipated probably on account of the 46th Division’s success on the right flank.
Passing through the 30th Division the objectives for the reserve Brigade of the 3rd Australian Division (9th Brigade) on the 30th September were Bony village and the northern entrance of the tunnel. The battlefield, cratered, wet and muddied and crossed by belts of wire was proving difficult for all to cross and by the time of the assault only seven of the eighteen tanks allotted for the attack had appeared. For the 14th Brigade of the 5th Australian Division they were to swing their right flank forward in the direction of Joncourt in conjunction with any advance made by IX Corps. This day was a day of intense, slow and methodical hand to hand fighting. By nightfall the line of the 3rd Australian Division had advanced 1,000 yards and had reached the southern outskirts of Bony village, and the 5th Australian Division had cleared the Le Catelet trench system and its right well to the east of Nauroy. Pte Ryan of the 55th Battalion was awarded the Victoria Cross for defeating a determined counter-attack.
 Overnight the enemy must have made its mind up that any further hold on the tunnel line was hopeless and further resistance melted away. By 10am on the 1st October the 5th Australian Division reported the capture of Joncourt and soon passed it over to the 15th Lancashire Fusiliers of the 32nd Division. By midday the whole of the village of Bony was in Australian hands and that patrols were rapidly approaching Le Catelet village, with the Germans withdrawing their troops, transport and guns up the hills beyond the Beaurevoir Line. Here they settled and began to shell the Australian outposts heavily such they had to be withdrawn beyond the crest. Just to the south the British IX Corps had sized the Beaurevoir Line east of Joncourt. Meanwhile the northern end of the tunnel had been taken and by nightfall the whole operation had been successfully completed. The three day operation had resulted in the capture of 3,057 prisoners and 35 guns. The way was now open for XIII Corps to pass across the line of the tunnel and swing left to knock the enemy out of the northern continuation of the Hindenburg Line, and for the Australian Corps to push on to the final obstacle in the Hindenburg Line, the Beaurevoir Line. The Australian 3rd & 5th Australian Divisions were by now exhausted from their efforts and were relieved by the 50th Division from the British XIII Corps and the 2nd Australian Division respectively. The two relieved divisions now joined the 1st & 4th Australian Divisions in the welcome rest area to the west and south-west of Amiens, their service in the front line now done.
 The 5th Brigade took over the part of Monash’s front facing the Beaurevoir Line during a cold and clear night. In the morning of the 2nd October the 16th Lancashire Fusiliers on their right attacked but any orders for the 18th Battalion to assist had not materialised, and like so many hurried local efforts to exploit a potential breakthrough failed despite initial successes. During the intensely dark night the 7th Brigade relieved part of the 5th Brigade on the northern half of the 2nd Australian Division front. With the 5th Brigade on the right, astride the Le Cateau Road, and the 7th Brigade on the left the objectives were first the Beaurevoir Line and then passing through to the village of Beaurevoir and the uncaptured part of the Beaurevoir Line on the left. [Click link for geo-referenced trench map reproduced with permission of the National Library of Scotland]. The attacking battalions would be supported by five artillery brigades, a company of heavy tanks, and eight whippets would assist the 5th Brigade to capture Beaurevoir. The 7th Brigade looked down on the Torrens canal, more of a stream than a
  major waterway. The early part of the night was wet making it difficult for the tanks to arrive on time, and the infantry had to endure a steady stream of gas shells being fired at the positions at Joncourt, Estrees and Folemprise Farm. The barrage fell and at 6.05am on the 3rd October the 18th and 19th Battalions on the right followed by the 17th and 20th made progress through the thick wire, assisted by the tanks but made possible through the bravery of men like Lieut. Maxwell (photograph left) of the 18th Battalion who was awarded the Victoria Cross. On the left the 7th Brigade encountered pill-boxes and over fifty machine-guns in their sector. Lewis gunners of the 25th Battalion suppressed much of the enemy fire aided by two tanks. The Germans were holding Prospect Hill to the left and Major-General Rosenthal was content with securing a foothold on the heights just short of Beaurevoir when he brought forward his reserve 6th Brigade, the orders not reaching the 22nd Battalion until 3pm. A barrage was placed at 4.30pm but it would not be until two hours later that the 22nd and 24th Battalions would be in position to make their attack. By the end of the day the Beaurevoir Line had now been seized by IX Corps on a 5,000 yard front from Sequehart to Joncourt and by the Australian Corps for 6,000 yards up to the south of Prospect Hill. On the undulating countryside beyond Beaurevoir and Montbrehain still lay in German hands.
 With the British 7th Brigade on their left attacking the village of Beaurevoir, the 22nd and 23rd Battalions of the Australian 6th Brigade attacked on the 4th October towards Geneve and Ponchaux. Both battalions were stopped at the Montbrehain-Geneve road, with every attempt to go farther meeting intense fire from three copses on the ridge ahead. The day ended with Beaurevoir still in German hands but the 6th Brigade’s front protruding between it and Montbrehain. Meanwhile Lieutenant-General Monash received orders from General Rawlinson to retain control of the battle front for one more day until relief by the American II Corps. The 22nd and 23rd Battalions remained in their positions guarding the right flank while the 21st, 24th and the 2nd Pioneers, assisted by twelve tanks would attack and seize Montbrehain. For the Pioneers this would be the first time that they would attack as infantry. The British 137th Brigade would protect the right flank by seizing Mannequin Hill. To the north the British 25th Division would again attack Beaurevoir. At dawn on the 5th October the barrage fell, but with some batteries arriving late shells fell upon the attackers from the 21st Battalion causing losses. In front of the Pioneers the Germans had set up a line of machine guns manned by about 100 men along the railway embankment, but Lieut Wilkinson of the 6th Machine Gun Company managed to outflank them, pouring fire into their positions killing or wounding dozens and the rest simply melted away. This action allowed the right of the line to reach its objectives without further trouble, though operations on the IX Corps front on the right had failed. On the left the 24th Battalion had met strong opposition from posts in the hedges, houses and trenches on the western side of the village plus from the enemy barrage being directed into their positions. Company Sgt. Major Cumming was killed trying to lead a charge and then recently commissioned Lieut. Ingram along with Lieut Pollington (Military Cross) led a rushed attack from both flanks
  killing or capturing forty and taking six machine-guns. Lieut Ingram (photograph left) – Victoria Cross – then with the assistance of a tank captured 63 prisoners from one dugout before bursting into the back of a house where he rushed the cellar stairs capturing another thirty prisoners. The left company of the 24th Battalion had been caught by heavy fire from the village, and its Company Commander Capt. Fletcher killed by a field gun firing at the tank which had come up to support the attack. As the two centre companies attacked through the village their progress was often impeded by French civilians emerging from houses and cellars gratefully greeting their liberators. By noon the northern edge of Montbrehain had been taken. To the north the British 25th Division had captured Beaurevoir. At night two battalions of the 118th Regiment, 30th American Division came up and took over the salient formed by the capture of Montbrehain, in what had been the last and one of the most gallant actions fought by the Australians in the First World War. Although taking its objectives including 400 prisoners, victory came at a high price with 30 officers and 400 men becoming casualties, a consequence of a limited attacking into a salient somewhat reminiscent of the costly attacks at Mouquet Farm two years previous. Ten officers and 110 other ranks had been killed, including some of the best leaders in the 6th Brigade, and many of the best NCO’s that had served with the AIF.
Outcome
 The breaching of the Hindenburg Line system, along with the capture of thousands of prisoners and scores of guns, had been achieved in the Australian Corps sector with relatively light Australian casualties of just over 5,000 men (photograph of the 4th Australian Division Monument, Bellenglise). By the time that the 2nd Australian Division – the last of the Australian divisions to go into battle in taking the final obstacle, the Beaurevoir Line – the Kaiser and the German Government had been informed by Ludendorff that the war was lost and thus had begun their end moves for peace. On the 3rd October 1918 a communique was sent from Berlin to Washington: The German government requests that the President of the United States of America take the initiative in bringing about peace, that he inform all the belligerent states of this request, and that he invite them to send plenipotentiaries for purposes of beginning negotiations. The German government accepts as the basis for peace negotiations the program stated by the President of the United States in his speech to Congress of January 8, 1918, and in his subsequent pronouncements, particularly in his speech of September 27. In order to avoid further bloodshed, the German government requests the immediate conclusion of an armistice on land, at sea, and in the air. Signed: Max, Prince of Baden, Chancellor.
General Rawlinson’s British Fourth Army continued to drive the Germans across the Selle River and took Le Cateau. At the same time across the entire Western Front the British and its Empire soldiers, the French, the Americans and the Belgians in Flanders, forced the Germans into retreat. Back in the rest area, General Hobbs who was commanding the Australian Corps in Monash’s leave of absence was warned on 21st October that the Corps would again be required. As Prime Minister Hughes had promised the Australian divisions that they would have a long and unbroken rest General Rawlinson agreed to a two week delay when on the 10th November 1918 the 1st & 4th Australian Divisions began to move forward to relieve the British 32nd and 66th Divisions beyond Le Cateau. Their progress forward was slowed by time delayed mines that demolished railway, road junctions and bridges. Later that night Marshal Foch ordered that all operations were to cease at 11am the following day.
 FIRST WORLD WAR TIMELINE