
 Background
 Following the Russian Revolution at the end of 1917 and the collapse of their Army on the Eastern Front, the German High Command saw a window of opportunity to decisively go on the offensive before the Americans in mid-1918 would ultimately tip the balance of power in favour of the Allies. General Erich Ludendorff (photograph right) met with his Chiefs of Staff on 11th November 1917 and devised a plan to use their newly gained numerical superiority on the Western Front to punch a hole at the junction of the British and French Armies and to swing north behind the British, thus defeating and removing them from the war and placing Germany in a much stronger position for the eventual peace talks. At the same time most expected that the British offensive around Ypres would resume in the Spring, but the loss of six divisions to support the Italians following the Battle of Caporetto, the shortage of reinforcements following four hard months of fighting during the Third Battle of Ypres plus anticipating a regenerated German Army due to the events in the East, forced a change in attitude by Field Marshall Haig. In mid-December Haig issued an order to prepare for an expected German Spring Offensive and work commenced on developing the British lines of defence.
The new British Armies had yet to specifically prepare and train the art of defence as almost all their instruction since 1915 was to be on the offensive as witnessed at the Somme in 1916, and Arras and Ypres in 1917. Haig believed that it would be almost impossible to stop a massive German strike at the front so the British Armies prepared for defence in depth, comprising three systems with each having at least three lines. The forward line was to be prepared only as an outpost, primarily manned by snipers and machine-gun posts designed to stop all but a major attack. The second system was to be placed some two to three miles behind the front line, built on advantageous ground, and some 2,000 – 3,000 yards in depth. The area between these first and second systems would become the battle zone, and further to the rear was the third or reserve line out of range of all but the heaviest German guns, holding the  infantry ready to counter-attack or seal off penetrations. This was the only period in the war in which the Australian divisions undertook on a large scale the construction of defences with concrete (photograph left of Australian engineers completing a concrete dugout in March 1918). Despite the travails of the recent Ypres fighting and the Flanders winter, spirits were high amongst the Australian infantry battalions now relishing the prospect of dishing out a devastating response, for the first time, behind strong defensive positions.
The German Army had by now developed and refined its own method of attack. By utilising the largest concentration of guns to date, they would be able to provide a brief but devastating bombardment thus maximising the element of surprise. To enable the initial breakthrough the artillery first provided a brief bombardment on the enemy’s command and communications, then the destruction of the artillery and finally an attack upon the enemy front-line infantry defences. A second major change was that the German Army had concentrated many of its best troops into Stormtrooper units (photograph below), trained to infiltrate deep into the enemy lines and bypass front line units, leaving these strong points to be ‘mopped-up’ by follow-up troops of the regular infantry.
 By mid-February 1918 British intelligence now estimated that the Germans now had 178 divisions on the Western Front, with nearly half being opposite the British Army. However Haig felt that the main blow would come against the French to the south, but told his Army commanders to be prepared for an attack across the old Somme battlefields where communication for the British remained difficult. He also felt that the initial blow was less likely to be delivered in Flanders where the ground remained wet much later than to the south. By the end of the month air reconnaissance and other intelligence picked up signs of a new German Army HQ being established between Arras and St. Quentin. By then British GHQ estimated that the German forces in the West had grown to 181 divisions, and during the following fortnight signs of a pending attack became increasingly evident. On 19th March 1918 statements from Alsatian and Polish deserters, a captured flying officer and other prisoners were all pointing to the principal point of attack on the British sector would be in the Arras – St. Quentin sector in the coming days. The troops of the British 3rd & 5th Armies were told to expect an attack on the morning of either 20th or 21st March. However for the men in the front, warnings had been issued before and nothing had happened. In light of the intelligence Haig transferred four of his divisions from the 2nd Army in the north to the 3rd & 5th Armies expected to take the brunt. The triple defence system had been established along the British line, but the sector to the south recently taken over from the French was in the poorest condition.
Combat
 There were four German operations in the German Spring Offensive, or Kaiserschalcht (Kaiser’s Battle) codenamed Michael, Georgette, Blücher-Yorck and Gneisenau. Operation Michael was the first and main attack, with the objective to break through the Allied lines, outflank and then sweep north behind the British forces which held the front from the Somme River to the English Channel, and thus defeat the British Army. Once this was achieved, it was hoped that the French would seek armistice terms but with the Germans in a position of strength. [Map courtesy of New Zealand History – click on image for detail.]
Operation Michael: the First Battle of the Somme, 1918, 21st March – 5th April
 Shortly before 5am on the 21st March 1918, the mighty German force comprising four armies and supported by the biggest barrage of the war so far, with more than three million shells fired in five hours, fell upon the central Allied position between Arras and St. Quentin held by the British Third & Fifth Armies in what was known as Operation Michael, and the start of the German Spring Offensive or ‘Kaiserschlacht’. Aided by the foggy conditions the German Stormtroopers were able to penetrate deep into the British lines. By the end of the first day, the British had lost nearly 7,500 dead and 10,000 wounded and the Germans had broken through at several points on the front of the British Fifth Army. After two days the British Fifth Army was in full retreat. As they fell back, many of the isolated redoubts were left to be surrounded and overwhelmed by the following German infantry. The right wing of Third Army became separated from the retreating Fifth Army, and also retreated to avoid being outflanked.
 Within days the ferocity and speed of the German Spring Offensive saw the advancing divisions achieve territory gains on the Western Front not seen since 1914 and the formation of the trench systems that ran the length of the front. [Map courtesy of Webmatters -click on image for detail.] News began to come in that the German Army were now fighting in High Wood, within a short distance of Pozieres where two summers previous I Anzac Corps fought its bloodiest battle. In fact the British front was broken with the Fifth Army driven back and the serious danger of the separation of the British and French Armies. The orders coming through to the Australian divisions were now in a tone reflecting the seriousness of the situation and that everything must be done to halt the Germans, and for many, at last, this was the very job for which they had enlisted and gone overseas. The 3rd & 4th Australian Divisions were the first to head south and were temporarily assigned to the British 62nd Division holding the line at Hebuterne to the north of Albert. As the troops crammed twenty-five in each lorry moved south, they kept with them their Lewis and Machine Guns plus ammunition as they might have to fight soon after arrival. As the leading brigade of the 4th Australian Division arrived at the previously undamaged town of St. Pol, having once been twenty-two miles behind the front-line, the veteran 4th Brigade entered a town battered by the German long-range guns. The people of the village were loading carts with their possessions to beat a hasty evacuation, but their spirits were lifted by the sight and the reputation of the arriving Australians. The relief of the Australian divisions in Flanders manning the forward positions for their move south began on the 26th March with the 5th Australian Division relieved by the British 19th & 21st Divisions, the 2nd Australian Division (25th Division) at Ploegsteert on 3rd April, and the 1st Australian Division (9th Division) at Hollebeke on the 5th April.
 The stream of retreating British troops, tired and disheartened, were completely intermingled with men from other units and villagers fleeing with their possessions. The Australians were the only ones in sight moving forward. Half eaten meals on cottage tables showed how hurriedly the people had left. The artillery of the 4th Australian Division which just three days earlier been in Flanders arrived by forced march and took up positions to cover the infantry. By nightfall orders were received to probe forward and to secure the village of Hebuterne which in turn was be probed by forward German patrols and by midnight the 13th Brigade had formed a defensive line through the village.
However orders were received that the 4th Australian Division had to urgently march to a new destination south and towards Albert, and the 12th & 13th Brigades who had just reached their billets had to set off on a night march, accompanied by the sound of planes bombing, and machine-guns rattling off to their left. The column moved through almost empty villages, reaching their destination in the once familiar countryside between Warloy and Albert by dawn. The two Brigades of Gen. MacLagan’s 4th Division, plus the three of Gen. Monash’s 3rd Division would temporarily come under the command of VII Corps and be tasked to deploy in a line across the German Army that had broken through and heading towards Amiens between the Ancre and the Somme. If the Germans were not stopped at about the line of the old French defences of 1914/15 to the east of Amiens then the German Army would be free to turn northwards behind the line of the British Third Army and southwards across the Somme and behind the Fifth Army.
 At day break on the 27th March the Australians of the 4th Brigade found themselves looking out over the old Somme battlefield 0f 1916, in many places utilising the remnants of the old support trenches along with their now rusting wire entanglements. Shortly after noon wave after wave of advancing Germans came on in a direction that would take them to the south of Hebuterne and the village of Sailly-au-Bois, but the attack was broken by the 15th and 13th Battalions of the 4th Brigade pouring fire into their flank. At 4pm another column of some 150 Germans were seen advancing but were soon scattered by the joint efforts of the British artillery and the machine guns of the 4th Machine Gun Company firing at almost a mile’s range. During the day the order came through to the 4th
  Brigade and all ranks that ‘no retirement’ from the present position was permissible. On the contrary the young Colonel Marks of the 13th Battalion seeing that the Germans holding the nearby cemetery could make their position precarious ordered its taking, and having been taken by surprise the Germans relinquished this once important strong-point. [Click link for geo-referenced Trench Map reproduced with the permission of the National Library of Scotland].
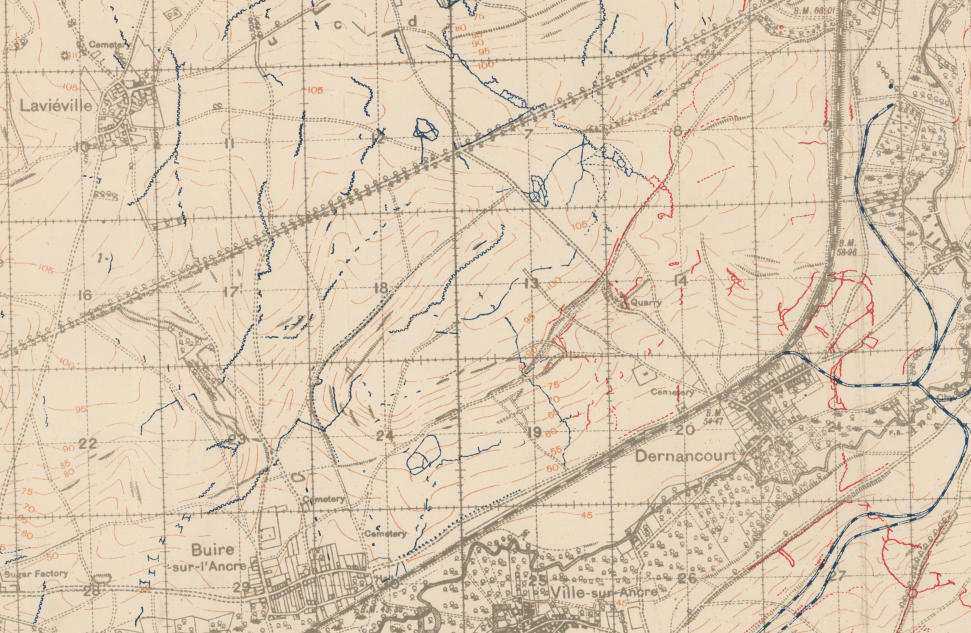 To the south two battalions of the 12th Brigade lay across the eastern end of the summit of the Lavieville Down astride the Albert-Amiens Road, followed shortly by the 13th Brigade to their rear. In the confused state, troops of the 47th & 48th Battalion moving down the slope were both shelled by the Germans and attacked by British planes that had been told that any soldiers to the east of Lavieville were certain to be Germans. They took up positions along the western side of the railway. [See map above and click link for geo-referenced Trench Map reproduced with the permission of the National Library of Scotland]. The divisional artillery had during the day reached the area of Acheux-Lealvillers-Varennes with orders to cover the front between Albert and Dernancourt. Meanwhile the 38th, 37th, 43rd & 42nd Battalions of Monash’s 3rd Australian Division, now the right flank of the British Third Army took up positions between the Ancre and the Somme in the now overgrown old French trenches, without wire, taking over their occupation from small parties, remnants of British battalions that had been over-run and had retreated as the offensive rolled on. Also in the vicinity of this green farming land devoid of mud and shell holes were patrols of British cavalry that were in contact with the enemy, which by now had taken the village of Morlancourt. On the slopes opposite Dernancourt the old abandoned Casualty Clearing Station became a hunting ground for men salvaging blankets, preserved food and other items.
 The following day the Germans made several half-hearted attempts to attack but were beaten back by the 4th Brigade. A number of prisoners (photograph left) were taken as they wandered unawares into their old strong-point at the cemetery. However to the north of the Australians a dangerous gap existed between the 4th Brigade and the British 62nd Division and the Germans probed forward in the direction of Gommecourt.
To the south violent fighting took place as the Germans attempted to cross the railway line between Albert and Dernancourt held by the 12th Brigade, during which on one such occasion Sgt MacDougall (photograph below) of the 47th Battalion was awarded the Victoria Cross. At one stage and out of bombs the defenders could only throw stones in retaliation to the Germans on the other side throwing their grenades. Minenwerfers and shelling were also taking a toll on the exposed men firing over the rails. The 4th Division artillery supported by British batteries focused on the two German assembly points leaving the machine-gunners and riflemen to focus on the attackers that managed to get through the shell fire. To their  south the 3rd Australian Division faced a much lighter task in comparison to the 4th on their left, enabling Monash’s 10th & 11th Brigades to actually push forward into pretty much unclaimed land by a distance of about ½ mile towards Morlancourt, but at a relatively high cost of some 300 casualties. By the end of the day, the spirit of the German soldier had noticeably changed from that of supreme confidence to that of being depressed having been so definitely stopped and the attempt to cross the Ancre between Albert and Buire defeated.
For the men of Gellibrand’s 12th Brigade, who had now been moving, marching, digging and fighting for three days and nights almost without sleep, they were now exhausted but the rain now falling rendered the renewal of a German attack less likely. Furthermore good news was received that on the previous day some 15-20 miles farther north a major attack by the Germans (Operation Mars) on the British front at Arras had been defeated. To the south the situation on the Fifth Army’s front was becoming critical, so Brigadier-General Rosenthal’s 9th Brigade, initially protecting the Third Army’s right flank at the River Somme was ordered south of the river immediately to the rear of Villers-Bretonneux and be placed under XIX Corps of the Fifth Army. To guard the bridges Elliott’s 15th Brigade of the 5th Australian Division were brought to Corbie.
On the 30th March the New Zealand Division made a sharp minor attack on a 1,200 yard frontage to secure the higher ground in front of its centre and in the process captured 230 prisoners and 110 heavy and light machine-guns and the news of this came as a great tonic to the whole of the British Army during these difficult days.
 To the south a German bombardment opened up south of the Somme and on the 3rd Australian Division holding the Ancre-Somme spur, accompanied by German aeroplanes swarming overhead. [See map below and click link for geo-referenced Trench Map reproduced with the permission of the National Library of Scotland]. The Germans were spotted deploying for the attack but even despite being a distance away were met with intense fire leading to confusion in the attacker’s ranks. No Germans were able to get within 300 yards of the 44th Battalion’s outpost line. To their left the 40th Battalion on the hill crest were also able to pour heavy fire into the advancing
  Germans who were soon stopped. Several hundred men tried to take shelter on the Somme flats but the artillery was soon brought to bear upon this group. By 4pm the only visible movement in most of the enemy’s area was that of the stretcher-bearers working among the wounded. That day the 11th Brigade lost some 150 casualties, though the enemy’s was far greater. Actual German losses are difficult to verify – some Australian’s including General Monash – put the number of killed as 3,000. This is likely to be widely exaggerated but the historian of the German 8th I.R. that was involved in the attack stated the attack ‘was a miscarriage such as the division had never before suffered…. Spirit sank to zero…. Was this the end? …Was the offensive beyond our strength?’ During the night the remainder of the Australian 3rd Division’s Artillery came into the line, and with the British 35th Division relieved by the 13th Brigade of the 4th Australian Division the front between Albert and the river Somme was now held by two Australian divisions, each of two brigades with their third still under temporary deployment elsewhere on the
  front. At least for the present the British front line north of the Somme was fairly secure. Furthermore German preparations for the continuance of the advance were hampered by the wet and the lack of railway communications across the old Somme battlefields. After consultations regarding the sufficiency of ammunition Ludendorff ordered a postponement to the offensive for several days. [Photograph left of the 3rd Australian Division Monument on the D1 Corbie road north of Sailly-le-Sec].
 To the south of the Somme, the 33rd Battalion of the 9th Brigade was ordered to mount a counter-attack and with a cycle unit and the cavalry of the 12th Lancers moved forward passing stragglers that had been in the front moving to the rear. The attack began at 5pm through the surrounding woods in the direction of Aubercourt, with the cavalry driving the forward elements of the enemy back enabling the 33rd to get in position to mount the main attack. As the 33rd Battalion advanced, without artillery, they soon encountered the new German front line on the crest of the ridge where
 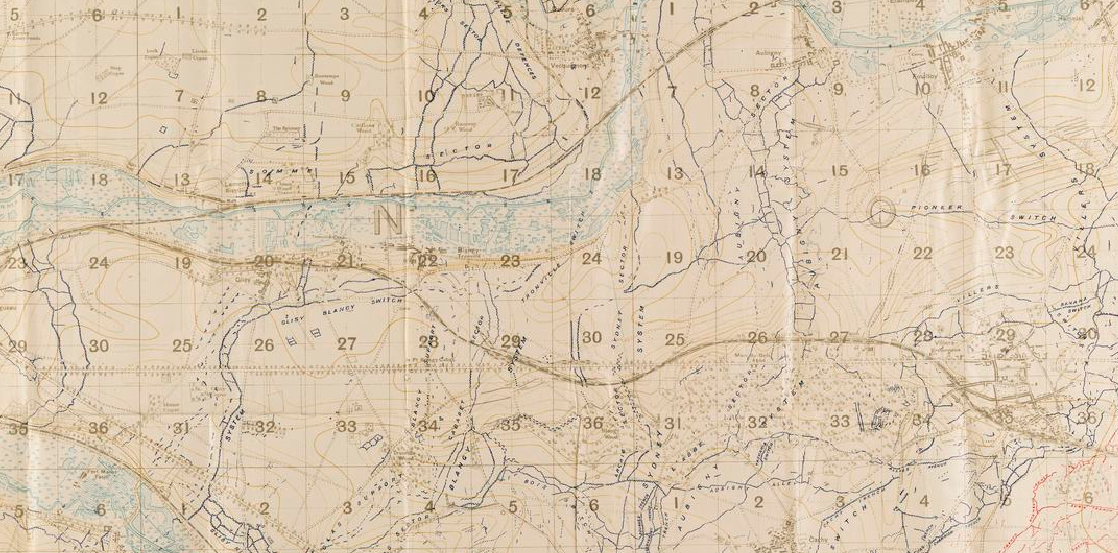 machine-guns were able to enfilade into the attackers. This action was only partially successful in its territorial gains and came at a cost of 200 casualties, but it did have the desired effect of giving a morale boost to the British troops that had hitherto been on the retreat and at the same time to diminish the morale of the enemy. Also that day the 35th Battalion were brought forward to man the defence line of some 2,800 yards in length, immediately to the south and west of the vital town of Villers-Bretonneux. Although long in length, the recovery of abandoned Lewis Guns and panniers resulted in a total of 30 Lewis and Vickers machine-guns to give a formidable defensive fire-power. Being flat countryside and bereft of wire entanglements the men in the forward outposts were ordered to dig deep, and keep low and out of sight. On 1st April and to the north the 16th Battalion assisted by the 13th carried out a small attack and captured a length of trench taking 71 prisoners and 4 machine guns. The front was advanced well down the slope and now lay 250 yards beyond the village. The crisis at Hebuterne had already ended, and the front now seemed to be settling down into trench-warfare. The 4th Brigade, now under the temporary command of the British 37th Division, was seen as the ‘saviour’ of Hebuterne and as a result was kept in the line far longer than normal.
 Now that the German engineers had laid new railway lines enabling artillery and ammunition to be brought forward, the 4th April 1918 saw the resumption of the German offensive across a 21 mile front, starting at 5.30am with a German bombardment falling on all the villages in the area of Villers-Bretonneux southwards as well as the front line itself signalling an imminent attack. Fearing the strength in numbers of the attackers Capt. Coghill, MC, of the 35th Battalion gave orders to not fire until the enemy was close and therefore unable to skirt around their posts, and time after time fire was placed on the attackers who retreated, reformed, attacked and fled again. At 7am the whole German line was seen to advance and with the S.O.S. flare fired the British barrage fell upon the advancing infantry and combined with an intense rifle fire sent them to ground. However on the 35th Battalion’s left flank the Germans had broken through the British 14th Division on the north of the Roman Road and began to appear in their rear. With the position becoming precarious and the retirement of the 7th Buffs on their right, Coghill, himself having been wounded twice during the attack, was also forced to withdraw. By 11.35am the troops of the 3rd Australian Division north of the Somme spotted German infantry entering the village of Hamel, but although British infantry were retreating the Cavalry in the area performed well to help secure a new defensive position to the north-east of Villers-Bretonneux up to Hill 104 which commanded observation both east over the Germans and west to Amiens. In the afternoon the Germans broke through the British to the south of the 9th Brigade. Seeing this happen the 35th Battalion ordered its right flank to withdraw and form a defensive flank, but seeing some men moving rearwards along with the withdrawal to the right, lacking Coghall’s leadership the rest of the right of the 35th and 33rd Battalions simply got up and retired. This event caused consternation at headquarters and the 36th Battalion was ordered to counter-attack. Moving at a jog-trot the 36th quickly passed the crest of the hill and came in view of the advancing Germans, who at once hesitated and turned back into the wood. During the successful counter-attack the 36th Battalion lost 150 men, a quarter of its strength. Meanwhile on the Roman road the 33rd Battalion leapt at the chance of counter-attacking with the Cavalry, with their swords and lances drawn, while at the same time three cars of a Canadian motor machine-gun battery lent by the IX Corps roared into action. The German offensive of the 4th April, though it had failed in its objective, had driven back the British Fourth Army on its whole front and at some points for nearly two miles. To the south the French had too been forced back but with reinforcements arriving the danger was probably less than at Villers-Bretonneux. The defence of Villers-Bretonneux predominately by the 3rd Cavalry Division and the 9th Brigade, who lost 30 officers and 635 men during this period, had a major influence on the outcome of the spring campaign in this area. A continuous line, albeit a thin one had been re-established north as well as south of the railway. Meanwhile the 5th Brigade having just arrived from Flanders with the rest of the 2nd Australian Division was detached from its sister brigades and assigned to hold the reserve line (known as the Aubigny Line) behind the northern flank of the Fourth Army and with the 8th Brigade now also in reserve General Rawlinson was feeling happier about keeping the Germans out of Amiens.
 To the west of Villers-Bretonneux masses of Germans were seen apparently digging themselves in but the machine gun and trench mortar crews setting up there offered rich targets to the men of the 36th Battalion. At Dernancourt (aerial photograph right, showing the village and to the bottom left the slope leading down to the railway embankment) early morning patrols of the three front-line battalions of the 12th & 13th Brigades reported Germans massing to the west of the village into which a nearby Stokes Mortar Battery sent ten rounds. General Gellibrand ordered the artillery to fire on its S.O.S lines and then at 7am the German artillery opened up on the 4th Australian Division and its artillery with an intensity not witnessed since Pozieres two years previous. Fifteen minutes later German infantry could be seen moving down from the Morlancourt hilltop, but with all telephone lines cut and fog hindering observation no word of the enemy action was received at
  divisional headquarters in the rear. Over the next few hours reports and rumours were coming in that the Germans had breached the railway embankment (photographs above and below) and were pushing up the slope with prisoners being taken. Section by section the 47th, 48th & 52nd Battalions began a rear-guard action as they with the exception of the flank platoon of the 48th on the Amiens road and the right of the 52nd still on the railway withdrew up the exposed slope. By 1pm the 49th Battalion had been ordered to counter-attack and moved forward from its reserve at Lavieville. The counter-attack supported by the withdrawing battalions on the flanks and accompanied by a heavy short bombardment was one of the finest undertaken by the Australians and despite facing heavy small arms and machine-gun fire as they rushed over the crest and down the slope, they
  regained the majority of the support line just failing to recover the most optimistic of objectives, the railway embankment. During the fighting at Dernancourt the 12th Brigade suffered 580 casualties, the 13th Brigade approximately 500 plus a further 153 in the field artillery supporting the 4th Australian Division, who during this engagement fired 27,558 rounds.
Further north the 4th Brigade and the New Zealand Division, having endured one their most fierce bombardments of the war, beat off a strong German attack with the villages of Hebuterne and Colincamps their objectives. Meanwhile in the early hours of the 7th April the newly arrived 5th Brigade were tasked with re-taking Hangard Wood to the south of Villers-Bretonneux. The attack by the 19th & 20th Battalions failed primarily because the northern half of objective in front of the 19th Battalion was not tenable on account of the spur of high ground just beyond which gave the Germans an unassailable advantage. The two Australian battalions lost 151 officers and men in the operation.
During Operation Michael the Allies lost nearly 255,000 men, 1,300 artillery pieces and 200 tanks, but all of this could be replaced particularly with the American manpower. German troop losses were 239,000 men, many of them specialist Stormtroopers who were irreplaceable. Although achieving significant success and territory gains on the Somme in the first week of their Spring Offensive, the German Army was becoming exhausted, it’s elite units depleted, and it was becoming increasingly difficult to move supplies and artillery forward to support the advance across the wastelands of the 1916 Somme battlefields plus the destruction caused by the Germans themselves during the 1917 withdrawal to the Hindenburg Line. In terms of morale, the initial German jubilation at the successful opening of the offensive soon turned to disappointment, as it became clear that the attack had not achieved decisive results. With the defence by the British and French Armies now stiffened the German advance was held short of their objective of Amiens, around the village of Villers-Bretonneux. As a result Ludendorff called off Operation Michael on the 5th April and his attentions now moved to the next phase of the offensive.
Operation Georgette: the Battle of the Lys, 9th – 29th April 1918
 As the 3rd & 2nd Brigades of the 1st Australian Division were marching to relieve the 3rd Australian Division in the Baizieux and Corbie areas of the Somme, a disturbing message was received at its headquarters that the Germans had on 9th April attacked the previously quiet sector of the front held by the Portuguese troops between the La Basse canal and Bois Grenier and had penetrated four miles on a ten mile front. They later heard that the front had been extended north of Armentieres which the I Anzac Corps had just left. At 7.30pm came a message countermanding all moves previously laid down for the division and warning it to be prepared to entrain next day for the north. Unbeknown at this stage to the Australians, the Germans had launched their next phase in the Kaiserschlacht – Operation Georgette – with the thrust towards the vital British rail-head at Hazebrouck and gateway to the Channel ports of Calais, Boulogne and Dunkirk. The belts of wire entanglements and concrete strong-points built so diligently by the Australians during the previous winter were overrun in just a few hours. By 8.30 in the morning the Germans had actually reached Ploegsteert. Having to fight in this rear-guard where elements of the Australian Tunnelling Company, Engineers and Heavy Trench Mortars still in this area. By the end of the day, the few British divisions in reserve were hard-pressed to hold a line along the River Lys. On 11th April Field Marshal Sir Douglas Haig issued an ‘Order of the Day’ stating, ‘With our backs to the wall and believing in the justice of our cause, each one of us must fight on to the end.’
 At daylight on 13th April battalions of the 1st Australian Division began to take over forward positions around Strazeele (photograph left and see trench map below, reproduced with permission from the National Library of Scotland), having past refugees with laden carts on the roads heading west then into empty villages and abandoned houses. Six miles of the army’s emergency front line was being held by the 7th, 8th, 3rd & 4th Battalions from south to north, with their outposts behind hedges, in back-gardens, or orchards of farmhouses and cottages. Farmhouses became prime targets for the artillery of
  both sides, being reduced to ashes by incendiary shells within a matter of days. At dusk it was evident that most of the troops previously ahead of the Australians would have withdrawn to their rear before the next morning. The first attack on the 1st Australian Division’s new front line at Hazebrouck was made shortly after midnight when a company of Germans came marching up, and the Australians holding their fire until they were within twenty yards, were met with withering fire and whose survivors panicked and fled. At daylight of the following morning Germans were seen massing and marching forward for an attack. The seven brigades of the Royal Field Artillery covering the Australians effectively scattered the attackers. The Lewis gunners and machine-gunners had rich targets albeit at long ranges of a half mile and more. The waves that got closer were met by rifle fire from the forward posts. With the exception of two posts of the 8th Battalion which were destroyed, nowhere else did the Germans reach the Australian posts. Along with the British 5th Division, the Australians had completely stabilised the front between Hazebrouck and St.Venant, and furthermore the British First Army to the south had thrust back the Germans. For the Germans attacking from Merris, the battle of the 14th April was their third day in which they had come against a stubborn defence and the stress was beginning to take its toll, and with this set-back the offensive was suspended to the south and west of Armentieres. [Click link for geo-referenced Trench Map reproduced with the permission of the National Library of Scotland].
 Just to the north of the Australians the Germans attacked on the 16th April in front of Meteren where two companies of the New Zealand reinforcements held out in front of the village but were cut off resulting in the largest capture of New Zealand prisoners during the war. That day the Germans also succeeded in capturing Wytschaete and with their success at Bailleul turned the attention of the British 2nd Army HQ upon the northern half of the battlefield, and the fear was now Mount Kemmel overlooking in almost all directions the plain of Flanders. On the 17th April the Australian sector at Strazeele was shelled heavily, and although the guns had yet to be accurately registered on the positions of the main targets, the village and the railway station were wrecked. At 10am the Germans attempted to attack up the valley between Merris and Meteren but were met with a deluge of fire from the 4th and 1st Battalions. The 1st Brigade estimated that they had caused between 1,500 – 2,000 casualties whereas the 3rd Battalion to their south estimated that at the railway embankment their Lewis and machine-gunners had accounted for 700 casualties. By contrast the casualties in the 1st Australian Division were few.
 Having sensed the spirits of the Germans had waned a plan was hatched to counter-attack and recapture the village of Meteren (photograph left) without the aid of artillery but reliant upon surprise. The attack was to be made in two phases, the first a thrusting of the flanks on either side of the village to make the attack of the following night easier. The first phase on the night of the 22nd April by the 11th and 12th Battalions was a success at the relatively light cost of 33 casualties. For the second phase of the Meteren attack the 9th & 10th Battalions advanced under bright moonlight and as a result were easily seen by the enemy and machine-guns opened up. The attack was repulsed and cost the 3rd Brigade 160 men. Evidently the element of surprise for this attack had been lost with the success of the previous night! On 25th April the Fourth German Army in Flanders attacked Mount Kemmel and captured it. However, with the German offensive stalled because of logistical problems, exposed flanks, the counterattacks by British, French and Anzac forces which had slowed and stopped the German advance, Ludendorff ended Georgette on the 29th April. Hazebrouck remained in Allied hands and as the British abandoned the comparatively worthless territory they had captured at vast cost the previous year in the Third Battle of Ypres thus freeing several divisions to face the German attackers, the newly occupied land was now a vulnerable salient under fire from the British on three sides. As with Operation Michael, losses were roughly equal on both sides with approximately 110,000 men wounded or killed.
Villers-Bretonneux: 24th – 26th April 1918
 A feature of the German Spring Offensive was the frequent change in operational targets and after a lull in the fighting on the Somme Ludendorff gave the order for the resumption of the advance, firstly the capture of the village of Villers-Bretonneux and its heights that lay just to the east and overlooking the strategic city of Amiens. Unknown to the Allies at this time this was not a resumption of the strategic push to take Amiens but more of a diversion to Operation Georgette currently taking place in Flanders and keeping the British under pressure across the entire front. Since the cessation of Operation Michael on 5th April limited fighting had continued as witnessed on the 15th April when the 18th Battalion attempted to re-take Hangard Wood but as with the earlier failed attempt by their sister battalions of the 5th Brigade they too failed with approximately half of the 180 men that took part becoming casualties. The French who were also attacking on their right had success taking and holding the cemetery.
By now strain was being felt on the entire British front, with seven divisions needing withdrawal and rest after four weeks of the offensive, being severely under-strength and vulnerable if the German attack was continued. To assist in this situation General Ferdinand Foch (photograph above) who had now been given the role as co-ordinator and then Supreme General of the Allied Armies agreed to send French divisions north to bolster the defence around Amiens. On the 18th April the French First Army attacked south of Villers-Bretonneux and partially succeeded in pushing the Germans back about half-a-mile on several miles of front at the junction of the Avre & Luce rivers.
 On the previous day the German artillery drenched the village of Villers-Bretonneux with 12,000 gas shells, repeating the exercise the following day causing the defending battalions to lose a considerable amount of their men. A captured German confirmed that this gas bombardment was as a prelude to coming attack on the village.
In the skies above the Somme there was much activity with Erich von Richthofen’s red squadron again involved. While chasing a British scout over the Australian area von Richthofen (photograph left) was himself attacked by a Canadian airman Captain Roy Brown who thought he saw the Red Baron collapse under his fire. Brown broke off but noticed the other two planes fly on for about a mile, flying low along the valley and now a target for the many Lewis gunners and riflemen on the ground. As the two planes rose to clear the hill to the east of Corbie, von Richthofen swerved and crashed. There is still debate whether it was Capt. Brown or an Australian gunner that was responsible for von Richthofen being killed.
 At 4.45am on a misty 24th April 1918 an intense artillery bombardment including gas shells fell on Villers-Bretonneux extending six miles south of Hangard into the French sector. [Maps courtesy of Australians on the Western Front.] The village and its front was held by the British 8th Division, a particularly good British division but which had lost half of its 10,000 infantry in the March offensive. Reinforcements now coming from England included many young fresh-faced soldiers, and in some cases battalions were manned more than half by boys under the age of nineteen. To the north and rear of the town Brig-Gen. Elliott’s 15th Brigade was in divisional reserve, with the 14th Brigade manning the front to the north of the village. If the village was lost Elliott had already primed his 59th & 60th Battalions for the counter-attack. Around 8am patrols from the two 15th Brigade battalions came across both wounded and non-wounded British troops that the Germans were attacking with tanks. By 8.35am the 56th Battalion in reserve of its 14th Brigade on Hill 104 could see the village and that the Germans were holding it and now advancing north i.e. around the front of the 14th Brigade, but the position was secured through both the 56th Battalion and a battery of British field artillery firing at point blank range. At about noon the 8th Division began their counter-attacks, the first of which was delivered by three heavy – one ‘male’ and two ‘female’ – tanks. Heading for the vulnerable Cachy Switch Trench the tanks soon came across at a distance of 300 yards a German tank with two waves of infantry approaching, and two more tanks on either side. The machine-gun carrying ‘female’ tanks were no match and after being fired upon retired leaving tank
  commander Lieut. Mitchell in his ‘male’ tank carrying two six-pounder guns to fight what would become the first tank duel with the leading German tank, manoeuvring to bring first one gun into action and then the other. Eventually Mitchell took the risk of stopping to give the gunner a better platform and at once hit the opposing tank three times causing the crew to abandon and flee (photograph above of the disabled German tank ‘Mephisto’). Seeing this and to his surprise the two other tanks turned and made off. As Mitchell retired after being hit by artillery shell he was passed by seven light ‘Whippet’ tanks speedily coming in to action to clear up the situation in front of Cachy, causing havoc to the German battalions forming up in the open. German artillery and their remaining tanks fired at the whippets putting four out of action, but by now the contemplated attack by the Germans had been foiled. As for the British, the only counter-attack carried out with success by the infantry was by 2nd Royal Berkshire in front of the 14th Brigade’s position on Hill 104. At 9.30am and as soon as General Rawlinson had learnt of the loss of Villers-Bretonneux he ordered the nearest Australian reserve brigade, the 13th billeted at Querrieu north of the Somme, to march south at once to the III Corps to assist in the recapture of Villers-Bretonneux, which as he put it was ‘imperative to the security of Amiens’.
 At 10pm on the 24th April 1918 the British artillery opened on the village of Villers-Bretonneux as the two brigades of the AIF, the 15th Brigade to the north and the 13th Brigade to the south, prepared to counter-attack and to encircle and then regain the village. Within five minutes the German barrage started to fall on the assembly positions and at 10.10pm with all battalions in position the attack commenced. For the 51st Battalion of the 13th Brigade they had to pass a wood on their left which had supposedly been cleared by the British earlier in the day but flares were soon in the air and German machine-guns enfilading their advance. Pressing on to their objective at Monument Wood would have been futile at this stage so the local decision was taken by Lieut. Sadlier (photograph below) to attack the wood and bomb the guns out. His attack for which he was awarded the Victoria Cross was extraordinarily bold taking the German machine-gunners by surprise and with the Western Australians fighting wildly in the dark and amongst the
  trees. By this audacious attack all the machine guns along the edge of the wood were eventually silenced and a great danger was removed from the flank of the advancing brigade. To the centre and right better progress was made, but in one incident they ran into a party from the 2nd Devon and 1st Worcester who unaware of the counter-attack thought that they were being attacked by Germans from the rear. As the 13th Brigade advanced they had to now negotiate the diagonally running wire entanglements that had been erected to stop the Germans, who by now had positioned their outposts on the other side of the wire. By morning the wire was lined by the dead of the 52nd and 51st Battalions. Some 500 yards beyond lay a stronger line of defenders but once having engaged with their Lewis guns the Australian line rushed yelling and shouting and the Germans, newly arrived from the eastern front and not used to this ferocity, turned and ran as the 52nd chased the fleeing parties into the dark between the Monument and Hangard Woods The 51st on the left, whose progress had been hindered earlier by the fire from the woods plus the railway embankment that ran to the south of the village, reached a quarry in which several British wounded who had lain there since the previous morning were found, along with a German tank lying on its side. However the objective at Monument Wood was becoming less achievable as the attack moved forward with the Germans to the left and rear in the village, and the 7th Bedford’s on the right not in contact with a flanking company so a decision was made to establish a defensive line on the high ground behind the quarry. Although short by between a quarter and a mile from their objective, they had still pushed forward a mile and in a position to squeeze out the Germans in the village if the 15th Brigade to the north were able reach its objective.
 The progress of the attacking battalions of the 15th Brigade to the assembly position was slow on account of the dark and gas lying on the low ground. Lieut-Col. Marshall of the 60th Battalion took the decision to wait until the attacking companies of the 59th and the supporting 57th Battalions had arrived. As a result the brigade did not advance until midnight, two hours after the allotted time. The first part of the advance proceeded well in silence, and when a flare was fired the men would remain motionless. Once seen a machine-gun began to open up firing high and erratically at which point the order was given to charge and with it unleashed with a ferocious roar the infantry that with their rifle and bayonet gave no quarter to the enemy machine-gunners. This half hour would rank as one of the wildest experiences of the Australian infantry during the war. The main fighting was on the right where the brigade brushed the village, while to the north and on the plateau the Germans were manning the old British reserve trench that had been dug by the 5th Australian Division. The 60th and 59th having passed the north of the village continued rushing south-eastwards pursuing the fleeing enemy and killing those that remained in their shell-holes, until the objective of the old Roman road on the right and the Villers-Bretonneux-Hamel road was reached, and with what turned out to be relatively few casualties. However there was now confusion as the right battalion, the 57th, had been given orders to move on to what was the old British front line. With senior command not yet available, local commanding officers Capt.’s Peacock and Morgan decided to push on to what was now the old British out-post line, but there was no sign of the 13th Brigade on their right and unbeknown to them they were about 1,500 yards past the farthest point reached by the 13th Brigade attacking the Monument. Their northern flank was about 700 yards ahead of the 59th, and with the Germans beginning to out-flank them the decision was made to abandon the attempt to cross the Roman road so they withdrew to the captured trench-line in the rear of the 59th.
 By 4am on the 25th April, the third anniversary of the Anzac Landing, the 15th and 13th Brigades had established themselves in a position around the village, albeit not fully surrounded, to make the enemy holding and reinforcing of the village difficult. However the Germans had yet to be forced out as the attack by two battalions of the British 8th Division allotted with the task of attacking where the Germans most expected it had suffered heavy losses in their failed attempt. As daylight came sniper fire increased from the houses in the village. The task of clearing now fell to the 57th Battalion. Every now again a machine-gun opened on them from one of the houses, a Lewis gun would pour fire on it from the front while other men made their way round and bombed from the rear, and finding themselves surrounded the Germans surrendered. This process repeated itself as the troops advanced. By the time the main street was reached 300 prisoners had been taken. Some of the scattered German parties fought stubbornly, while 200 were seen retiring across the open country south of the railway towards Monument Wood. To the south the 13th Brigade were approached by three white-flagged Germans carrying messages that they were surrounded on three sides and should surrender forthwith to avoid destruction. By now the Germans in the wood to the rear had been cleared and the response to the Germans was short and less than courteous! As it turned out, and confirmed by the three whippets which went on one of their fast reconnaissance behind enemy line, this was just a bluff, but for the Australian troops digging in this added to their anxiety particularly as a tremendous bombardment began to fall on them at 7am for an hour. At 10am a gap of 500 yards still existed either side of the railway, but due to the machine-guns at the Monument and Hangard Wood sweeping the plateau during the day it would not be until the early hours of the next morning that the gap would eventually be closed.
As daylight broke on the 26th April the Australians of the 13th Brigade looked on with admiration and astonishment as the Moroccan Division advanced en-masse across the plateau to take Hangard Wood, but faced with a storm of machine-gun fire from the Wood and the Monument they were cut down, the suicidal attack costing the division some 3,500 casualties. The task of securing the position north of Villers-Bretonneux by improving the connection between the 15th and 14th Brigades was undertaken by the left company of the 60th Battalion, eliminating the re-entrant through a series of rushes that resulted in the Germans retiring. Although the straightening operation had been a success it actually cost the 60th Battalion more casualties than the main attack. The line was thus complete and lay upon its objective. After a furious bombardment the enemy were seen gathering for a counter-attack, but the machine guns of the 25th Company, the captured German machine-guns, Lewis guns and the artillery caused the enemy to scatter and the threat faded.
The Villers-Bretonneux operation cost the 13th Brigade the most with 1,009 casualties compared to the 455 in the 15th Brigade. The 51st Battalion alone lost 365 officers and men, mainly as result of having to skirt the Bois l’Abbe and in passing the wire near the Cachy Switch. However the Australians had 2,473 casualties in total, many on account of the gassing during the German bombardment. In all the British, including the Australians, had approximately 12,000 casualties, while the Germans on are estimated to have lost 8,000 men.
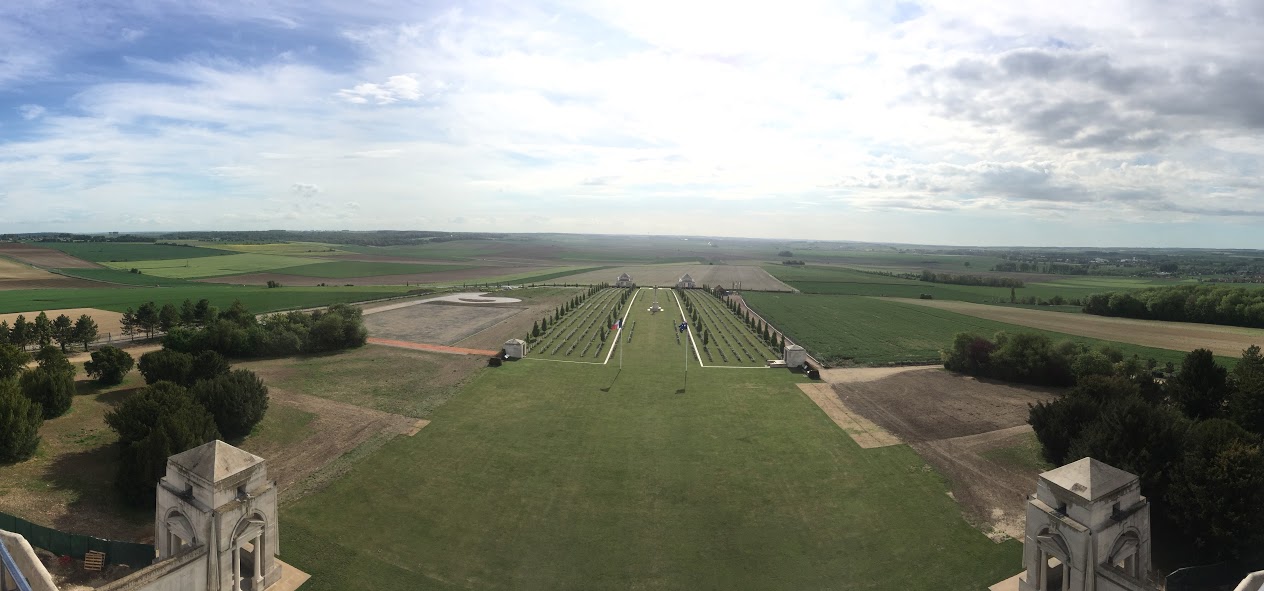 The counter-attack at Villers-Bretonneux brought great fame to the Australian infantry, and although falling short of its complete objectives had rescued the Allies from a dangerous situation. This was a very bloody operation, which did flout some of the rules for this type of operation, but was cited as one of the most impressive operations of its kind on the Western Front. For the Germans the attack on Villers-Bretonneux was in fact just a feint designed to keep the French from reinforcing the hard pressed British in Flanders, but once the limitations of their intentions had been realised it just became a costly and counter-productive waste of men, similar in reverse to the Fromelles attack that the 15th Brigade were victims of two years previous. Indeed it would have been far more effective if the preparation and apparent concentration of troops and artillery had been continued for several weeks, and ended without action.
Operation Blucher-Yorck: the Third Battle of the Aisne, 27th May – 6th June
 While Operation Georgette in Flanders ground to a halt, a new attack on French positions was planned to draw forces further away from the Channel and allow renewed German progress in the north. The strategic objective remained to split the British and the French and gain victory before American forces could make their presence felt on the battlefield.
The German attack took place on 27th May 1918, between Soissons and Reims. The sector was partly held by five depleted British divisions – 8th, 19th (Western), 21st, 25th & 50th – which were ‘resting’ after their exertions earlier in the year. In this sector, the defences had not been developed in depth, mainly due to the obstinacy of the commander of the French Sixth Army, General Duchêne. As a result, the German artillery fire was very effective and the Allied front, with a few notable exceptions, collapsed. Duchêne’s massing of his troops in the forward trenches also meant there were no local reserves to delay the Germans once the front had broken. Despite French and British resistance on the flanks, plus the morale boosting success of the Americans at the Battle of Cantigny on the 28th May in what was the first American attack in the war, German troops advanced to the Marne River and Paris seemed a realistic objective. There was a frenzied atmosphere in Paris,  which German long-range guns had been shelling since the 21st March, with many citizens fleeing and the government drawing up plans to evacuate to Bordeaux. Although just 35 miles from Paris, the German Army was beset with supply shortages, fatigue and a lack of reserves to replace the mounting casualties. As before losses were much the same on each side: 137,000 Allied and 130,000 German casualties up to the 6th June. However German losses were again mainly from the difficult-to-replace assault Stormtrooper units.
Operation Gneisenau: the Battle of Matz, 9th – 13th June 1918
Ludendorff sought to extend Blücher-Yorck westward with Operation Gneisenau, the last of the four great operations in the Kaiserschlacht, intending to draw yet more Allied reserves south, widen the German salient and link with the German salient to the north at Amiens. The French had been warned of this attack by information from German prisoners, and their defence in depth reduced the impact of the opening artillery bombardment. Nonetheless, the German advance consisting of 21 divisions attacking over a 23 miles front along the Matz River was impressive, resulting in gains of 9 miles despite fierce French and American resistance. At Compiegne a sudden French counter-attack on 11th June by four divisions and 150 tanks with no preliminary bombardment, caught the Germans by surprise and halted their advance. Gneisenau was called off two days later, and losses were approximately 35,000 Allied and 30,000 German.
Outcome
Throughout the winter of 1917/18 the British had been expecting and hence preparing for the German attack. The strategy had been to hold fast and weather the pending storm to allow the Americans to arrive in sufficient numbers for the final push to victory. Although Ludendorff failed in his full intention to break the British Army and be in a position of strength during the peace negotiations the 109 German infantry divisions thrown against the 55 British and one Portuguese had within days put the Allies into crisis and to question whether their strategy had been right. In the end the French threw 41 divisions into the battle and along with the Belgians taking over a section of the British line had enabled the British to weather the storm, but at a cost of some 300,000 men with eight divisions so reduced that they had to be withdrawn from the line.
In First World War terms the Kaiserschlacht offensives had yielded large territorial gains for the Germans. However, victory was not achieved and the German armies were severely depleted, exhausted and in exposed positions. The territorial gains were in the form of salient, often war-torn land with little value, which greatly increased the length of the line that would have to be defended when Allied and particularly American reinforcements gave the Allies the initiative. The German High Command predicted they would need 200,000 men per month to make good the losses suffered. Returning convalescents could supply 70,000–80,000/month but there were only 300,000 recruits available from the next annual class of eighteen-year-olds. Even worse, they lost most of their best-trained men plus the German leaders had been placing an immense demand on the spirit and energy of their troops, something that could not last for ever. 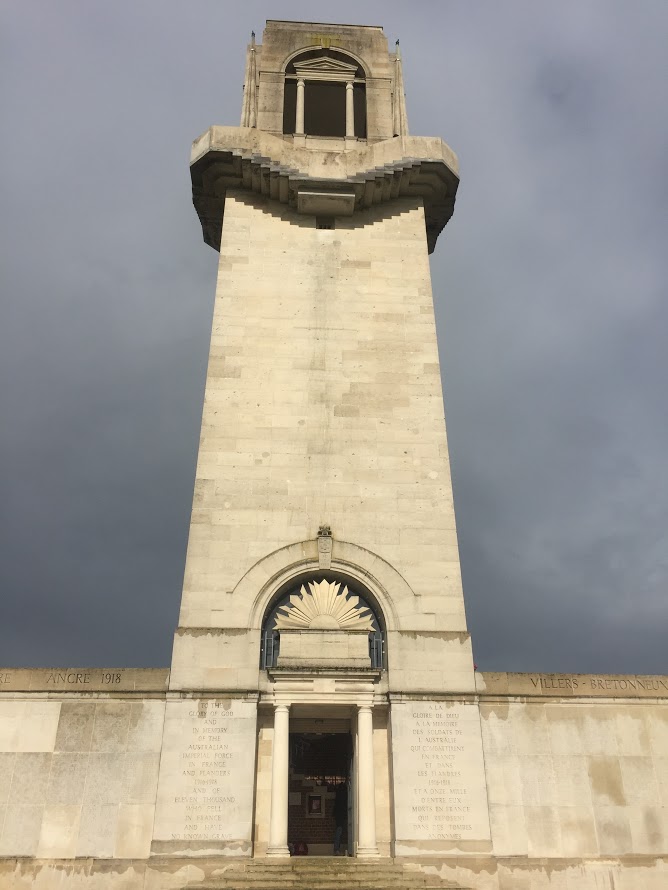 Indeed signs were there to be seen in the halted infantry at Villers-Bretonneux that a belief in victory was now evaporating and the fighting spirit as a whole had fallen well below those, particularly of the Australians, who relished this back to the wall situation and whose morale remained high. It is at Villers-Bretonneux that the Australians have their main National Memorial in France (photograph right), along with the Sir John Monash Centre opened in 2018 commemorating their men that fought and died during the Great War. The Memorial is the setting for the Dawn Service held annually on 25th April, Anzac Day, and also the anniversary of one of their finest victories in the war at this very spot.
The heavy fighting did take its toll on the AIF. For the Australian force the 15,083 losses between 21st March and 7th May resulted in the need for re-organisation, something that was dreaded by all, and particularly for the men of the 36th, 47th and 52nd Battalions that were earmarked for disbandment. For the British, the stream of reinforcements through conscription increased from a trickle to a flood, but mainly with the use of boy soldiers under the age of 19, many of whom were good but still lacked the hardening process and thus thrown headlong straight into some of the hardest fighting of the war.
 Once the German Spring Offensive had been halted and run of steam, the months of May and June were quiet and stagnant on the British front. However while the British Army was recovering from the hard fighting of March, the Australians alone were on the offensive – not an offensive of grand attacks and large advances but a series of nibbles, raids and local operations known as ‘peaceful penetration’ carried out with a daring and stealthiness that stressed and unnerved the enemy opposing them in their out-posts and trenches. [Photograph left of a stone and plaque unveiled April 2018 at Dernancourt commemorating the halt of the German Army by the Australians at the railway embankment].
 FIRST WORLD WAR TIMELINE