25th December 1916: Although the mud had made infantry attacks futile, artillery with plentiful supplies of shells was tasked with maintaining violent harassment of enemy trenches, roads, billets and battery positions. This included on Christmas Day at around midday when it was expected that the Germans would be sitting down to their midday feast when every gun of the Fourth and Fifth Armies fired two rounds at the points where the enemy might be gathering. Thus the fraternisation that existed in 1914 and to some extent in 1915 was entirely absent in 1916. This action was not very popular with the British troops, including General Legge of the AIF 2nd Division who made his feeling felt to a visitor before the bombardment began.
24th December 1916: The first minor offensive by the AIF 3rd Division as a raid by the 33rd Battalion entered the German trench besides the Armentieres-Lille railway but found this section deserted. This was a consequence of the new principle of ‘defence in depth’ and as a result the front line trench became merely the site for widely spaced outposts. From the 16th November very little was attempted on this front for the rest of the year. One such instance was a platoon of the 32nd Battalion (AIF 5th Division) attempted a raid against Finch Trench, but with casualties being sustained from fire from their own artillery, twelve men lost their way and were captured.
12th December 1916: In the Flers Sector on the Somme, Fritz’s Folly salient, abandoned by the enemy, was occupied by a scouting party of the 6th Battalion. A mine had been left beneath a stairwell as a welcoming present but was discovered in time.
9th December 1916: First experience of action for the AIF 3rd Division in the Armentieres sector as a party of 30 Germans raiders attempted to take the trench of the 38th Battalion but were repulsed.
27th November 1916: The 9th Brigade of the AIF 3rd Division began to take over the front-line trenches in the ‘nursery sector’ close to the south of the River Lys, followed by the 10th Brigade on 1st December and the 11th Brigade later in the month on 22nd December.
22nd November 1916: Having received further training in England, the AIF 3rd Division arrived at the ‘nursery sector’ at Armentieres within its allotted II Anzac Corps. Major-General John Monash took over command two days later.
14th November 1916: The 2nd Pioneers had completed a convenient ‘jumping off trench’ for the next attack to be conducted by the 19th Battalion and with the 25th and 26th Battalions from the 7th Brigade operating under the orders of the 5th Brigade. Zero hour was at 6.45am. The 26th Battalion attacking the right at first succeeded in entering the first and second trenches but was quickly repulsed. In the centre and left, the 25th and 19th Battalions had success and taken their objectives, but they too were counter-attacked over the next day. During this attack the Australian forces suffered 901 casualties, along with over 500 from the supporting British Divisions on their flank. As with previous attacks, the Germans had been expecting it through observations and the digging of the new JOT. This attack ended a series of operations for the Australians in the most difficult of conditions, and four days later Haig would suspend the great Somme Offensive of 1916 for the winter.
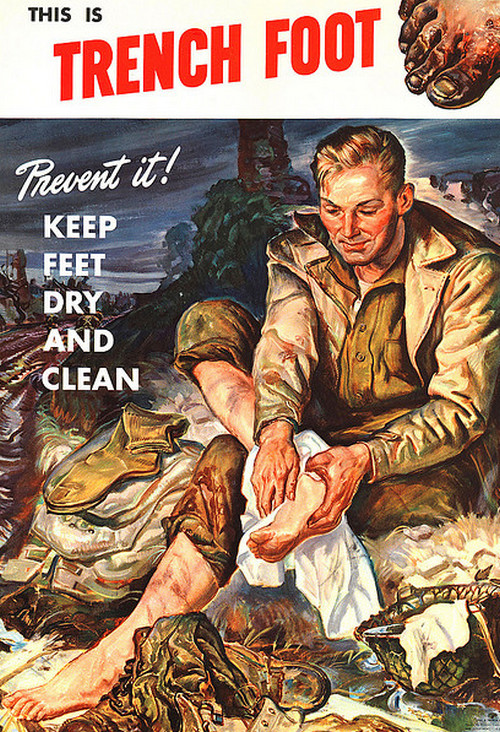 11th November 1916: At the height of the problem of ‘trench feet’, General Birdwood circulated a memorandum to the junior officers that it was up to them to ensure the well-being of the men under their command.
7th November 1916: A day of drenching rain and gale force winds. The conditions were now so appalling that the next attempt to break the German line scheduled for the 9th was postponed to the 14th. As Bean wrote, the attacks of the 4th/5th and the 14th and the interval between them formed the most trying period ever experienced by the AIF on any front.
5th November 1916: AIF launch first major attack since returning to the Somme. Despite the rain and thoughts of postponement, the 7th Brigade and the 1st Battalion of the 1st Brigade mounted separate attacks in the Flers Sector. For the attacking battalions of the 7th Brigade, short of rations due to the bad conditions, just getting to the front-line was exhausting. The 28th Battalion when crossing No Man’s Land noticed that many Germans appeared in the trenches in front on account of the trench being wrongly marked and the barrage already past. As a result they were met with heavy rifle and machine gun fire. The 27th Battalion to their right at first fared better, but too was forced to withdraw. With the gale force winds preventing aeroplanes from flying for reconnaissance and belief that the attack was succeeding, two platoons of the 28th Battalion were also sent forward to reinforce, but met a similar fate to the first waves. Except for a tiny foothold in The Maze trench, which was lost two days later, no ground had been won, with the 7th Brigade suffering 819 casualties. The British 50th Division which had attacked towards the Butte de Warlencourt to the left also failed with 700 casualties. Meanwhile the smaller attack by the 1st Battalion failed, and in the difficult conditions resulted in 170 casualties for the 1st and 38 in the supporting 3rd Battalion.
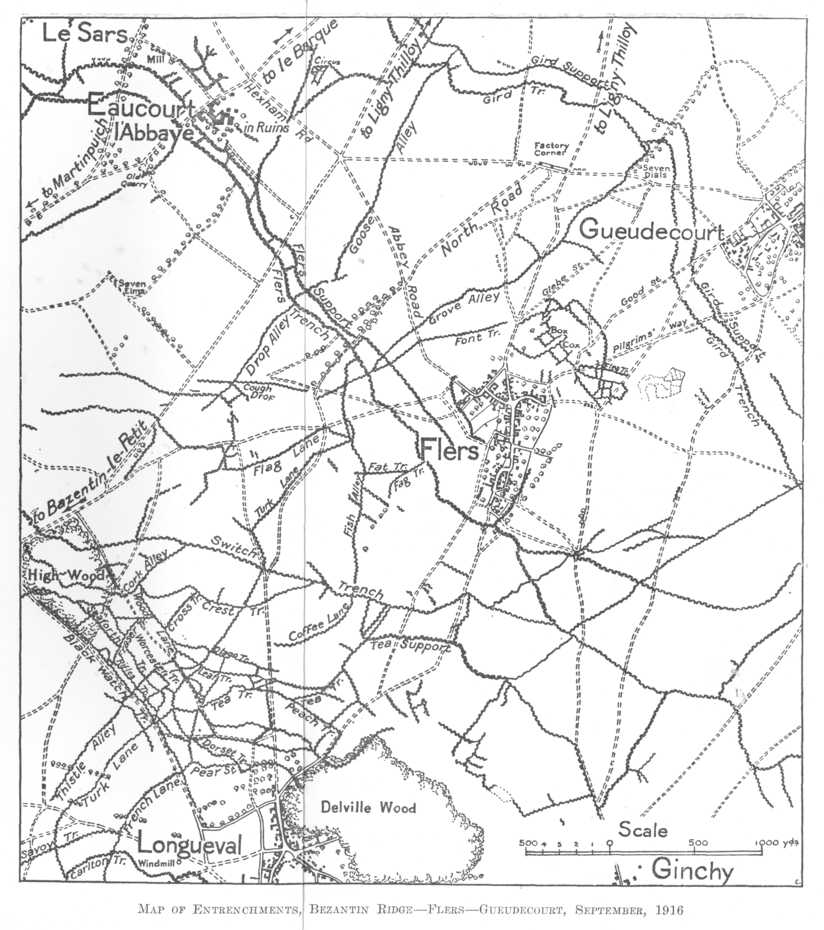 4th November 1916: The 6th Brigade takes over the Flers sector from the 8th Brigade (AIF 5th Division), with the 7th on the left flank and the 1st on the right. There were great difficulties bringing up supplies owing to the conditions of roads and the weather. No other mud attained such a notoriety as that at Flers, with a consistency, depth and stickiness unequalled by anything afterwards encountered in Flanders. ‘As bad as Flers’ was adopted as a standard description of filth and wretchedness.
3rd November 1916: The AIF 5th Division is relieved by the AIF 2nd Division newly arrived from Ypres.
30th October 1916: I Anzac Corps, now comprising four AIF Divisions (1st, 2nd, 4th & 5th) takes over from British XV Corps outside of Flers.
28th October 1916: Australia rejects conscription in referendum. When the First World War was declared in August 1914, Australians in their thousands voluntarily enlisted to fight ‘for the mother country’ and against an aggressor harshly imposing its will on small countries such as Belgium. With the casualties mounting from Gallipoli the Australian Government renewed its recruitment campaign in the summer of 1915, and yet again the recruiting halls were full of young and able Australians signing up ‘to do their bit’. However the four AIF Divisions fighting in France in 1916 suffered very heavily at Fromelles and Pozieres with 28,000 becoming casualties in the six weeks of fighting. With the number of men volunteering steadily falling concern was growing that the  divisions in France would soon not have enough reinforcements – estimated requirement of 5,500 per month – to bring them up to strength. As a result Australian Prime Minister Billy Hughes decided to hold a referendum on conscription, i.e. the compulsory enlistment into military service.
Compulsory military service had in fact been part of Australian life before the War stating that men between the ages of 18 and 60 should be available for service in times of war, but this was limited to fighting within the Commonwealth territories, which given the current theatre of operations for the AIF in Europe and the Middle East, was outside of this remit. PM Hughes decided to put the following question to the Australian people ‘Are you in favour of the Government having, in this grave emergency, the same compulsory powers over citizens in regard to requiring their military service, for the term of this War, outside the Commonwealth, as it now has in regard to military service within the Commonwealth?
The referendum argument turned out to be very divisive amongst the Australian population with fault lines exposed between political parties, religions and workers. The referendum was held on 28th October 1916 and the motion was narrowly rejected with 1,087,557 voting for and 1,160,033 against. Within the AIF the vote was in favour by 72,399 to 58,894, but it was understood that it was the men on transports and in the camps that had yet to witness the horrors of the front that were responsible for the ‘yes’ vote from the army. As a result there were concerns that there would not be enough reinforcements to replenish the existing four Divisions, and that the AIF 3rd Division should remain in England and be broken up to provide the normal reinforcement for the other four.  However, General Plumer, Commanding Officer of the British Second Army in Flanders objected stating that the 3rd was needed to strengthen II Anzac Corps and this wish prevailed.
Having been at odds with his Labor Party, Billy Hughes crossed the floor of the House with about half of his parliamentary party, formed the new National Labor Party and with the support of the Liberals remained Prime Minister. A year later he would ask the question a second time. Again the motion of conscription was rejected by the Australian people and despite the battalions fighting the rest of the war with reduced strength, the AIF remained the only fully voluntary army to fight during the First World War.
 Meanwhile in London a major PR event took place with the playing of an Aussie Rules exhibition football match near the Queens Club in West Kensington. It is believed that the match, contested between soldiers of the Australian 3rd Division and Training Units based in England, was the first organised Aussie Rules match staged outside of Australia and was seen as a great success. Click on the link to read more and see remastered footage of the event
25th October 1916: General McCay received orders that his AIF 5th Division would attack, but with rain falling constantly day after day it kept being postponed.
 21st October 1916: After passing Flers, the Australian 14th Brigade saw their first tanks, derelicts of the September fighting, in some cases with their crew still lying dead amongst the machinery (photograph right).
18th October 1916: Leading the Australian Imperial Force back to the Somme, the AIF 5th Division reached Ailly-le-Haut-Clocher in the British Fourth Army’s back area. The first stage in the journey to the front was the easiest, as the French had laid on motorised buses, but then it got worse with either poor billeting in overcrowded and verminous leaky barns or out in the open, then followed by the mud.
 16th October 1916: Hospital Ship ‘Karoola’ unties at Southampton and with its manifest full with the wounded from Pozieres starts the long journey home to Australia, including five members of the 5th/22nd.
14th October 1916: Further raids conducted by the 27th Battalion, AIF 2nd Division, and 45th Battalion, AIF 4th Division.
12th October 1916: The British Second Army conducted sixteen raids, of which 14 entered the enemy trenches. These included parties of the 2nd and 3rd Battalions of the AIF 1st Division, the 28th of the AIF 2nd Division, 49th of the AIF 4th Division, and 31st, 54th and 59th of the AIF 5th Division, the latter raiding the Sugarloaf, that it had attempted to take in the failed Fromelles attack three months earlier. This raid too failed, with one man killed and five wounded.
9th October 1916: Orders were received, and came as a bitter shock to the Australian commanders, to prepare for a return to the Somme. The three Divisions of I Anzac Corps would be joined by the AIF 5th Division that would precede their journey back south.
6th October 1916: Raids made by the 1st & 2nd Battalions of the AIF 1st Division, and to the south the 29th Battalion of the AIF 5th Division.
30th September 1916: A total of sixteen raids were undertaken on the British Second Army front, including raids by the 7th, 8th, 46th and 55th Battalions.
29th September 1916: Forty members of the 18th Battalion, 2nd Division, attempted a night ‘silent’ raid south-east of Sanctuary Wood. The raid failed, but the concept of ‘silent’ raids, i.e. without previous artillery bombardment was further encouraged.
25th September 1916: Raids on the following three nights by the 16th, 15th and 13th Battalions of the AIF 4th Division in the Ypres sector were made to coincide with the British Reserve Army offensive on the Somme at Thiepval that would see the eventual capture of Mouquet Farm.
24th September 1916: In the sector currently under the responsibility of I Anzac Corps and south towards Messines, both sides were active in tunnelling and the placing of large mines. The Germans in their listening galleries had detected tunnelling of the great mine at Hill 60. General Plumer, Commanding Officer of the British Second Army considered blowing the mine, but the German tunnellers passed within a few feet and it lay undetected until it was blown in the Messines offensive of June 1917.
15th September 1916: Raids on the following five nights by parties of the 56th, 30th, and 58th Battalions of the AIF 5th Division coinciding with the Flers-Courcelette offensive taking place on the Somme. During this period in the Ypres and Fleurbaix sector, the raids by the Germans were a lot less than those conducted by the British Army, possibly on account of a lack of ammunition. The German raids were preceded by a longer bombardment than those by the British, but with less casualties than earlier in May as a result of the method of lightly holding the front-line being in practice, with the men being distributed in strong-points, and the construction of more concrete shelters some 300 yards behind the front-line. With more British Divisions being required for the Somme, the practice of thinning out the front-line defences continued.
14th September 1916: The AIF 4th Division relieved the Canadians to the right of the AIF 1st Division in the Ypres sector, with its artillery that had been in training after Fromelles re-joining the Division. For the three Divisions of I Anzac Corps, their time in the Ypres sector would be predominately the improvement of the defences in the salient along with nightly patrols scouring No-Man’s Land. Most danger to the front-line troops during this time came from the German Minenwerfer trench mortars, plus some sniping from the nearby Hill 60 which provided commanding views over the area. Each Division had a Brigade out of the line in training, and officers were sent to the schools, plus a small proportion of both officers and men received leave to England.
10th September 1916: The AIF 2nd Division joined the 1st Division to its left in the Ypres sector.
5th September 1916: With the relief of the 13th Brigade the participation of the Australians in this phase of the Somme battle had come to an end. The Fourth Army to the right had succeeded at Guillemont, but on the orders of General Haig the Reserve Army’s attempt at securing Thiepval before the mid-September offensive was given up. Seven times the Australians had launched against Mouquet Farm and only on the last and greatest effort was any success made, and this on a front so narrow that it would not hold a deliberate counter-offensive which inevitably came on the 8th September causing terrible loses for the Canadians, and resulting in the Germans retaking the Fabeck Graben.
4th September 1916: The following day of the attack saw German counter-attacks and bombardments, but the 49th Battalion though greatly reduced in number held on to this position. The fighting on these two days were some of the bitterest fought by the AIF, but part of the Fabeck Graben was held, the only success in Gough’s encircling attack on Thiepval. The 13th Brigade lost 41 officers and 1,305 men, but the men were conscious that they had won and held what was considered an important objective.
3rd September 1916: Just after dawn the British Reserve Army attacked towards Thiepval from three directions, with the Australian 4th Division resuming the attack at Mouquet Farm. Further to the right and east the British Fourth Army and the French Sixth Army would at noon launch the main effort preparatory to the mid-September offensive towards Guillemont and the Combles area.
The attack on Fabeck Graben to the east of the farm was conducted by the 49th Battalion, with the 52nd to their left and the 51st attacking the farm itself. Good progress was made and as the 51st entered into the farm they stopped to bomb all discoverable entrances to the underground works. By 7.30am brigade headquarters had heard that Mouquet Farm had been taken with the exception of a few dugouts that were being dealt with. Beyond the farm progress was being halted by increasing German resistance and machine gunners that not have the luxury of deep dugouts in which to hide from bombardments, were able to fire quickly into the advancing Australian infantry. The 52nd began to fall back, and seeing this the 51st battalion retreated to the farm as the Germans bombed forward, and with the Germans now regaining access to the underground tunnels soon had the place surrounded. With the exception of the 49th Battalion on the crest of the ridge, the Australian thrust had again been defeated.
At 6.30pm, having been informed that all efforts by the Reserve Army had failed, General Gough suspended all other operations with the exception of safeguarding the higher ground captured by the 49th with two companies of the Canadian 13th.
31st August 1916: It was decided that the next, and final, attempt by I Anzac Corps would be part of General Gough’s long anticipated assault on three sides of Thiepval. The 51st, 52nd and 49th Battalions of the 13th Brigade would attack on a limited front of 1,250 yards, with the 50th in reserve. Also the assistance of the 1st Canadian Brigade relieving the 2nd Division’s 7th Brigade, and the 12th Brigade relieved the 4th Brigade. The day was gloriously sunny, with the air filled with aircraft and observation balloons as the digging parties prepared the jumping off trenches for the forthcoming offensive.
30th August 1916: With daylight the stretcher-bearers of both sides came out under large red cross flags to search the mud. In front of the 13th Battalion the stretcher-bearers divided No-Man’s Land between them, each handing over any of the others wounded that they had found. Corps HQ, and indeed the German High Command were concerned that the enemy could misuse the collection of wounded to recover guns or conduct fatigues, and both sides sought to limit the amount of stretcher-bearers that could go into No-Man’s Land.
In Belgium the AIF 1st Division began to take over part of the British sector north of the Ypres-Comines Canal.
29th August 1916: With the 14th and 15th Battalions relieved by the 16th and 13th Battalions, orders for a renewed attack (the sixth) on Mouquet Farm were given. Rain fell heavily that turned every shell-hole into a slimy pool and mud covered the men as they prepared to attack. One of the 13th Battalion’s objectives, Kollman Trench was easily taken, but as they pushed on to the Fabeck Graben they came under attack in front of the thin wire entanglement and could not respond as their rifles and Lewis guns became choked with mud, and even the bombs could not be used as the pins could not be pulled. As a result the survivors had to struggle back to the front line from which they had attacked. The 16th Battalion did not fare any better to the left. The two Battalions were relieved the next day with the 13th Battalion having lost 10 officers and 221 other ranks, and the 16th 9 officers and 219 other ranks.
28th August 1916: The 14th Battalion attempted to straighten the line in front of Mouquet Farm, but again faced with strong opposition failed with a loss of seventy-five men, the majority being wounded. Meanwhile having been earlier relieved from Pozieres the AIF 1st Division reached Poperinghe, six miles outside of Ypres, with the 3rd Brigade being billeted for a few days in the town while the 2nd Brigade were in camps and tents in the area.
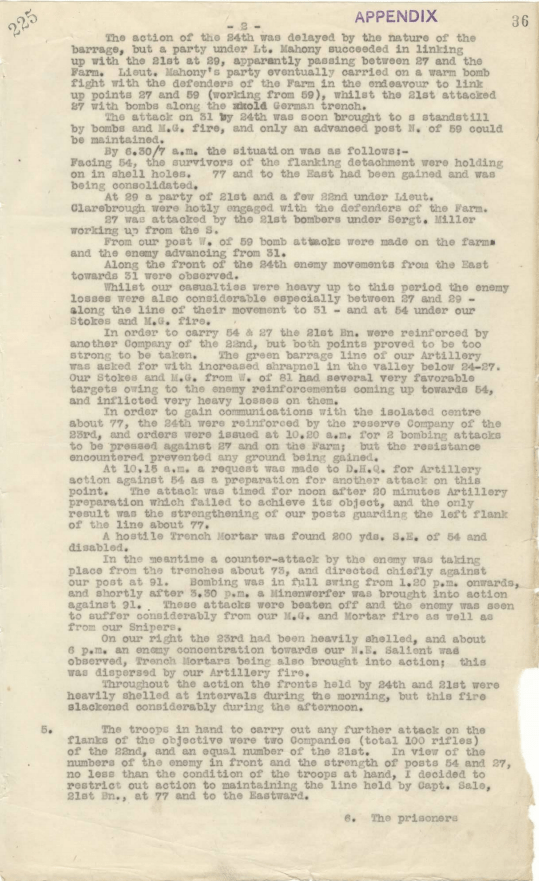
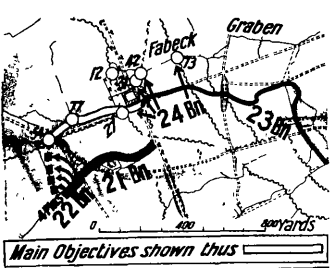 26th August 1916: The 6th Brigade attacked Mouquet Farm at dawn (Brigade report, below). The artillery barrage, which for the first three minutes advanced in steps of about fifty yards a minute, was laid down by four brigades of artillery, while seven batteries of heavy howitzers, which for some days had battered the objectives, fired heavily for five minutes on the Fabeck Graben strongpoint. The 21st Battalion which thirty minutes before the starting time had climbed out of the front-line trench and lain down twenty-five yards ahead now followed the screen of bursting shells. Though the ground was rough with shell holes they were dimly lit and the troops were able to keep up with the line of shells and made progress towards the farm and managed to seize the trench. To the east the 24th Battalion was also making progress and began bombing the cellars of the farm, rousing the defenders who started to set up their machine gun rendering digging and further bombing impossible.

 On the left the 21st Battalion encountered a series of deep dugouts from which came many Germans that had been sheltering and starting firing into the party from the rear. The 22nd Battalion on the left flank also became exposed as the 21st had in fact veered too far to the north-east during its attack. Pockets of men had to fight off counter-attacks from shell-holes. The attack had come up against a considerably strengthened enemy, and the 21st lost 13 officers and 444 men, and the 6th Brigade out of a fighting strength of about 2,500 lost 896. About sixty men were captured on the night of the 26th August and a few others the next day or so, though some men were able to make their way through German lines and made their way safely through to the British lines at Thiepval. After dark the 4th Brigade of the AIF 4th Division relieved the 6th Brigade.
25th August 1916: 6th Brigade’s Commanding officer General Gellibrand chose to attack for the first time by the Australians on the Somme at dawn. By careful observation on the dawn of 25th August, Gellibrand determined that the light was suitable at 4.30am giving the attackers the ability to move into position during the dark and enough cover but allowing them to see the lie of the land. In consultation with Divisional Headquarters the time of the attack was set at 4.45 on the next morning, with the 21st Battalion attacking west of the farm, the 24th to secure the dugouts to the east and a Company of the 22nd Battalion to protect the left flank by dropping its platoons one at a time at flanking posts.
24th August 1916: To assist in communications Gellibrand moved his brigade headquarters a mile and three quarters closer to the front line, plus the issue of supplies had been eased by the Pioneers extending the tramway to the head of Mash Valley. During the afternoon, an elaborate series of moves in a very tight and congested area resulted in the 24th and 21st Battalions changing positions.
23rd August 1916: Orders are received that the attack on Mouquet Farm should take place from the west, not east as originally thought, meaning that the attacking 21st Battalion was in the wrong place. Patrols were sent out at night to ascertain the strength of the enemy, but conflicting reports over the next two nights came in, with some saying that it was practically empty while others maintained that it was a warren of strongly garrisoned underground works.
22nd August 1916: An early morning mist enabled the men to work on a line joining the new position until the mist began to thin and shots were coming in from short range began to wound and kill the diggers. Later that day the AIF 1st Division was relieved. The 3rd Brigade had lost 840 in front of Mouquet Farm, and overall the 1st Division had lost 92 officers and 2,558 other ranks. The progress that had been made was miniscule, and the fruitless task was then handed over to the AIF 2nd Division.
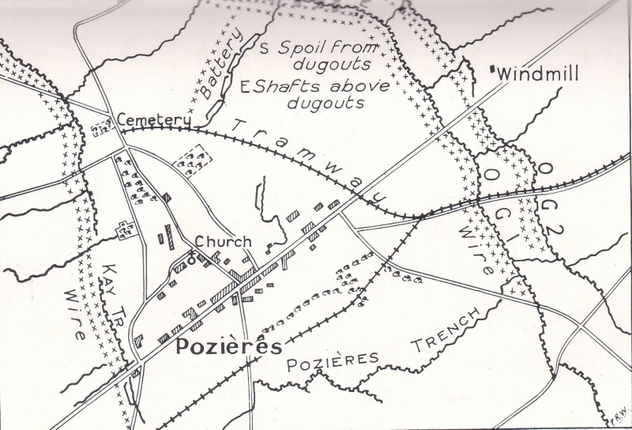
By the time the AIF 2nd Division had arrived for its second tour, lessons were being learnt not to overcrowd the front line and provide defence through staggered lines and increased artillery. In Pozieres, half a mile behind the front line support companies were in places like Kay Trench and Centre Way whereas the reserve battalions, usually assigned carrying duties, were in the rear in Sausage Valley or at La Boisselle. In attack, the trend was moving towards effective bombardment with a smaller attacking force which by its very nature had the greater chance of achieving surprise.
The 6th Brigade having suffered the least in the first tour was selected as the next attacking battering ram against the farm. Gellibrand pointed out that only the 21st was strong enough for this purpose so it was positioned to the east of the farm from where the attack was most likely to be made, with the 24th to their left, the 23rd to the right and the 22nd carrying. The front east of Pozieres was held by the 20th and 19th Battalions of the 5th Brigade with the 7th Brigade employed in digging communications trenches.
These weeks were marked by great aeroplane activity over the battlefield, the Allies – on some days with at least fifty machines simultaneously in the sky – endeavouring to maintain their local superiority. The day of the relief was one such day and as a result the columns moving north were spotted and an intense barrage of shrapnel and high explosive followed, and the 24th which had suffered heavily in Kay Trench four weeks earlier, was again caught. The guide for one company was killed and the officers had to grope the best they could through the moonless night.
21st August 1916: The attack of the 3rd Brigade took place in broad daylight, the first time that the Australians had done this on the Somme. The attacking force was strengthened by two parties from the 11th Battalion responsible for linking up with the 10th and 12th, but needing to come from way back as Sausage Valley they were seen by the enemy who put down a barrage on the reserve company of the 12th moving up Kay Trench. To finally get to the front line men had to rush open ground, in view of the enemy. Thus all chance of surprise had gone, and the Germans put down a barrage and within one hour the 10th had lost 120 of its 620 officers and men. The attacking waves proceeded but with the enemy behind both flanks the 10th fell back. Some of those that went farthest attempted to retire but without support and surrounded the survivors surrendered. The 12th though had more success and had created a small salient almost touching the south-eastern corner of the farm.
19th August 1916: The 1st Brigade was relieved by the 3rd Brigade with the 9th Battalion on the left followed eastwards by the 12th, the 10th, and 1st Battalion of the 1st Brigade on the right where it continued operations of sapping forward and entrenching along its whole front so as to build up a new firing line further east. The 11th Battalion carried for the Brigade. Moving to the front, Colonel Elliott of the 12th Battalion decided to send his front-line companies consisting largely of reinforcements forward in the open to reduce the spectacle of the dead all along the route. The relief was shelled, but most of the troops got through without heavy loss. As a preliminary all the front line battalions sent out patrols to ascertain the strength of the enemy and perhaps establish the location for a new jumping off position. Little was achieved except confirming that the German positions were strong.
Meanwhile the AIF 5th Division, as part of II Anzac Corps in the Fleurbaix sector, conducted the first of a series of minor raids since the disastrous Battle of Fromelles a month earlier, designed to provide a limited diversion to the offensives that were taking place on the Somme to the south.
18th August 1916: The Australian 1st and 2nd Brigades launched an attack to coincide with other British attacks on the same day on the Somme. The 7th and 8th Battalions of the 2nd Brigade were to attack eastwards, south of the Bapaume road. Due to difficulties in communication the exact timing of the barrages had not reached the Brigade headquarters, and despite the attack appearing to follow the creeping barrage they were probably too far behind thus giving the enemy too much time to recover once the barrage had lifted. Some men entered the trenches, but with many killed they could not hold on. After the attack the new trenches dug were heavily shelled. By the time that the Brigade was relieved by the 5th Brigade (AIF 2nd Division) on 21st August it had lost 915 of the 3,750 strength that it had when it resumed this tour six days previously. For the 1st Brigade to the north, difficulties had arisen in the exact location of the front-line, and when the pre-attack bombardment came numerous shells were landing on the front line of the 3rd Battalion causing casualties. Parties were sent out but driven back. The 4th Battalion further west had more success and posts were established in the taken trench. However this was now the second operation of great difficulty at Mouquet Farm and had resulted in just one comparatively trivial gain. The 3rd Battalion had lost 9 of its officers and 151 other ranks, at least half by bombardment of its own side; the 4th Battalion had lost 9 officers and 279 other ranks.
Elsewhere immediately to the left of the 1st Brigade the British had successes thus the Mouquet Farm salient was now a little less pronounced, and immediately to the right of the 2nd Brigade the Scots recorded successes in Munster Alley. There were also successes further along the line at Guillemont though operations at High Wood had failed.
16th August 1916: Digging commenced for the creation of new Jumping Off Trenches by the 1st and 2nd Brigades. Shelling on the 3rd and 4th Battalions in the north was heavy during the day, not only hindering digging progress but signalling that a counter-attack may come which it duly did but was between back by the Lewis guns and bombers of the 4th Battalion.
15th August 1916: General Walker informed that his AIF 1st Division would be returning to the front and be expected to take on two missions – attack north to Mouquet Farm, and eastwards to capture the new German frontline opposite the Windmill – at a time to coincide with other British and French operations on the Somme. While away from the front the 1st Division received reinforcements taking it to two-thirds of its original fighting strength. The salient at Pozieres meant that the front had now lengthened, so the 6th Australian Artillery Brigade was brought up and stationed in Mash Valley to the north of the Albert-Bapaume road, its batteries being the first to be placed in this valley. The 2nd Brigade took over the east Windmill line, and the 1st Brigade the north.
14th August 1916: Orders were given for the capture of objectives of Mouquet Farm and the Fabeck Trench on the ridge behind the farm. However, British documents or papers stating the importance of taking Mouquet Farm had found themselves into German hands around Thiepval and as a result the German Army was expecting a move from the south by the Australians and prepared accordingly. A furious bombardment was placed on the Australians for many hours before their assault scheduled at 10pm. Messages from the three attacking battalions, the 50th, 13th and 51st all recommended a postponement of the attack, but these were overruled. All three battalions pressed on but met stiff resistance and neither the 50th on the left or 51st on the right could make contact with the 13th in the centre, meaning that all were potential subjects of flanking attacks, thus the decision was taken to withdraw. Faced with a strong and continuous defence line through Mouquet Farm, Gough’s and I Anzac’s northward advance had met its first check. All three battalions were worn out, and the 51st had lost some 300 officers and men, the 13th (including earlier engagements) 386 and the 50th 414. The relief of the AIF 4th Division by the AIF 1st Division which had already been brought back to Albert, was therefore begun at once.
13th August 1916: General Gough outlines his plans for the next step wishing I Anzac to shift its thrust eastwards until it had complete observation over the Courcelette Valley. Meanwhile the 4th Brigade was relieved by the 13th Brigade under considerable difficulty by having to go through the firing line of the extreme right of the position.
12th August 1916: The formal second stage of the advance of I Anzac and British II Corps to the line of Mouquet Farm was to be conducted by the British 12th Division to the west and AIF 4th Brigade to the east assisted by the 50th Battalion, 13th Brigade. As with many before, the passage to the front was fraught with danger and by the time the last company of the 50th got through they had suffered considerable loss, especially of officers and NCO’s, from the bombardment. The advance of the 50th and 13th Battalions commenced at 10.30pm under a creeping barrage and reports soon came in stating that objectives had been reached. Thus within three and a half days the Australians had advanced a third of a mile along the ridge and the line to the west had come up level with them and making good progress to getting to the rear of Thiepval.
11th August 1916: As plans were being made for the next formal advance, the 13th and 16th Battalions were tasked to continue their progress by occupying certain points ahead. However the position of the 16th Battalion on the left flank on a slope facing a valley put the troops in full view of the Germans on the far side and the German artillery threw on them a heavy bombardment. At noon the bombardment intensified and as it continued through the afternoon so many men were killed, wounded, buried or shell-shocked that the garrisons in these positions were either totally withdrawn or reduced by half. At 2.30pm columns of Germans were spotted in the vicinity of Mouquet Farm preparing for a counter-attack. The reserve Lewis guns were brought forward to re-occupy the forward posts just vacated and as the German line began to cross the valley they were caught in a deadly enfilade, and those that made it to the top were met by a withering fusillade from the 16th Battalion riflemen. The artillery was the used to shell the remainder now sheltering in the shell-holes in the valley below. The German guns continued throughout the night, with an intense barrage being thrown on the Windmill, Tramway Trench and to the rear setting on fire the dump at the Chalk Pit, with bombs, rockets and flares of all colours exploding in all directions for hours afterwards.
10th August 1916: Just after midnight the 16th Battalion, having replaced the Suffolks on the left of the attack, along with the 15th Battalion made the rush after five minutes of intense bombardment. The operation was a complete success, capturing the German machine guns and their crews and enabling the 15th to re-occupy the positions evacuated the previous night. On the extreme right the 14th Battalion re-occupied two posts that it had dug on the night of the 8th August in pursuance of the policy of ‘making room’ eastwards. At dawn on the 10th the northern flank of the Australian line lay just over the skyline north of Pozieres, astride the ridge, with a valley ahead of its left and left-centre and another on its extreme right. For the first time since the Australians had entered the Battle of the Somme a little rain began to fall. German shelling was scattered and intermittent until about 4pm when it descended heavily on the front-line and communications as far back as Sausage Valley. During the afternoon, the comparatively fresh 13th Battalion relieved the 15th.
 8th August 1916: With the Pozieres Heights now secure, plans were now put in place for the second phase with the push northwards from this salient to Mouquet Farm and to outflank the German stronghold at Thiepval. With this new captured position came the dangers inherent of being visible on three sides by enemy artillery observers, and it did not take long before the Germans realised that the point of each attack on a narrow frontage was the farm, thus they could concentrate their fire. To help alleviate part of the problem, each time there was an attack the right flanking battalion was tasked with pushing right and eastward in order to widen the frontage. On the night of the 8th the 15th Battalion along with the Suffolk Battalion on the left attacked and commenced the advance northwards. Having made gains, the 15th Battalion found itself in front of the objective but was forced to withdraw.
7th August 1916: The last major German counter-attack at Pozieres commenced at about 4am when the enemy barrage suddenly ceased on the OG Lines and began to fall heavily far back beyond Pozieres. The forward posts manned by the AIF 4th Division immediately began to observe the enemy moving towards them up the slope from Courcelette. On the Australian left, OG2 Line was manned by the 14th and 15th Battalions and as the Germans passed to their right towards OG1 rapid fire was poured into the advancing column. Some of the outposts were overrun and about 40 men of the 48th Battalion were captured and taken prisoner. The Germans continued to pour past the OG Lines in the centre, throwing  bombs into the dugouts one of which contained Lieutenant Jacka, VC, (pictured right) who having been aroused by the deafening explosion emerged into open with the remaining men from his Platoon to see that a large number of Germans were now between his position and Pozieres. Jacka lined up his men and decided to dash through the enemy back to Pozieres. No sooner had he done this then he encountered the line of 48th prisoners who seeing what was going on then entered the fight, some being shot by their guards, with others overcoming their captors. Other Australians in the surrounding areas shell holes also rushed forward and what followed was a series of one-on-one life or death battles, with bayonets crossing and men being shot at point blank range. Jacka threw himself into a shell hole in which German bombers were situated, and despite being wounded, killed and captured another. With the arrival of additional Australian platoons the Germans suddenly surrendered. As Bean wrote, Jacka’s counter-attack stands as the most dramatic and effective act of individual audacity in the history of the AIF. Within an hour the area was clear of the enemy. This action of the 7th August was the last attempt by the enemy to recapture the crest east of Pozieres. The bombardment that the 48th Battalion suffered resulted in the loss of 20 officers and 578 other ranks, and for the 45th Battalion south of the road a loss of 5 officers and 340 men. After this action only four men remained unwounded in Jacka’s Platoon in the 14th Battalion.
6th August 1916: From their posts in or front of the OG Lines the Australians had found themselves at day-break looking across the crater field at the contrasting leafy tree tops and broken roofs of Courcellete, and beyond to the green heights of Lapaume Wood near Bapaume. Evidence of increased German reconnaissance in the form of three rare balloons – as opposed to masses of British to the west – and a number of German aeroplanes, as well as ‘bogus stretcher-bearers’ indicated that plans were being made for a counter-offensive. The bombardment became denser and more accurate in the late afternoon and losses were mounting to the Vickers Machine Gun crews and Lewis gunners manning the front-line.
4th/5th August 1916: The last demolition bombardment of the German Lines OG1 and OG2 at Pozieres was to open at 6pm and continue for an hour, then the artillery would fire normally until 9pm when it would cease for 15 minutes, before starting up again with a three minute intense barrage on OG1 before lifting to OG2. The first two waves would take OG1, then the third and fourth would follow at 9.30pm to the second objective, OG2. The line of attack for the three Brigades of the AIF 2nd Division was the 23rd (flanking) and 22nd Battalions of the 6th Brigade on the left, the 26th, 25th and 27th Battalions of the 7th Brigade in the centre and the 18th and 20th (flanking) Battalions of the 5th Brigade on the right.
 To the south of the Bapaume road the two Battalions of the 5th Brigade had by the time darkness had fallen secured OG1 and were digging in on the site of OG2 with their Lewis guns out in front. Protected by a smoke screen covering its southern flank the casualties of the 5th Brigade were light. The advance of the 7th Brigade succeeded almost as swiftly as that of the 5th, despite delays caused by the incompleteness of the Jumping Off Trench meaning that the 25th Battalion were forced to wait in the crowded communication trench, who in turn blocked the passage of the second wave of the 27th Battalion. Success for the 7th Brigade was delivered by following very close on the barrage, and caught many of the enemy in their dugouts before they had time to remount their machine-guns. However, entry into the attack by the 22nd Battalion on the northernmost sector was delayed by fifteen minutes on account of congestion and confusion in the communication trenches leading to the jumping off trench. In this crisis Major MacKay, a young and strong leader, took control and led his company up Kay Trench in face of a strong shrapnel barrage and then to the jumping off position and straight into action. The later waves then hurried forward to join the attack. A machine gun on the left flank caused many casualties before the first wave was able to reach OG1 and swarm along it to take the gun. The third and fourth waves were able to pass through the first objective and on to OG2 which they occupied and thus achieved its objective. MacKay was killed while approaching OG1. Without his intervention the situation could have been perilous by exposing the left flank to enemy machine gun fire to the communications lines for the 7th Brigade.
Around midnight the German barrage changed its concentration, diminishing in the rear areas but increasing on the OG Lines. Casualties amongst the attacking battalions increased so much that few officers were left to organise and direct consolidation, with NCO’s and even privates doing officers work. Counter-attacks followed in the direction of the lines held by the 25th and 27th but they were repulsed by Machine Gun fire. To the north a counter-attack was directed towards the 22nd and 26th and the men scrambled onto the parapet and fired at them. This though brought them into sight of German snipers and Capt. Curnow, one of the few remaining 22nd Battalion officers, was killed. Behind the attacking forces the left flank, now forming what would be the front-line for the next stage attacking northwards towards Mouquet Farm was secured along the line of Brind’s Road. Further west the British 12th Division had pushed forward thus linking up with the Australian left position, and at the other end of the line the 18th Battalion had linked up with 7th Brigade at the Windmill, thus completing the attainment of the AIF 2nd Division objective. The Pozieres Heights had been won, and a position of much importance gained. For the Germans it represented a serious loss, and plans were put in place for its re-capture.
 The bombardment now falling on the whole line was becoming more accurate as the enemy’s batteries were registered on the new front line, which as a result of the action was now a salient and upon which the Germans could fire from three sides. Furthermore both lines were visible to the enemy, OG2 from front and flank, and OG1 from the left rear from the direction of Thiepval. Batteries close to the Thiepval Ridge were now able to ‘snipe’ at even solitary men making their way across the crater-field to the rear of the lines. The German artillery was thus able to systematically work up and down trench lines and communication trenches. In OG1 men were able to take shelter in the dugouts, but not so in OG2 where few officers now survived and the Lewis guns were gradually being destroyed. In order to reduce casualties orders had already been received to thin out the garrison to a minimum to defend the position. The position in OG2 deteriorated and the 27th withdrew to OG1 along with the 28th returning to Pozieres. Meanwhile the 4th and 12th Brigades of the AIF 4th Division were being readied to effect the relief of the three brigades of the 2nd Division. The bombardment on the night of 5th/6th August took a heavy toll on men of both Divisions,
  particularly in Kay Trench. Dead and wounded lay everywhere, some killed on their stretchers with stretcher bearers lying amongst them. During its twelve days of practically continuous bombardment the AIF 2nd Division endured conditions seldom experienced elsewhere. Whether manning the front, storming and holding a key position, or simply working and bringing through their supplies, the men of the 2nd Division steadfastly stuck to their task. In all the Division lost 6,846 men killed, wounded or missing. Many of the wounded were suffering from shell shock in addition to their physical wounds – an eyewitness recorded that of many sitting in front of Vadencourt Chateau to have their wounds seen to many were shaking like a leaf.
3rd August 1916: AIF 2nd Division Commanding Officer General Legge had targeted this date for the next attack on the OG Lines, however work on the jumping off trench was far from complete, being only one or two feet deep in places, so the attack was postponed.
 31st July 1916: By the end of the month the village of Pozieres had been wiped away, the shell pitted ground covered with powdered brick dust and soil, and under the summer heat resembled more like desert that they had previously been in. Trenches that had been dug were quickly filled in by the next shell. In preparation for the next attack the demolition of the OG Lines was to be carried out in four heavy bombardments of an hour by the heavy howitzers of I Anzac and II Corps, the first commencing at 6pm on the 31st July, with subsequent bombardments over the next days. In addition the field artillery took part in separate hurricane barrages designed to mystify and harass the enemy and to practice the field artillery for the actual attack. The problem for the Pioneers, Engineers and other troops tasked with digging the important new communication and jumping off trenches, each time a bombardment occurred the Germans were likely to respond in kind, therefore making their job even more precarious. Sometimes the response was so fierce that many thought that it signalled a counter-attack from the Germans. As Bean wrote ‘in a single tour of this battle divisions were subjected to greater stress than in the whole of the Gallipoli campaign.’
30th July 1916: Field Marshal Haig’s attention was turning towards his next major offensive on the battlefront which would probably be held in mid-September. Prior to that Corps Commanders were told to make sure that any local attacks with selective objectives must be conducted with a high degree of planning and chance of success, plus minimise the loss of fresh troops and munitions. For the Australians their objective over the coming weeks would be to secure the Second Line Ridge around Pozieres and to continue to wear down the enemy. But for the troops on the ground it felt as though they were being used as a battering ram against the same old objectives. Close by that night the British Fourth Army launched an attack but were defeated everywhere except between High Wood and Bazentin.
Attacking at dark brings the confusion and uncertainties which made large scale attacks difficult, therefore the decision was made for the next attack to take place at dusk. The date of the next attack therefore would be determined on the time taken to dig a 1,400 yard jumping off trench, plus communications trenches to enable the assaulting troops to prepare unnoticed.
29th July 1916: The attack on the OG Lines would be conducted by five battalions of the AIF 2nd Division: on the left the 23rd Battalion of 6th Brigade (replacing the 22nd and 14th that had suffered heavily already), then the 26th, 25th and 28th of 7th Brigade with the 20th Battalion of 5th Brigade attacking on the right and on the right of the Bapaume road. No other important attack was being launched that night in any part of the Somme
battlefield. An intense bombardment of OG 1 occurred at 12.14am and a minute later lifted to OG 2 as the infantry attacked. The continued presence of red enemy flares over the front-line from German commanders to their artillery indicated that the attack was not preceding well, and later it was apparent that only the 23rd Battalion on the far left had succeeded in its objectives, despite the loss of seven officers and 326 other ranks. It turned out that the Germans had been well warned of the attack, first by the severe artillery fire during the day, later by reports of Australian troop concentration in Pozieres and finally by detection of the 5th Brigade deploying. The main cause of failure was the rushed preparations and lack of time, together with a complete lack of surprise. Also the lack of 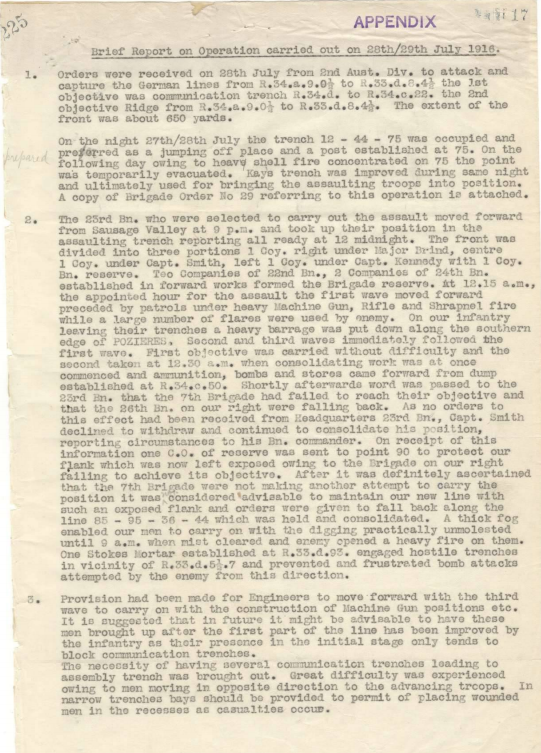 a close enough jumping off trench meant that the attacking forces had far too much open ground to cover thus subject to withering machine gun fire, and when they reached the OG1 they found that in many places the wire entanglements had not been cut. The first attempt to take the OG Lines had thus failed, with a loss of 2,000 men from the AIF 2nd Division on top of the 1,500 in holding the front during the previous two days. During the day stretcher-bearers from both sides tended to the Australian wounded out by the wire and in no-mans land. For this failure, Birdwood and White of the Anzac Corps received a serious reprimand from Field Marshal Haig. The 6th Brigade report of the attack is provided above.
28th July 1916: By dawn the three advanced positions had been dug along with a new trench to the north-west of the village. The preparatory bombardment of the OG Lines began by the heavy artillery of the siege batteries attached to I Anzac and British II Corps. Through the day a reconnaissance of the area was made by the commanding officers of 7th Brigade that would be leading the attack. Between 6 and 7.30pm the brigade began to move from Tara Hill towards the assembly positions.
 27th July 1916: The dreadful bombardment that had been poured upon Pozieres and the AIF 1st Division for the past four days now fell on the 19th Battalion of the 5th Brigade to the north of Bapaume road, and to their left the newly arrived 22nd and 24th Battalions of the 6th Brigade occupying the trenches bordering the east and north of the village. The bombardment on the 27th July began at 9am, and with a focus on Kay Trench to the west of Pozieres, where the support companies of the 22nd and 24th Battalions being particularly hit hard, and with the 22nd losing all of its officers and a great part of its men, and similar carnage befalling the 24th Battalion. At the eastern end of the village the 19th Battalion was also being heavily bombarded, with the trench constantly changing shape by the bombardment.
Preparations were being made for the next attack, but limited time was available for the British and Australian artillery to make sure that the wire entanglements had been sufficiently destroyed, plus it was not possible to dig a new jumping off trench within easy striking distance of the next objective, the Second Line of German defence otherwise known as the Old German (OG) Lines.
26th July 1916: The relief of the 1st Brigade by the 2nd and the 3rd by the 5th – temporarily under the command of the 1st Division – began the previous evening and completed by dawn, just in time for the recommencement at 7am of the German bombardment on Pozieres. The enemy fire this day was a severe as the previous and the new front-line dug by the Australians beyond the village had now been accurately located and was being shelled heavily. Captain Binns of the 6th Battalion saved many of his men by moving them out of the trench forward into the shell holes. In the southwestern corner heavy shells were falling at the rate of one every three to four seconds and part of the upper chamber of Gibraltar – now the headquarters of the 7th and 8th Battalions – was smashed in. Runners and carriers in the sunken road from the Chalk Pit suffered heavily too. Either side of Pozieres the battlefield remained quiet, Corps commanders on either flank observed, except in Pozieres which was shelled heavily all day and from time to time with great intensity. For the battalion commanders the ferocity of the bombardment seemed to indicate that a counter-attack was imminent, and as a precaution the whole of the Australian 1st Division artillery opened on the enemy front line while the heavy batteries of II and III Corps were engaged against the enemy guns. The counter-attack did not come, but was simply intended to inflict damage and loss. At 11.30 two Battalions of the 6th Brigade (2nd Division) were to relieve the remaining 1st Division in the western and northern half of Pozieres. With the exception of the OG Lines to the south of the Bapaume road, the 1st Division had met all its objectives. In achieving this the division had lost 5,285 officers and men. The total loss was thus slightly less than that suffered by the 5th Division at Fromelles a few days earlier, but many positives were achieved including better communication and execution of plans, including having liaison officers with artillery, engineers and flanking British brigades, accurate supporting artillery fire, the bold use of Lewis guns in forward positions, plus the fast support of pioneers to dig communication trenches, strong-points etc. Also, despite a constant barrage, all men in the front-line received water, ammunition and a certain amount of food. Also through his inability to observe from the air, the enemy’s bombardment of the back area had been negligible, and the artillery slow to locate the new front as it advanced.
25th July 1916: The attack by the 5th Battalion to the south of the Bapaume Road in the direction of OG1 and OG2 commenced at 2am following a short bombardment on to the OG Lines. By 2.40 the objectives had been taken and the troops began to dig in. However with a German attack on its north flank and enemy activity to the right in Munster Alley the decision was made to evacuate OG2 and return to OG1 via a communication trench. The enemy’s endeavour to retake OG1 led to one of the most desperate bomb-fights in the history of the AIF. The range of the German bombers was greater than that of the Australians, and trying to remedy this by crossing open ground all but two of the regimental bombers of the 5th were either killed or wounded. Since the holding of the trench depended on maintaining the bomb supply, a large proportion of the reinforcements was engaged in forwarding bombs as fast as they could carry them. At the barricades hastily built in the trench the surviving bombers, being covered by riflemen and Lewis gunners, threw until their arms gave way. At 7.30 three platoons of the 7th Battalion arrived and the Germans were driven back along OG1 to the railway, resulting in the Australians taking about a quarter of their intended objective.
To the north of the village the 11th and 8th Battalions pushed on at 3.30 with the objective of creating outposts on the outskirts of Pozieres, and with the 4th bombing forward, northward up K trench and to the left of the 8th. The British 48th Division also attacked from the west, linking up with the Australians in the early hours of the next day. Meanwhile the enemy guns opened up at 7.15pm with a heavy bombardment of the whole village. At 8.15, while the bombardment was continuing, large numbers of the enemy were seen advancing southwards on the crest near Pozieres windmill. Thinking this was a counter-attack, the advancing forces were met by heavy Australian machine gun and artillery fire, thereby stopping any immediate danger. Although the bombardment of the 25th was heavier than the previous day, the Australian troops in Pozieres were able to attain greater shelter, some in the dug-outs and cellars of the village, including about seventy men into the deep dug-out of the Gibraltar strong-point, but those in the newly made trenches and without dug-outs had to withstand the full force of the bombardment. The British counter-battery fire was accurate and it was reported later that the 117th German Division had ten of its guns put out of action that day, but conditions for spotting were hampered by the dust and smoke of the Pozieres bombardment and the hazy weather conditions.
24th July 1916: The following day after the attack saw orders for the AIF 1st Division to clear Pozieres as far as the cemetery to the north of the town and to establish posts and create a new jumping off line against the OG Lines to the north-east of the town, together with a resumed attack on the OG Lines to the south of the Bapaume Road. On each flank the British would be attacking K Trench in the west and Munster Alley to the east. Although not faced by immediate danger from the German infantry, their artillery began to shorten their range and started to shell the 1st Brigade in the south-west sector along the Albert-Bapaume Road. With the trench system being no more than hastily dug ditches, men were being easily buried by the soil being lifted and frantic efforts thus followed in trying to extricate their mates. The bombardment lasted for most of the day, with many killed and some men now succumbing to shell shock. Casualties were high too for the carrying parties and runners with the bombardment focused on the sunken road from the Chalk Pit.
23rd July 1916: The ferocious bombardment that preceded the attack at Pozieres was seen for nearly 20 miles around, visible clearly to the men of the AIF 2nd Division that were bivouacked at the brickfield outside of Albert. The Germans that had been waiting daily for the attack on Pozieres to begin laid down a precautionary barrage which mainly passed over the Australian front-line but fell heavily on the area through which the troops for the third objective would pass. About 10 minutes after midnight men and officers of the first wave, with the 1st Brigade on the left and the 3rd Brigade on the right crept forward from their jumping-off trenches in order to approach the German position before the final bombardment began. The second wave followed at twenty or thirty yard intervals after the first. At 12.28 the 1st Division’s field artillery burst on the enemy trench, firing as fast as they could, immediately in front of the crouching infantry. At 12.30 the AIF 1st Division guns lifted their fire to the line of the orchards and the infantry rushed for Pozieres Trench which was taken with little opposition, and the second line passed through the men of the first and lay up near the barrage ready to assault the second objective along the back hedges of the village. Only on  the extreme right in the OG Lines did the first attack meet with heavy resistance, and where 2053 Pte Leak (photograph left) of the 9th Battalion rushed forward throwing bombs to help clear the situation and was awarded the Victoria Cross. Although strict orders were given that each attacking line must not advance beyond its objective once taken, the sight of fleeing Germans was too tempting and about 140 men of the 9th and 11th soon found themselves too far ahead by the third objective, and in danger of being cut-off had to retreat back through their own barrage back to the second line. By 2.30 along the whole length of the village a front line was being dug with all their might parallel and close to the Bapaume Road, to entrench themselves by day-break. At certain points engineers and pioneers were constructing strongpoints and also communication trenches to connect with saps already driven forward. The objectives in Pozieres had thus been taken without much resistance from the enemy, but in the OG Lines to the east the attack had been much more stubbornly opposed and was stopped 600 yards short of its objectives.
Day broke without any sign of an enemy counter-attack, though sniping was being carried out from the ruins across the road. Small parties of Australians would venture out looking for the cellars or dugouts where the snipers may be and rolling phosphorous bombs into them, setting fire to them and forcing the occupants out. At 5.30 am the first counter-attack was being formed in the OG Lines to the east of the village, but when it advanced was met by heavy fire by the dug in 3rd Brigade and then by the supporting artillery. Meanwhile one of the dreaded German barrages was now falling on the support lines, to which the Australian infantryman would soon learn to accept, work and carry whether taking supplies to the front line or taking wounded back to the dressing stations. By noon, through his stalwart actions, the support troops had re-equipped the front-line troops with water, food, rifle ammunition and bombs. Dumps of munitions had been formed in the communication trenches and other convenient points in the rear. To gain range for a farther advance, the 2nd Brigade AFA brought up its batteries and emplaced them about a mile behind the infantry towards the head of Sausage Valley. The attack of the 23rd July at Pozieres was just one part of what would lead to the third great British attack on the
Somme in the summer of 1916. For the Australians they had achieved their first victory of importance on the Western Front and their reputation, begun in Gallipoli, took hold in Europe.
 With reports that Pozieres had been abandoned, plans were now drawn up to capture the rest of Pozieres, with small parties venturing forward and climbing over the rubble, flushing the small groups of Germans and snipers from the dugouts and ruins, including over twenty men being taken prisoner in the ‘Gibraltar’ strong-point (photograph right) to the west of the village. By the early hours of the 24th July, Pozieres had thus been captured and the Australian position was strong from a defensive point of view.
21st July 1916: AIF 1st Division Brigadiers informed that the attack on Pozieres would commence thirty minutes after midnight on 23rd July, preceded by a two minute barrage ahead of the infantry advance to the first objective, Pozieres Trench to the south of village, followed by two subsequent barrages and attacks on the second and third objectives culminating with taking the southern side of the Albert-Bapaume road. The attack would be made from the newly made ‘jumping off trench’ excavated by the 1st Pioneers.
20th July 1916: Before dawn the front trenches from which Pozieres was to be attacked, and showing evidence of recent fighting all around, had been occupied by the AIF 1st Division, with the 1st Brigade on the left and 3rd Brigade on the right. That same night the artillery had taken over positions in Sausage Valley.
 19th July 1916: On the 16th July 1916 and despite deep misgivings from General Haig and his staff, approval was given for Lieut. General Haking’s attack towards the Aubers Ridge at Fromelles involving two Divisions, the 61st British and the Australian 5th Division, with the object to prevent the enemy from moving troops southwards to take part in the Battle of the Somme. Having been the last of the four Australian divisions to arrive in France, the AIF 5th Division would be the first Australian division in serious action on the Western Front, attacking to the left of the German stronghold known as the Sugarloaf held by the 16th Bavarian RIR. The infantry attack commenced at 5.30pm on 19th July 1916 and what followed turned out to the worst single 24 hours in Australian military history with 5,533 casualties. Much was said at the time of the rawness of the officers, the men and the supporting Australian artillery, but many other factors contributed to the failure including the flat, water filled terrain that offered scant defence to the attacking forces, all under the watchful gaze of the German artillery observers. Even if the attack had succeeded, the
  German High Command would have known in a matter of days that this was just a feint and it is unlikely that it would have resulted in a change in the defensive strategy for the Somme.
Many of the dead lay undisturbed in No-Man’s Land until the end of the war, hence the high proportion of men that have no known grave. After the battle the Germans buried over 250 Australian’s in a mass grave at Pheasant Wood which was excavated in 2009 and so began the identification and reburying process in the new Fromelles Cemetery, and to date 144 men have been positively identified, including Lieut-Colonel Norris Commanding Officer of the 53rd Battalion, and formerly CO of the 22nd Battalion in Egypt.
17th July 1916: The two divisions were in position prior to launching the Fromelles attack, initially ordered for that day. Preparations had been exhausting, not helped by the British 61st Division releasing a gas cloud some of which drifted back over the British lines, but also a strong German bombardment supporting a raid and which resulted in heavy losses for the AIF 5th Division of 42 killed, 118 wounded and 4 missing, due to the front-line being heavily garrisoned in preparation for the attack. The attack was postponed due to adverse weather conditions, much to the relief of the troops worn out by the hurried preparations. The assault battalions were sent back from the front-line to the villages and the support line in the rear.
On the Somme the AIF 1st Division was allotted to the British Reserve Army under the command of Lieut-Gen H.Gough for the seizure of Pozieres.
16th July 1916: Attitudes within the British GHQ towards the pending Fromelles offensive were changing and Haig’s staff, far from pressing for the demonstration with the infantry, had deep misgivings. General Haking gave his assurances that he had sufficient artillery and resources to succeed.
15th July 1916: The approval is given for General Haking’s initial scheme of attack at Fromelles involving two British Divisions and the Australian 5th Division with the object to ‘prevent the enemy from moving troops southwards to take part in the main battle (Somme).’ The AIF 5th Division, having been the last of the four Australian Divisions to arrive in France, would be the first in serious action. At this point none of the three Divisions allocated for the attack were considered fit for present use in the Somme offensive. Furthermore the attack was to be supported by two not three of the Divisions artillery, plus they were short of the medium trench mortars as the men of the Australian batteries were considered too raw for employment. As a result Haking decided to narrow the front of attack to 4,000 yards, with just the British 61st Division (1st Army) and the Australian 5th Division (2nd Army) attacking either side of a German stronghold known as the Sugarloaf. The total artillery would be 258 field-guns and howitzers, 64 heavies, 70 medium trench-mortars and two 12-inch howitzers on railway tracks and one or two of the long-range guns allotted by headquarters of the two British Armies.
14th July 1916: Following their move south from the Bois Grenier sector, the AIF 1st, 2nd and 4th Divisions of I Anzac Corps were all now stationed in the area between Doullens and Amiens, about 25 miles to the west of the Somme battlefield and out of range of the guns. Three days earlier, General Rawlinson Commander-in-Chief of the British Fourth Army had identified Pozieres with its commanding view across the plateau as key in the area as it was holding up the flank of the 4th Army.
10th July 1916: The AIF 5th Division begins taking over the positions of the 4th Division as the most southerly Division of the British Second Army in the vicinity of Cordonnerie Farm opposite Fromelles, with the British First Army to their right.
9th July 1916: To provide diversionary support to the Somme, night raids were conducted by Godley’s New Zealand forces within II Anzac Corps, however the Germans were becoming more familiar with them and raiding was becoming harder than the series of raids recently conducted by I Anzac Corps. These raids were being predicted by the Germans and not causing any undue concern. If the German battalions were to be pinned to this section of the line and not move to the Somme then a much bigger action was required.
8th July 1916: Although the AIF 5th Division had not fully arrived, of the 338,000 troops within the British Second Army at this time over 80,000 were from Australia and a further 20,000 from New Zealand. This number was about to be reduced with the withdrawal of I Anzac Corps to join Rawlinson’s British Fourth Army engaged on the Somme, leaving the New Zealanders and the 20,000 of the 5th Division in the Armentieres sector.
7th July 1916: The order is received for the immediate transfer of I Anzac Corps to the British Fourth Army on the Somme, the move to be completed by noon on 13th July. The withdrawal resulted in the temporary abandonment of the attack at Messines. However General Plumer of the Second Army was already contemplating an operation [Fromelles] for the same purpose as Messines to exploit weaknesses in the German line from the withdrawal of troops to support the defence on the Somme.
5th July 1916: The 12th & 13th Brigades of the AIF 4th Division had relieved the 1st & 3rd Brigades of the AIF 1st Division thus taking over whole of the front of the 1st Division in the southern sector of I Anzac Corps. To the north of the 4th Division now lay the New Zealand Division thereby relieving the AIF 2nd Division in preparation for a move to another part of the front (the Somme).
4th July 1916: The headquarters of the AIF 2nd Division moved north and arrived opposite Messines and took control of the 2nd and 7th Brigades which had moved in the preceeding weeks. The following day the 2nd Divisional Artillery and part of the 1st took over the gun positions from the British batteries, comprising of 180 6-inch howitzers at first rising to 275, and in addition one huge 15-inch howitzer, 67 heavy guns and 40 field batteries. On Hill 63, directly facing Messines, the Australian engineers and pioneers began the construction of thirty observation posts for the artillery and creation of bivouac areas behind trees and hedges.
3rd July 1916: The operations of the previous night concluded the programme of raids by I Anzac Corps, and command was handed over to General Godley of II Corps. By these actions the tension in the previously quiet Armentieres sector, although not equal to a protracted battle, had certainly risen. Whether they had the desired effect of keeping the German front-line formations fully occupied while the major offensive was taking place at the Somme to the south is questionable. However it was of value to the Anzac troops who gained self-confidence from these raids and lay the foundation for the tough fighting in the years ahead.
That night the Germans struck back raiding the Anzac line in two places, one against the 14th Battalion that had been involved in the previous night’s raid, and the other against the New Zealanders at the Epinette Salient. The 14th Battalion suffered 40 casualties that night while the New Zealanders had 90 casualties including 20 killed.
2nd July 1916: Raid by 5 Officers and 62 other ranks of the 11th Battalion, AIF 3rd Infantry Brigade at the ‘Tadpole’ near Cordonnerie. Enemy suffered 104 casualties including 38 dead. The preparatory bombardment completely destroyed the German trenches, and only one living German was found. No prisoners were taken, but identification of the dead found them to be from the same 21st Bavaria RIR as those found by the 9th Battalion the previous night. The raiders suffered no casualties.
Raid by 6 Officers and 83 other ranks of the 14th Battalion of the newly arrived AIF 4th Infantry Brigade. This raid involved heavy fighting and resulted in 50 of the enemy being killed, whereas the raiders suffered 38 casualties including ten killed.
Raid by 4 Officers and 104 other ranks of the Wellington Battalion, 2nd NZ Infantry Brigade south of Frelinghien. The enemy had anticipated the attack and had evacuated the trench to be entered, barricading it and positioning securely behind it and in the support trenches with machine guns already mounted and a large supply of bombs. Once entering the trench and analysing the situation, Lieut. Sheldon wisely ordered a retirement. The raiders suffered 53 casualties including 12 killed and five missing. The enemy did not suffer any casualties.
1st July 1916: Raid by 4 Officers and 144 other ranks of the 9th Battalion AIF 3rd Infantry Brigade to the south of Fleurbaix. 54 enemy casualties including 14 killed and 25 taken prisoner; raiders suffered 33 casualties including seven killed. According to Charles Bean this was probably the most brilliantly executed of this series of raids. In accordance with Birdwood’s wishes that the methods should be varied, this was ‘silent’, i.e. conducted without artillery support except for trench mortars to cut the enemy wire. The objective was a sector north-east of the Sugar-loaf salient and an emplacement containing a troublesome machine-gun. The teams had been carefully trained behind the lines beforehand, but once they had made inroads into the enemy trench all parties had heavy fighting. The machine-gun was captured, and carried back to the Australian lines with the base still attached.
A second raid by 3 Officers and 76 other ranks of the Wellington Battalion 1st NZ Brigade north of Wez Macquart. 15 enemy killed and 10 prisoners taken; raiders had nine casualties including 1 killed.
27th June 1916: Raid by 4 Officers and 58 other ranks of the 1st Battalion, AIF 1st Brigade east of Petillon. 55 enemy casualties including 19 killed, and 2 captured; raiders had 11 casualties including one killed.
Raid by 4 Officers and 58 other ranks by 25th & 27th Battalions of the AIF 7th Brigade near ‘Ontario Farm’, west of Messines. 15 enemy killed and 4 captured; raiders had six casualties including one killed. This raid was not on the I Anzac Corps front, but on that of the British 24th Division to which the 7th Brigade had just been transferred.
26th June 1916: Raid by 6 officers and 73 other ranks of the 18th Battalion, AIF 5th Brigade south-east of Bois Grenier. 36 enemy casualties including 13 killed, and 4 captured; raiders had 14 casualties with one missing (wounded then taken prisoner).
 25th June 1916: The next raid in the pre-Somme series by 9 officers and 73 other ranks of AIF 5th Brigade south-east of Bois Grenier. 38 enemy casualties including 13 killed, and 4 captured; the 5th Brigade raiders had 14 casualties with one killed. During the raid young Private William Jackson (17 when enlisted) of the 17th Battalion was awarded the Victoria Cross for his bravery in bringing back the wounded despite being wounded himself. Also that night saw a raid by 3 officers and 72 other ranks of the 3rd NZ Brigade east of Pont Ballot. 29 enemy killed, and 9 captured; raiders had 10 casualties with 2 killed. The raiders found a mine-shaft which was blown up.
The headquarters of the AIF 5th Division arrives from Egypt and is established at Blaringhem between Hazebrouck and St. Omer, with the division concentrated in the surrounding area.
17th June 1916: In preparation for an attack which would create a second front to the forthcoming British Somme offensive to the south, the 7th Brigade of the AIF 2nd Division is withdrawn from Armentieres and heads north to Messines. The following day the 2nd Brigade also arrives and both are put under the command of the British 24th Division.
14th June 1916: After the request from Marshal Joffre, Commander-in-Chief of the French forces on the Western Front to General Haig for an earlier launching of the Somme offensive, an order was issued that as many raids as possible be launched along the British front between 20th-30th June. This action was designed as an attempt to try and deceive the German High Command as to the real front of the attack, to wear him out, and to reduce his fighting efficiency.
13th June 1916: A raid was undertaken by about 50 volunteers from the 6th Battalion of the AIF 1st Division. The attackers came back with six prisoners and left twelve of the enemy killed. Their own casualties were light with three wounded.
6th June 1916: The 7th Brigade, drawing men from the 26th and 28th Battalions under Captain Foss, conducted the first raiding party by the Australians near Armentieres. The raiding party, for which volunteers were called, comprised of six officers and sixty men. In preparation the men were withdrawn to the rear where they trained, using mock-ups of the enemy positions, for two weeks, and in this case were assisted in the training by two Canadian officers – the Canadians were attributed in pioneering this type of warfare near Messines during October 1915. The men would be given special tunics with no badges or distinguishing marks, have faces blackened, bayonets painted. The scouts, bombers, carriers and messengers carried revolvers instead of rifles, and short stout sticks headed with bolts of iron.
The raid was a success, with three prisoners being brought back and some seven of the enemy killed. However upon their return, the Australian raiding party suffered six casualties, two of which were killed, by the retaliatory bombardment, and there were twenty casualties in the trench garrison from the artillery retaliation. This raid had the effect of raising the confidence of the Australian infantry and removed some anxieties now that some of their mates had been in the enemy line. This minor action by the 2nd Division was soon followed by a raid by each of the two other divisions, and then by a series of similar raids that formed part of the subsidiary part of the general plan of the Allies.
31st May 1916: At the end of May the newly formed AIF 4th and 5th Divisions training in Egypt were ordered to France and to join the 1st and 2nd Divisions on the Western Front.
30th May 1916: An intense German artillery bombardment descended upon the 11th Battalion holding the Cordonnerie Salient, from the front line post to about 400 yards in the rear where a great number were killed or wounded. A German raiding party then advanced and entered the Australian line with the objective of identifying the troops facing them and destroying the mine-shafts in the vicinity. This well planned and executed German assault resulted in a total loss for the 11th Battalion of 131 casualties, with 47 killed and 11 missing.
28th May 1916: Although constant attempts had been made to capture Germans in No-Man’s Land, it was not until the 28th that a prisoner was taken – a private of the 20th Bavarian RIR who had been out on patrol and had lost himself for two hours in the fog, stumbled into an Australian listening post and surrendered.
22nd May 1916: With German miners getting close to the British lines and tunnels, the Australians fired two camouflets (mines designed to destroy the enemy galleries) but they did not break through.
21st May 1916: Following the German raid on the 5th May, restrictions on the use of artillery shells was relaxed with a trebling of the Australian field gun and howitzer allowance. This meant that they were more able to retaliate against any enemy bombardment. Retaliation however worked both ways, and on the 21st May when the Anzac heavy artillery bombarded and destroyed the church spires (used for observation) at Radinghem, Le Maisnil as well as the Chateau d’Hespel, the German artillery responded in kind shelling the church at Fleurbaix and the village of Erquinghem.
12th May 1916: At the Cordonnerie Salient where the 175th British Tunnelling Company were working eleven mine-shafts, the Germans fired a mine about 50 yards from the Australian line. No damage was done to the British miners or their workings.
5th May 1916: Heavy German bombardment on the 20th Battalion holding the Bridoux Salient to the south-east of Bois Grenier, causing about 100 casualties. The bombardment was followed up by a German raiding party but quickly retired without losing a man, and taking with them eleven prisoners and two Stokes Mortars which up until this point the British had been trying to keep this new trench mortar a secret. Through this action German intelligence was able to confirm the presence of the Australian 2nd Division in France, but the importance of the Stokes Gun to the British was at this stage not appreciated by the Germans. However, this first engagement by the Australians in France was a major setback and embarrassment for the Australian commanders and their troops and the loss of the two Stokes guns rapidly became known throughout the army. Disciplinary measures were taken with Court Martials for the two officers in charge of the mortars, and with the Commanding Officer of the 20th Battalion being sent back to Australia.
27th April 1916: In response to a suspected gas attack by the Germans, the Australian 5th Field Artillery Brigade responded by firing at the enemy parapets in accordance with standing orders, the theory being that the bursting shells would help to dissipate the gas cloud. The gas attack proved to be a false alarm and the artillery was stopped after an hour. This was the first time that the infantry of the AIF 2nd Division had seen a barrage by its own artillery on the enemy parapet and as an event had an impact on morale showing that when required they could rely upon the accuracy and performance of its own guns.
20th April 1916: The AIF 1st Division under General Walker arrived relieving a brigade of the British 35th Division, and was situated on the right side of the AIF 2nd Division. The 9th Battalion, temporarily assigned to the 1st Brigade and having just arrived the previous day, suffered heavily from the shelling of one of their billets two miles behind the front line resulting in 25 men being killed and 49 wounded.
The shelling of billets, command centres etc way behind the front line had a big impact and put a strain on the soldiers. The accuracy of the German artillery fire led many to believe the presence of spies amongst the local population. This was not the case, and it was often the careless actions of the troops themselves under careful observation from enemy spotters that was responsible.
11th April 1916: The staff of the Australian 2nd Division under General Legge relieved that of the British 34th Division and became responsible for the divisional front.
7th April 1916: During the night of the 7th the first relief by Australian Imperial Force on the Western Front began in the Bois Grenier sector of northern France. The 21st Battalion of the 6th Brigade relieved the 10th Lincolnshire Battalion in the front-line near Fleurbaix, and the 27th and 28th Battalions (7th Brigade) took the place of the 20th and 21st Northumberland Fusiliers near Rue Marle, Armentieres.
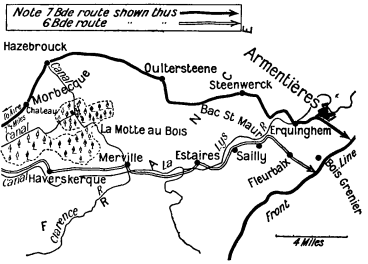 4th April 1916: The AIF 6th and 7th Brigades commence their march to the front line, with the 6th Brigade following the Lys River, towards Armentieres in French Flanders and the Bois Grenier sector of the Western Front, also known as the ‘nursery sector’. General Joffre, Commander-in-Chief of the French Army was visiting the British area and inspected some of the Australian troops.
1st April 1916: The Brigadiers of the AIF 2nd Division were taken by buses to the forward area where their troops would be taking over shortly. Detachments from the Divisions artillery began to go forward, without their guns, to the British batteries whom they would be replacing, and transport officers taken to the 34th Division to see methods for drawing rations, ammunition etc.
24th March 1916: The arrival of the Australians from Egypt caused two main anxieties for the British awaiting in France. The first was disease which had been a major problem for the troops both in Egypt and in Gallipoli; the second was the poor reputation for indiscipline that had developed (see below). To help combat the first all the Australian soldiers were compulsorily vaccinated, their clothing had been put through disinfectors, and during the voyage under the orders of GHQ an inspection for venereal disease took place.
23rd March 1916: Enemy submarines were active in the Mediterranean during the passage of I Anzac Corps from Alexandria to Marseille. The transports, most of which carried a gun on the poop deck, sailed singly, and were escorted part of the way by destroyers or sloops. The troops observing precautions wore their life-belts by day and used them as pillows by night. On the 23rd, the ‘Minneapolis’ returning to Alexandria after having just delivered the first Australians to France was torpedoed and eventually sunk near Malta.
22nd March 1916: The advance staff of the AIF 2nd Division reach the Headquarters of the British Army at Aire, some 20 miles from the front-line and 30 miles from the French coast on the English Channel. The following day the infantry began to arrive at Thiennes, where the men started to settle in tents as snow began to fall.
21st March 1916: The AIF 1st Division commenced embarkation from Alexandria, following the 2nd Division to France. General Birdwood sails on the 29th March to take command of I Anzac Corps, and and General Godley remains at Ismailia to command II Anzac Corps.
19th March 1916: Three weeks after having been informed that the AIF will be required to fight on the Western Front, the first Australian battalions set sail for France. Having been impacted the least by the re-structuring of the AIF while in Egypt, the AIF 2nd Division was the first to leave, with the Brigadier-General Paton and 7th Infantry Brigade HQ, together with the 25th Battalion arriving in Marseille on 19th March 1916 to cheering crowds on the quayside as the regimental band played the ‘Marseillaise’. Communication was received that the AIF 2nd Division was to join XI Corps of the British 1st Army positioned in the Bois-Grenier sector in French Flanders close to the Belgium border.
 Shore leave was not granted that evening on account of the disciplinary concerns regarding the Australian soldier particularly when on leave. With the AIF 1st and 2nd Divisions preparing to leave Egypt for France General Birdwood wrote to all men serving in the AIF reminding them of their responsibilities and not to damage the fine reputation that had been won above the cliffs of Anzac Cove. Furthermore, fearing riotous behaviour upon their arrival in France steps were taken to move the arriving troops from the ships in Marseille Harbour to the waiting trains during the night to lessen the chance of men absconding into the bars as they marched through the city. As it happened, after the AIF 2nd Division then 1st Divisions had passed through the city, General Birdwood was informed that no troops had caused less trouble. The same gratitude and admiration was afforded to General McCay as the 5th Division passed through a couple of months later.
As the 2nd Division was the first to land in France, it’s troops were warmly greeted at every stop. Men and women passed them gifts of fruit and wine. From these early days in France it became apparent that the Australian soldier, with their friendliness and not hindered by social distinctions was much more akin to the French than the more reserved British soldier. This affection between the two became even stronger as the fighting prowess of the Australian soldier became widely known to the French people during the war.
13th March 1916: The Australian 2nd Division was the first to leave camp for Alexandria and the voyage across the Mediterranean to France. The 7th Infantry Brigade was the first to leave, followed by the 5th and 6th Brigades.
9th March 1916: The front-line east of the Suez Canal was manned by sentries from a small group encamped to the rear. The front-line itself was marked out by stakes in case any of the abandoned sections be filled in by sand.
5th March 1916: The AIF 1st and 2nd Divisions began to move in from the desert. As there was no apprehension of an attack by the Turkish Army, the whole of the front-line of the Corps was handed over to two brigades of the Anzac Mounted Division until relieved by the 4th and 5th Infantry Divisions. For many of the men of the 1st and 2nd, it was still destination unknown, possibly Salonika.
29th February 1916: General Murray warns General Birdwood that I Anzac Corps would be required to move from Egypt to France within two weeks.
26th February 1916: Five days after the start of the massive German offensive on the French Army at Verdun, requests arrived for General Murray, Commanding Officer EEF, to prepare his Divisions to be sent to France. As a result of the current restructuring along with the great number of reinforcements still undertaking basic training, Gen Murray selected three British Divisions, the 11th, 29th and 31st, ahead of the Anzac Divisions.
15th February 1916: Despite rumours of sightings of Turkish patrols, there were no enemy incursions into the Canal Zone during this period. This, together with a change of thinking by General Sir A.J. Murray, Commanding Officer of the Egypt Expeditionary Force, resulted in a move away from the reliance on a great defensive position to one of mobile columns that could strike at the enemy, and this responsibility would fall to regiments of the Light Horse of the Anzac Mounted Division under the command of Major General Sir Harry Chauvel.
 12th February 1916: With the Anzacs regrouping and training in Egypt in early 1916, Generals Birdwood (pictured right) and Godley, the two respective Commanding Officers of the Australian and New Zealand forces, had to decide how best to absorb the 35,000 – 40,000 reinforcements that had arrived in Egypt into the Corps that had recently arrived back from Gallipoli. In addition another 50,000 new troops were promised, and therefore thousands of further reinforcements expected.
A decision was made to create new infantry divisions and merge the veteran soldiers of Gallipoli with the new arrivals. Firstly, the additional troops arriving from New Zealand enabled the formation of an independent New Zealand infantry division, resulting in the AIF 4th Brigade, which had up to that point been fighting alongside the kiwis, to be released for absorbing into an Australian division. The 4th Brigade along with the other Gallipoli ‘veteran’ 1st, 2nd and 3rd Brigades of the AIF 1st Division, were split into two, with one half of these men going to create the AIF 4th and 5th Divisions, and then with each of the resulting AIF 1st, 4th and 5th Divisions being brought up to strength by the reinforcements. A new division, the AIF 3rd Division was being formed in Australia, whereas the AIF 2nd Division consisting of the 5th, 6th and 7th Brigades remained unchanged. Although many men at first resented the splitting, the new ‘daughter’ battalions were able to wear the colours of the ‘parent’ battalion, and this act went some way to soften the bitterness and help bind the battalions in a relationship which remained throughout the war.
 With a move to the Western Front imminent, additional new supporting units were also being formed at this time. The development of the air-cooled automatic Lewis Gun enabled these new machine guns to be deployed into the infantry units, and as a result the heavier water-cooled tripod-borne Vickers machine guns were taken from the infantry and allotted to the newly formed machine-gun companies, one per brigade. For military works requiring less skill than the engineers but more than the infantry, Pioneer Battalions were formed, with one battalion per Division, together with the Tunneling Companies for underground warfare. Other lines of communication services were also formed such as bakeries and butcheries. To form these new units every battalion had, first, to detach its machine-gunners; second to provide about fifty tradesmen and pick-and-shovel men for the divisional pioneers; third to provide volunteers for the bakeries and supply units. In addition each battalion of the newly formed divisions had to provide 100 men suitable for the Artillery which included the new Trench Mortar Batteries. Read more on the new supporting units, and which members of the 5th/22nd Battalion were transferred during the re-organisation in February and March 1916 prior to the sailing to France.
23rd January 1916: A month after evading the Turkish Army in the successful evacuation of Gallipoli, the Australian Imperial Force was once again preparing to meet its Ottoman foe, this time in the Egyptian desert on the Sinai Peninsula. With its territory now secure, Turkey could now continue with its prime objective of defeating the Russians in the north, and now to the secondary objective for the Central Powers, including its German ally, of threatening the British in India and the vital Suez Canal sea route.
 In January 1915 the Turkish Army had attacked and attempted to take the Suez Canal but was repulsed primarily by the highly trained soldiers of the Indian infantry brigades, inflicting a loss of 2,000 Ottoman soldiers killed against 32 in the British Army.Following reports of increasing numbers of Turkish troops arriving by train at Beersheba, concerns were growing that a full assault by the Turkish Army on the Canal and then the rest of Egypt was being prepared. As a result the Australian 1st and 2nd Divisions moved to the Canal Zone to help dig and then man the defences. Of the ten bridge-heads and bases, Ferry Post and Serapeum lay within the Anzac sector. Each day half or more of each battalion went out to dig, while the rest where training in the sand. Within two weeks the 5th, 6th, 3rd and 2nd Brigades (in that order from left to right), had created a chain of works along the twenty miles of front, with the 2nd Division occupying 8 miles based around Ferry Post in the north and the 1st
  Division 12 miles around Serapeum to the south.
By March the AIF infantry divisions were returning from the Sinai front-line positions and being prepared for the Western Front. However the threat from the Ottomans was still present and the decision was taken by British High Command that the best form of defence was to move away from the static defence positions of the Canal to a more mobile strategy of attack. For this type of warfare the Australian Light Horse was most suited and as a result the majority of the Light Horse remained in the Middle East gallantly fighting their way up through Egypt and Palestine until the Ottoman Empire agreed to the Armistice of Mudros on 30th October 1918.
20th January 1916: The first few weeks of January saw the well earned rest in Egypt by the returning Gallipoli veterans, and many enjoyed relaxing in the hotels and cafes of Cairo. However, as before and prior to their departure for Gallipoli in April 1915, a small minority were causing problems in the streets and bars, bringing General Murray, Commander of the Mediterranean Expeditionary Force, to issue an appeal to all his troops to now focus on the serious task of re-organising in the short weeks remaining before the likely redeployment to the Western Front.
1st January 1916: Following their evacuation from Gallipoli the Anzacs were transferred almost immediately from Lemnos to Egypt, as this was the only place that they could be properly rested, refitted and reorganinsed – with thousands of new reinforcements now arrived in Egypt from Australia – plus in preparation for the defence of Egypt along the line of the Suez canal. For their concentration a new site was chosen at Tel-el-Kebir, some 30 miles due east of the canal. It proved a much more suitable location for training than the previous location at Mena, but also it acted as an encampment for a reserve to the Canal line, and was also far enough away from Cairo to lessen the problems of indiscipline that occurred prior to the sailing to Gallipoli in early 1915. In addition Lord Kitchener realised that a large scale threat to Egypt was only likely for a short period in the Spring due to the heat and harsh climatic conditions, so from March the garrisons in Egypt would act as a reservoir from which the British Army could draw for any other front.
Events Archive 1915
Published as ‘news’ 100 years on to the day, follow the 22nd Battalion on the project website and via Facebook and Twitter
 FIRST WORLD WAR TIMELINE
1914 1915 1916 1917 1918 1919