
 Background
With the failure of General Nivelle’s Spring Offensive at the Chemin des Dames and the subsequent French Army mutinies, plus with the British held to a stalemate at Arras, Field Marshal Douglas Haig’s long favoured Ypres campaign had now become the main focus for the Allied armies on the Western Front. The historic city of Ypres (photograph below of Australian troops marching past the Cloth Hall) was pivotal, not just for the defence of the Allied held channel ports, but it was also the gateway to attack and force the German Navy out of the Belgian ports of Ostend and Zeebrugge that were the  base for a flotilla of small submarines that operated within the German remit of ‘unrestricted’ submarine warfare and were a constant menace to the Allied cross-channel shipping. For Haig this would continue the wearing down process on the German Army at a place that they could ill afford not to fight, while waiting for the arrival of the Americans in sufficient numbers and the Allied Spring and Summer offensives of 1918.
The ground to the east and south of Ypres is characterised by a series of ridges running crescent shaped from south to north and it was the systematic step-by-step taking of these areas of high ground with limited but well defined objectives that formed Haig’s strategy (maps below courtesy of Australians on the Western Front 1914-1918). The final objective was the town of Passchendaele on a ridge some 12 kms to the north-east of Ypres, hence the alternative name often given to the Third Battle of Ypres. Before the offensive could begin a major obstacle needed removing in the form of the Messines-Wytschaete Ridge which afforded the German Army with a fine panoramic view over the mustering British infantry and artillery to the south of Ypres. Heralded by the detonation of 19 huge mines under the German positions on the ridge, the successful attack at Messines on the 7th June 1917 marked one of the most successful British operations of the war so far, and for the II Anzac Corps on the right flank of the attack was the easiest success for the Australians since they entered the war over two years ago.

Even at that time Haig’s Passchendaele campaign in Flanders was controversial and has remained so ever since. The British Prime Minister, David Lloyd George, opposed the offensive, as did General Ferdinand Foch the French Chief of the General Staff. Haig did not receive approval for the Flanders operation from the War Cabinet until 25th July, some six weeks after his success at Messines and with time now shortening before the onset of Autumn and the expected deterioration of the weather conditions.
Combat
The great bombardment at Ypres began on 15th July 1917, and with 3,091 British 2nd & 5th Army guns (one to every six yards of front) this was more than at Arras earlier in the year and almost twice as many that the 4th Army had on the Somme the previous year. However the summer haze plus the reluctance of the German artillery to show themselves meant that the destruction of the German batteries was not on schedule thus  Haig agreed to delay the start of the offensive in spite of worries of the rains expected in late summer. For the arriving Australian artillery they would endure conditions much more severe than on the Somme, where due to German air parity and the guns being positioned on the plains overlooked by the German spotters, the positions were targeted much more heavily causing many casualties at such a rate that it was feared reinforcements would have to be raised on a scale similar to the infantry. The transfer north of I Anzac Corps to Flanders began on 26th July, with Corps Headquarters to Hazebrouck and its 1st, 2nd and 5th Australian Divisions to the neighbouring areas. By this time the battalions were well rested and trained in the evolving techniques of overcoming the German defences of this area characterised by pillboxes dotted across the countryside.
The Battle of Pilckem Ridge
The Third Battle of Ypres began at 3.50am on the 31st July 1917 with the attack by the British infantry supported by the artillery of the 1st, 2nd & 5th Australian Divisions moving forward with their limbers as the advance began. By nightfall of a ‘most satisfactory’ day Haig’s British and French troops had taken and held the third objective on the left and centre of the attack, the second objective on the right centre, and first objective on the  right. To the right of the main attack General Godley’s (photograph left) II Anzac Corps within Plumer’s Second Army carried out a feint attack, the New Zealanders on La Basse Ville and the 42nd & 43rd Battalions of the 3rd Australian Division on outposts in front of the Warneton Line. The attacks were successful and new forward posts established, withstanding the German counter-attacks, but at a cost of 550 casualties for the 11th Brigade. The British II Corps attacked again on 10th August, to capture the rest of the black line (second objective) on the Gheluvelt plateau. The advance succeeded but German artillery fire and infantry counter-attacks isolated the infantry of the 18th Division, which had captured Glencorse Wood. At about 7:00 p.m., German infantry attacked behind a smokescreen and recaptured all but the north-west corner of the wood, only the 25th Division gains on Westhoek Ridge being held.
The Battle of Langemarck:
The Battle of Langemarck was fought from 16th – 18th August 1917 with General Gough intending that his British Fifth Army take the rest of the green line from Polygon Wood to Langemarck, and the Steenbeek crossed further north. In the British II Corps area, the failure of the 10th August attack was again repeated with the infantry managing to advance, but then being isolated by German artillery. The Germans appreciating the tactical value of the ground concentrated their efforts in retaining the ridge through determined defence and counter-attacks. By the end of the month Inverness Copse changed hands eighteen times, and the British had suffered some 100,000 casualties for little gain but the holding of the Gheluvelt plateau had come at a big cost to the German Army too.
 On the 16th August the Australian No.3 Casualty Clearing Station at Brandhoek (photograph right) was bombed killing an officer and one man, and five days later the Germans began to shell it. The nurses refused to leave, but eventually the hospital had to close and move to British No.10 CCS.
Haig transferred command of the offensive to General Plumer, the British Second Army commander on 25th August, and the following day the 4th Australian Division, coming out of the line at Messines, was transferred back to I Anzac Corps. With its impending return to the front-line, the 4th Australian Division would make it the most heavily used AIF Division in 1917. In preparation for the next phase the infantry of I Anzac Corps began to move forward on 12th September, with the 2nd Australian Division to Reninghelst and the 1st Australian Division the following day to Ouderdom. At no time within the experience of the Australian infantry were the German airmen so active behind the lines harassing the troops in their camps or on the move by bombing or machine-gun attacks. At night searchlights would cross the sky picking out the enemy planes for the anti-aircraft batteries.
On the 15th September the main bombardment ahead of the I Anzac Corps offensive began. By the 18th September the attacking brigades of the 1st Australian Division (2nd & 3rd Brigades) and 2nd Australian Division (5th & 7th Brigades) were brought forward to within easy marching distance of the front line. As the battalions began to arrive the weather had turned from clear to drizzle and then to steady rain, and with the battlefield now changing from dust to mud.
The Battle of the Menin Road
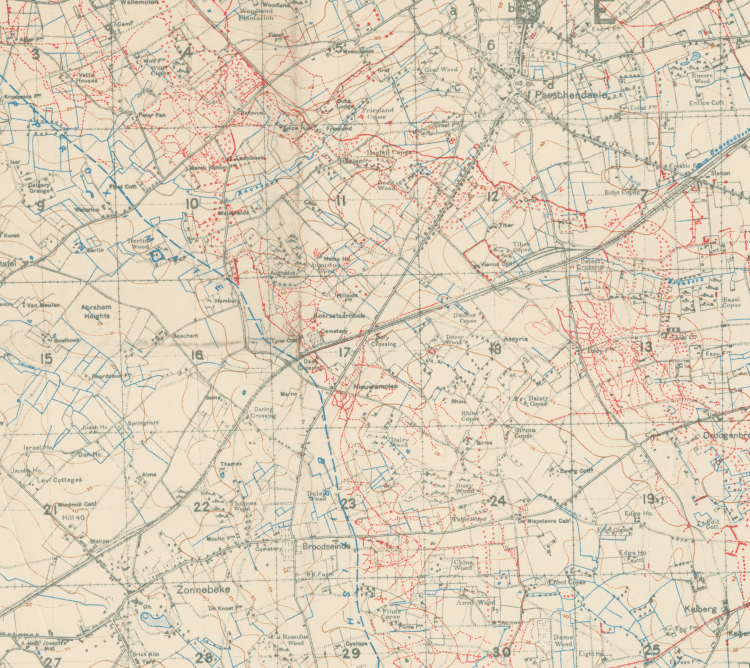
 The British plan for the battle of the 20th September 1917 included more emphasis on the use of heavy and medium artillery to destroy German concrete pill-boxes and machine-gun nests, which were more numerous in the battle zones being attacked and to engage in more counter-battery fire. With the attacking battalions moving to the assembly positions German artillery began its normal pre-cautionary bombardment of the forward area in case of attack, with the 9th Battalion particularly suffering losing many of its officers. At 5.37am German field guns began to come into action, movement having evidently been discovered by the Germans, but in fact they were prepared having recently found operational papers on a captured officer of the 2nd Australian Division. Three minutes later the British artillery and machine-guns opened up signalling the start of the attack. The two Australian divisions, together with four British on their right and five on their left on an eight mile front moved forward. This was the first time in the War that two Australian divisions had attacked side by side, and this gave a boost to the men knowing who was on their flank. [Click on link for geo-referenced Trench map reproduced with the permission of the National Library of Scotland].
 The Battle of the Menin Road went to plan. The artillery barrage was the densest that had covered the Australian troops so far, and it was the artillery that did the damage. In many cases the Germans in the heavily protected pill-boxes (see photograph, right) offered little resistance. By 6.09am the first objective was reached along the whole of the British offensive. After three-quarters of an hour the main barrage returned to the immediate front of the infantry signalling the next advance was imminent. The attacking battalions (18th, 27th, 12th and 5th Battalions from north to south) moved through the Red Line garrison to catch up with the shell bursts and at 7.08am began their advance to the Blue Line. The second stage was even easier than the first, and in front of the 5th Battalion on the right the pillboxes mostly surrendered without resistance, enabling the Australians to reach their objective and assist the British 23rd Division on their right. The same advance brought the 12th Battalion on the left of the 1st Australian Division to the edge of Polygon Wood, which by now was barely recognisable as a wood, capturing many unfired machine guns and their crews from pillboxes. Thus between 7.30 and 7.45am the second objective had been reached on the Australian front and most of the British front in accordance with the timetable.
 There now followed a halt of two hours, in which the barrage wandered into the German back area, while the Blue Line troops dug in along their objectives and the battalions for the third stage reorganised. As previously, when the protective barrage thinned, German machine-guns from pillboxes ahead sniped at the digging infantry. At the far end of Polygon Wood a mound of higher ground, once the Butte of a former shooting range (see photograph below) and now used as a German headquarters and observation post was throwing harassing fire on the digging-in Australians. At 9.53am the long pause ended and the barrage came down in front of the Blue Line, but in some areas such as at Black Watch Corner the artillery was falling short. The advance to the third objective, the Green Line, by the 17th, 28th, 26th 9th, 10th, 7th and 8th Battalions, was short lived with prisoners taken and pillboxes captured. Shortly before noon German troops and artillery were seen moving in preparation for a counter-attack, but almost immediately were drenched with shells. Another movement was spotted around 3pm but again was caught in the defensive barrage. Assisted by the 1st Pioneers the infantry began to entrench in their new positions, with the forward posts quickly linked up to form a continuous trench. It had been intended to bring up the 1st and 6th Brigades in reserve to take over the Red Line, but General Birdwood Commanding Officer of I Anzac Corps (photograph above left) having been warned by a British airman that the Australian front already appeared overcrowded countermanded this order. Nightfall was marked by another German movement met once again by a ferocious artillery barrage, and with this ended the fighting on the Anzac front.
During the night of 23rd September the 1st & 2nd Australian Divisions were relieved by the 4th & 5th Australian Divisions in preparation for the next blow. So ended with complete success the first phase in Field Marshal Haig’s step-by-step tactics, with the British Army achieving its objectives and even more cleanly than at Messines in June. British and German losses were comparable, between 20,000 to 25,000 men on both sides, of which Australian casualties within the 1st & 2nd Australian Divisions numbered 5,013. However the German troops came out of this battle crushed, and the British comparatively fresh, leading to an air of optimism both in the field and in England and France.
The Battle of Polygon Wood
 The next phase in Haig’s plan lay principally with I Anzac Corps, with the British X Corps on the right flank and V Corps on the left. Attacking on a front of 2,100 yards the 5th Australian Division, fresh from four months rest, would attack the harder task on the main ridge, and the 4th Australian Division which had been withdrawn from the Messines Ridge just three weeks before would attack Tokio Spur. The attack on the Butte in Polygon Wood (photograph below) would fall to the 14th Brigade under Brigadier-General Hobkirk. [Click on link for geo-referenced Trench map reproduced with the permission of the National Library of Scotland]. The new operation involved moving forward almost the whole of the massed
  artillery, but the battlefield had been churned by the guns of both sides such that movement was impossible until tracks of some sort – light railway was the preferred option – had been made. On the 25th September 1917 two practice barrages took place in preparation for the following day’s attack – the first at 6.30am by the whole artillery of the army lasting an hour, and at 8.30am by the guns of I Anzac Corps for 18 minutes. The German artillery was also active and at 5.30am the SOS signal went up and two hours later it was clear that the Germans had attacked and seized part of the front line, the forward ammunition dump for the next day’s attack had been blown up, and that preparations including the creation of the JOT for the attack would be visible to the enemy. 15th Brigade Commanding Officer General Elliott decided to send two companies of the 60th Battalion forward to restore the breached line and shore up his flank, but against a deteriorating system with the Germans shelling and aeroplanes shooting at his troops. Columns of Germans were seen moving forward against the 58th Battalion and by 10am had worked their way round their flank to fire at them from behind. The Middlesex’s supported by the Argyll & Sutherlands pushed
  forward on the 15th Brigade flank and the German thrust ended, but for Elliott he had thrown in all but the 59th Battalion of his infantry for the following days attack, and the 58th and 60th had suffered heavy losses. At 7pm Elliott called General Hobbs (5th Australian Division Commanding Officer) to inform the seriousness of the situation however Hobbs and Birdwood confirmed that the attack would take place and that the 8th Brigade would lend two battalions.
 With the onset of first light on 26th September 1917, the barrage supporting the attack was the most perfect that ever protected the Australian troops. The ground was dry and each shell burst raised a wall of dust and smoke behind which the Australian and British divisions advanced, but this cloud created confusion for the advancing battalions and they soon became intermingled. The 15th Brigade had the hardest day. Pillboxes to the right of the 31st Battalion were causing problems and during the attack on these strongpoints Pte Bugden (photograph left) was killed and later posthumously awarded the Victoria Cross. Fierce fighting ensued against the German strongpoints of Jerk House and Cameron House on the right flank, but with assistance from the 2nd Royal Welch the objectives of the Red and Blue Lines were secured. The 14th Brigade attacking the Butte and the 4th & 13th Brigades to their left fared better, outflanking the pillboxes, and achieving their objectives with relative ease. Protective barrages were then put in place and with the determined work by the infantry to secure their positions, successfully deterred the expected German counter-attacks. In taking its objective the 14th Brigade captured some 200 prisoners and 34 machine guns. However the success of the operation was largely down to the leadership of Brigadier-General Elliott, commanding officer of the 15th Brigade whose battalions suffered that greatest of the 5,500 Australian casualties that day.
 The 5th Australian Division (photograph right of the 5th Div. Monument on top of the Butte) was relieved from the front-line at Polygon Wood, with the 55th and 56th Battalions withdrawn and replaced by the British X Corps. The attention was now turning to the third phase of the Battle for Ypres, the main German buttress running along the Broodseinde Ridge that looked down over the British positions to the west. II Anzac Corps would then play the chief part by extending the capture of the ridge to beyond Passchendaele. In the days preceding the next attack Anzac engineers and pioneers were engaged in extending the duckboards along the tracks for the approach march, but there was not enough time to board the whole route nor plank the way forward for the artillery for the next advance. The weather was uncertain and misty rain of the next day warned of problems if the weather broke.
By now, and for the first time in the war, four Anzac divisions from the two Anzac Corps were side by side in the front line, with the 1st Australian Division on the right followed by the 2nd, the 3rd then the New Zealand Division on the left. The I Anzac Corps boundary had now been shifted to the Menin Gate, which was used by both corps, and all the Australian divisions had their headquarters in the dugouts in the ramparts, those of the 1st and 2nd Divisions by the Lille Gate, and those of the 3rd at the Menin Gate. Further to the right (south) of the Anzacs the British X and IX Corps were positioned, and on the left (north) the British XVIII and XIV Corps. In summary twelve divisions and parts of two others would attack on a 14,000 yard frontage.
The Battle of Broodseinde
The preliminary bombardment commenced consisting of a series of practice barrages, twice daily, but with no other intense bombardment until zero hour. The Anzac attack battalions began to move east and bivouacked in shell holes, and at various hours after dusk moved to the tapes. As Bean recalls the 1st & 2nd Australian Divisions having carried out one great attack just two weeks before advanced to this second operation in exuberant mood, their spirits lifted by having four Anzac divisions fighting alongside each other, plus having the British 7th Division on their right whose fighting quality had been witnessed by the Australians on their flank at Bullecourt five months previously. The chief danger to the operation would appear to the chance of a break in the weather.
 In the early hours of 4th October 1917 the whole attacking force of I and II Anzac Corps lay crowded about the front line (map courtesy of Australians on the Western Front 1914-1918). At 5.30 am, some thirty minutes before zero hour, German flares were sent into the air followed by the opening of their barrage. The men lying out in no-man’s land with their capes over their heads against the rain endured the barrage thinking that they had been observed, and casualties within the 1st and 2nd Australian Divisions from the shelling began to mount. At 6am, zero hour, the British barrage crashed down and the men began to move forward [Click link for geo-referenced Trench map reproduced with the permission of the National
 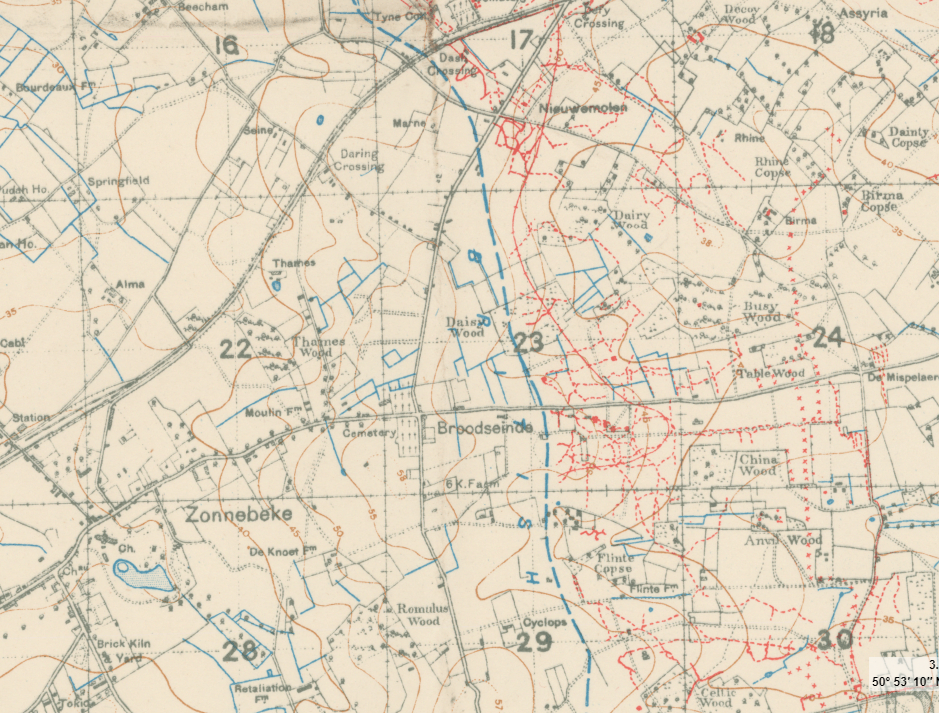 Library of Scotland], but as if by miracle the German bombardment ceased at this very moment. Through the smoke ahead shapes were seen moving around, and most of the Australians who saw them quickly grasped the fact that the Germans were mounting their own attack at the same zero hour, and began firing at the surprised enemy.
In contrast with the experience of 20th September, the Germans put up stiff resistance at most of the pill-boxes, but they were outflanked and captured, including four large pillboxes by the 6th Brigade as the advance of I Anzac Corps brought it across remnants of the Flandern I Line. To their left the 3rd Australian Division came across a main avenue of communication, pillboxes and shelters crowded with Germans, and many were brought is as prisoners. The Red Line first objective had been reached across the Anzac front by 7.20 am at which time a temporary halt was called to enable re-organisation prior to the push to the summit of the ridge. However fire was coming in from German strong points and it became increasingly difficult for impatient forward troops to wait and individual moves were made against shell holes and pillboxes containing German defenders. Once dispatched the sight of German troops fleeing over the crest proved too much for some in the forward companies of the 22nd, 21st and 24th Battalions pursuing the enemy before being hastily brought back before the next stage.
At 8.10 am, after four minutes of intense artillery bombardment, the second stage of the attack was launched. On the front of the 1st and 2nd Australian Divisions the summit was crossed almost immediately without difficulty, and the troops now found themselves looking over a landscape that had been hidden from the British infantry since May 1915, including farmland with grazing cows and fields fringed with trees. The whole objective of I and II Anzac Corps had been gained, and as this was part of Haig’s step-by-step approach orders were given to dig in. The news from other parts of the battlefront was almost equally as good.
This was the third blow struck by the British at Ypres in fifteen days with complete success, driving the Germans from one of the most important positions on the Western Front. General Plumer indeed called this ‘the greatest victory since the Marne’, and at this point the British faced the possibility of achieving a decisive breakthrough. For the Germans the 4th October was a significant defeat and they had suffered serious losses. However, losses too for the Australians were heavy with the three divisions sustaining 6,500 casualties.
 While Haig was having good fortune on the battlefield he was now losing the one thing he could not control, the weather. Rain commenced on the previous day during the attack and within a very short period of time the logistics of getting materials (artillery, ammunition, equipment) to the front, and wounded to the rear began to break down. Recently captured pillboxes were now crammed with wounded men trying to shelter from the elements and enemy shells. The rain continued as drizzle through the 5th October, were constant showers on the 6th and in bitter drenching squalls on the 7th. Mules and pack-horses endlessly ploughing their way along the limited tracks quickly rendered them almost impassable. Having only just come out of battle, the tired and wet men of the 6th Brigade spent hour’s cable laying in atrocious conditions. Having no coats they carried their waterproof sheets as capes and returned to their shell holes to find them drenched. Over the next day hundreds were evacuated with exhaustion, and many with trench feet. By the time of the next attack the 6th Brigade would be down to just 600 available men, and the 7th Brigade down to 800. The 5th Brigade that had not been used in the previous attack still had 2,000 men. Torrential rain fell in the late afternoon, and the meteorological experts forecasted no improvement in the weather. Haig, to the surprise of many, decided to push on with the offensive. General Birdwood, who knew that his troops were almost exhausted, hoped for postponement, but as his Corps had but a slight task on the flank of the attack he did not protest.
The Battle of Poelcapelle
 The French First Army and British Second and Fifth armies attacked on 9th October 1917, on a 13,500 yards front, from south of Broodseinde to St. Jansbeek, from the Broodseinde ridge towards Passchendaele. The operation of the 9th entailed the taking of two objectives, the red and blue lines being some 650 and 850 yards forward respectively, bringing the attacking British 66th Division of Gen. Godley’s II Anzac Corps 750 yards from the centre of Passchendaele. The 2nd Australian Division would provide the 5th & 6th Brigades for the right flank of the attack. The 66th Division was an untried division which caused anxiety in the Australian circles, and with drenching rain making passage forward extremely difficult, the right 197th Brigade was barely at the jumping-off tape by zero hour, having marched for twelve hours over a distance that should have taken just over an hour. Although an hour late the ragged formation of the 197th Brigade advance met little enemy resistance and the Passchendaele crest, the second objective, was taken. However neither the 198th Brigade on the left nor the Australians on the right were within touch or view.
 In the early hours the 20th Battalion with the 17th Battalion to their rear formed up on the tapes near Tyne Cot. [Click link for geo-referenced Trench map reproduced with the permission of the National Library of Scotland]. Though stronger than the battalions in the 6th Brigade their companies were down to 50-60 men. When they advanced at 5.20 am under what appeared to be a thin barrage the 66th to their left was nowhere to be seen. The barrage seemed to shorten or at least remain stationary and the 20th Battalion, having put in its junior officers, got caught and sustained enfilade fire from a German strong post near Defy Crossing. Part of the 20th Battalion worked around it, took 40 German prisoners and took the first objective. Only a few parties of the Germans offered more than just feeble resistance, and sustained Australian fire resulted in many bolting from Decoy Wood and the Keiberg hedges. The intensification of the barrage signalling the time for further advance was not easily detected, and resistance was met at the railway cutting. The 5th Brigade made its second objective, but alone and with numbers too small to eject the Germans who remained between the posts, they themselves were beaten back to the first objective suffering heavy losses.
 On the right the 6th Brigade attacked with all four battalion – 23rd, 21st, 24th and 22nd Battalions from north to south – on a frontage of 1,200 yards but with an average strength of just 7 officers and 150 other ranks, and at least half fresh from the nucleus at Caestre. So thin was the barrage that from the start the German machine guns were able to cause havoc for the advancing parties. On the right two detachments of the 22nd Battalion under Captain Bunning and Lieutenant Anderson attacking the area of the old German headquarters at the sandpit reached their objective but suffered heavily in the fighting with the nearby German posts. The 24th Battalion met strong rifle fire before reaching Daisy Wood, and then a machine gun turned on them from Dairy Wood before it was put out of action. The 21st Battalion which should have passed between the woods was mostly held up before reaching them. The 23rd Battalion had veered northwards behind the 17th Battalion, missing Dairy Wood from which the Germans were firing and with arrangement with the 17th Battalion dropped posts thus safeguarding the flank. The 6th Brigade had thus placed a few posts near its objective but the cover was thin and Germans were in posts to the rear. Brigadier-General Smith of the 5th Brigade decided to use his last reserve and successfully took both the woods thus securing the first objective, but the 66th Division that had made its way to the second objective of the crest and along with other sporadic out-posts were repulsed. During the attack the 2nd Australian Division suffered 1,253 casualties. General Birdwood later wrote that the return of heavy rain and mud sloughs was the main cause of the failure to hold captured ground. German General Kuhl concluded that the fighting strained German fighting power to the limit but that the German forces managed to prevent a breakthrough, although it was becoming much harder for them to replace losses.
The First Battle of Passchendaele
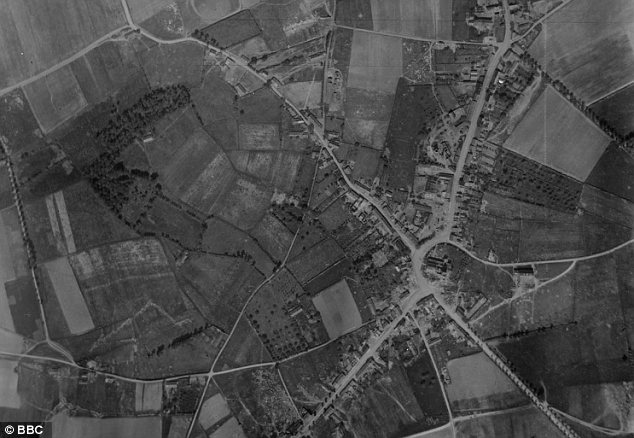
Haig issued the order for the attack on Passchendaele with II Anzac Corps leading in the centre and with the 4th & 5th Australian Divisions of I Anzac Corps replacing the worn out 1st & 2nd on the right flank. Aversed to attacking in the wet General Gough had concerns regarding the coming attack, particularly when informed that II Anzac Corps would be attacking from much further back than planned, and that the preparatory time for bombardment had been reduced from eight to just three days (however see the two photographs below of Passchendaele showing the village before and after the artillery bombardment).The weather and hence ground conditions was still providing serious issues for the movement of artillery forward for the attack. Ammunition became coated with mud and unusable until cleaned, and the experienced personnel, living in sodden shell-holes quickly dwindled through exhaustion and sickness.
The capture of Passchendaele was to be effected in three phases: the first objective (red line) was practically the second objective for the previous attack; the second (Blue Line) half-a-mile farther on, creating the jumping off line for the assault on the village and with the final objective being the Green Line some 400 yards beyond the village. The 3rd Australian Division would attack Passchendaele ridge and the village, and the New Zealand Division Bellevue Spur. The attack would start at 5.25am on 12th October 1917 and the Green Line reached by 12.11. The attacking battalions made their way forward in the rain as the  Germans fired gas shells in approaches. An hour before zero hour the rain ceased but as before when the barrage came it was thin and provided only light protection. Also any chance of the attacking battalions catching up with the advancing barrage disappeared in the mud. The 9th Brigade came under heavy machine gun fire from ruined houses, Augustus Wood and scattered pillboxes, creating heavy losses before the first objective was achieved. The 10th Brigade came under strong machine gun fire too from Augustus Wood and sniping from a pillbox, requiring the attackers to hop from shell-hole to shell-hole to their first objective. The attacking battalions of the 9th Brigade pushed on at 8.25am to the second objective and three posts were established. One party of the 10th Brigade on the left having no distinguishable barrage to follow pushed straight on for Passchendaele and the church, but with no support had to withdraw to the left flank of the 9th Brigade, and while doing so observed that the enemy had rallied and were trooping forward again. Furthermore there was no sign of the New Zealanders on the left – which had been held along their entire front by the mud, dense wire and crowded pillboxes, losing nearly 3,000 men in the process – and as the Germans began to file down the Bellevue Spur the situation was becoming precarious and the relentless shelling taking its toll. With the position now becoming hopeless and the prospect of annihilation the decision was made by the forward commanders to withdraw. The 12th Brigade of 4th Australian Division did not fare any better on the flank. Early success petered out and when it was seen that the 3rd Australian Division were withdrawing they too made their way back to their starting points. The failure of the 12th October mirrored that of the 66th Division just days before, with the dead and wounded of both attacks lying together in the mud. The following day stretcher-bearing parties struggled in the bog searching for the wounded, and even some unwounded stuck fast in the mud. There were 13,000 Allied casualties, including 2,735 New Zealanders, 845 of whom had been killed or lay wounded and stranded in the mud of no-man’s-land. In lives lost in a day, this was the worst day in New Zealand history. During the failed attack the 3rd Australian Division suffered some 3,200 casualties, and the 12th Brigade 1,000. The British Fifth Army gained little ground, and while the attacking troops had been exhausted and depressed, the Germans in spite of the severity of the casualties on their side, had been encouraged and reinvigorated. At a conference on the following day, Haig and the army commanders agreed that attacks would stop until the weather improved and roads could be extended, to carry more artillery and ammunition forward for better fire support.
 On the 22nd October the 3rd Australian Division in the II Anzac Corps Line was relieved by the Canadian 4th Division, with the Canadian 3rd Division relieving the New Zealand Division the following day. During a night gas attack on the 28th October the 5th & 6th Batteries on Anzac Ridge were put out of action. Between mid–October and mid-November there were over 1,300 gas casualties in the artillery alone, and although only a small number (twenty) were quickly fatal, the effects lasted for years to come for many of the men. The condition of the worst cases was pitiful with eyes swollen and streaming, voices gone and bodies blistered. Whole battalions came out of the line hoarse.
The Second Battle of Passchendaele
The second stage began on 26th October 1917, to complete the previous stage and gain a base for the final assault on Passchendaele. The attackers on the southern flank quickly captured Crest Farm and sent patrols beyond the final objective into Passchendaele. The attack on the northern flank again met with exceptional German resistance. The 3rd Canadian Division captured Vapour Farm on the corps boundary, Furst Farm to the west of Meetcheele and the  crossroads at Meetcheele but remained short of its objective. During a seven-day pause, the Second Army took over another section of the Fifth Army front adjoining the Canadian Corps. Three rainless days from 3rd-5th November helped the preparation for the next stage, which began on the morning of 6th November, with the 1st & 2nd Canadian Divisions. In less than three hours they reached their final objectives and Passchendaele was captured. The Canadian 1st and 2nd Divisions mounted the final and successful attack to take Passchendaele on the 10th November 1917. The final attack was carried out in a rainstorm.
The weather, combined with a reinforcing response to the joint Austrian-German attack in Italy at Caporetto that necessitated the sending of six British divisions to bolster the Italians, resulted in the end for the 3rd Ypres offensive. Furthermore the removal of the British Divisions together with the shortage of reinforcements meant that any plans Haig had for a resumption of the offensive in the Spring 1918 were now receding.
Outcome
 The 3rd Ypres campaign, controversial in 1917 and remaining so ever since, will forever be remembered as a campaign of ‘wretchedness in the Flanders mud’. The cautious step-by-step approach by Haig did result in territorial gains but came at a high cost of some 450,000 British and Dominion casualties, comparable to the Somme 1916 offensive, and was nowhere near achieving the initially held objective of driving the German Army from the channel coast. Although preferable to the limited, narrow front, wearing down assaults on the Somme of the previous year, the approach did have one major defect in that the attacks never went deep enough to disrupt the mass of the enemy’s artillery enabling it to retire and fight again. Despite the early successes, once the weather broke and turned the battlefield into an impassable quagmire, any thought of a decisive breakthrough had gone. However the offensive did have a significant impact on the eventual outcome of the war. Through this offensive Haig was able to buy time by putting the German Army under great strain thus preventing it from taking advantage of the French failure at the Aisne and their subsequent mutinies, enabling Petain time to rebuild in preparation for the arrival of the Americans, all during a period of crisis back home in Britain brought about by the German unrestricted submarine warfare and the political and military breakdown in Russia. For the Germans, eighty-six of their best divisions took part, and with resources reaching critical their quality was never the same again.
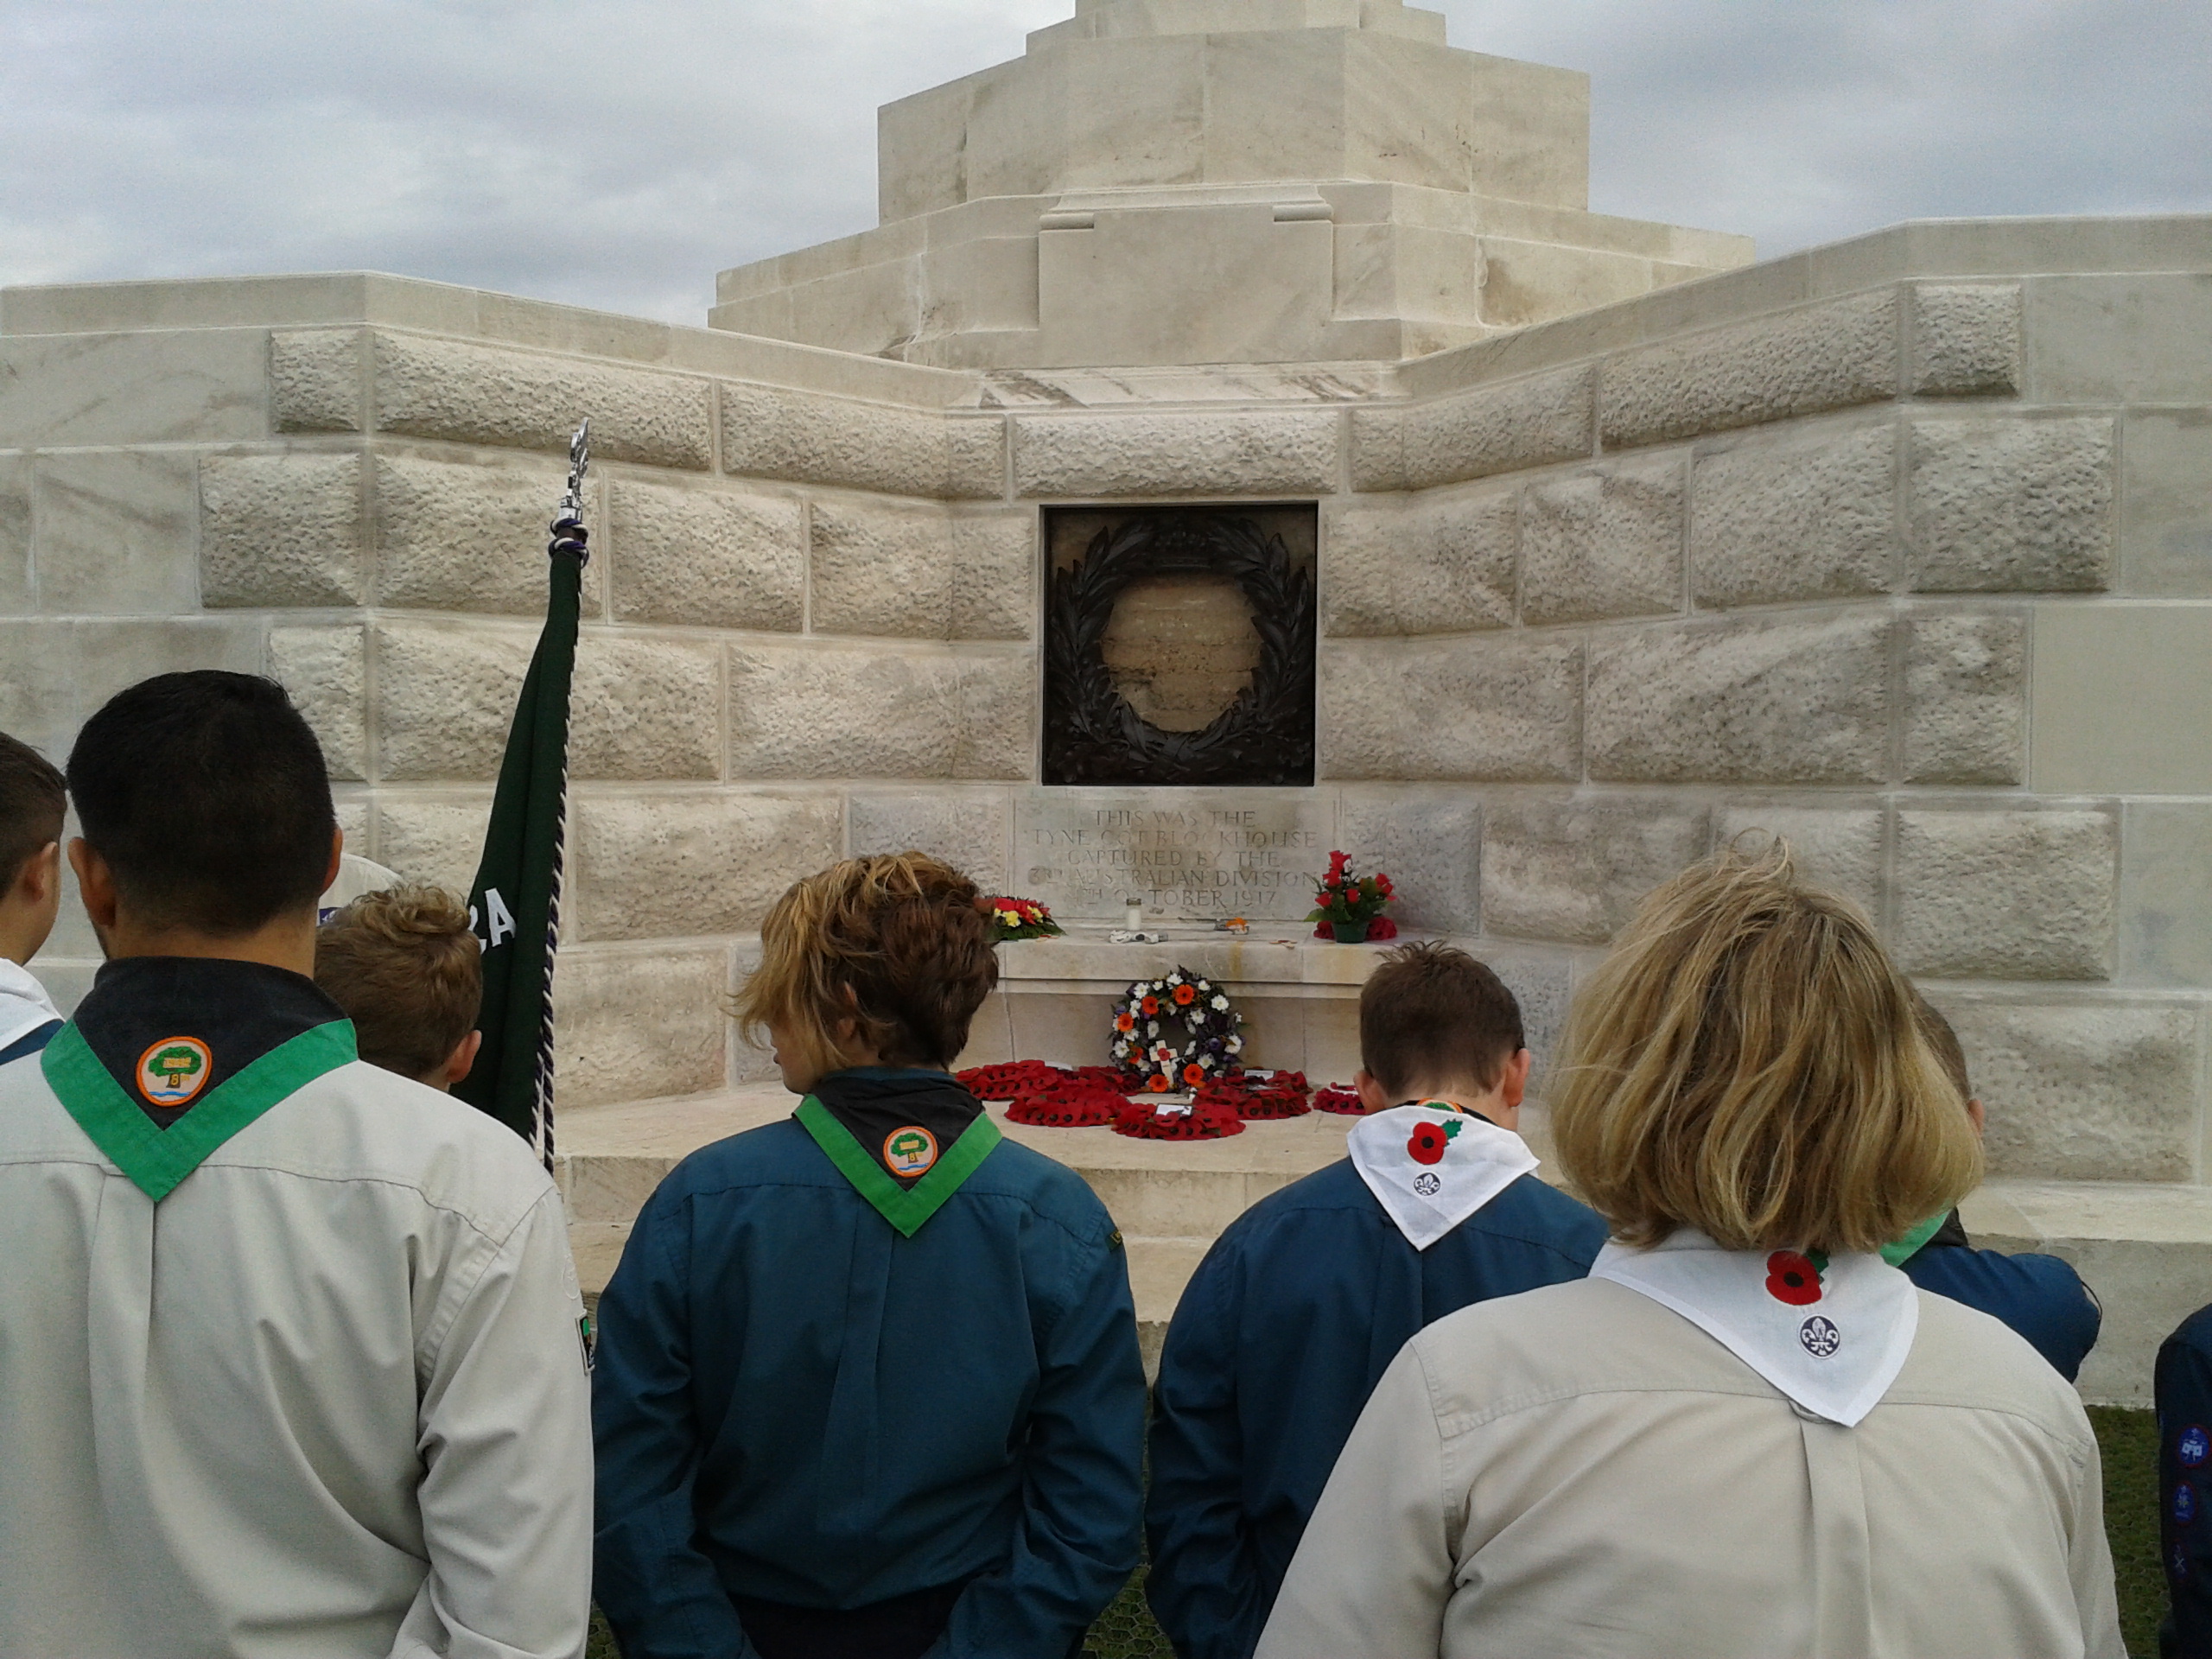
For the Australian Imperial Force, in spite of the events of 9th October, the Third Battle of Ypres was in the main a successful offensive and in which the Australians played a prominent part. The loss was heavy at an average of 7,300 for each Australian Division, but about 700 lower than at the Somme the previous year. The reputation of the Australians, as well as the New Zealanders and Canadians, increased further during the campaign and acknowledged by friend and foe alike. Two of the five Australian Divisions have their divisional monuments located in the area to commemorate their participation and sacrifice during the Third Battle of Ypres. The 5th Australian Division Memorial is located on the Butte in Polygon Wood, whereas a 3rd Australian Division plaque (photograph above right) is situated under the Cross of Sacrifice upon a former German blockhouse that was later used as a Dressing Station in the centre of the Tyne Cot Cemetery, the site of the attack on 4th October 1917.
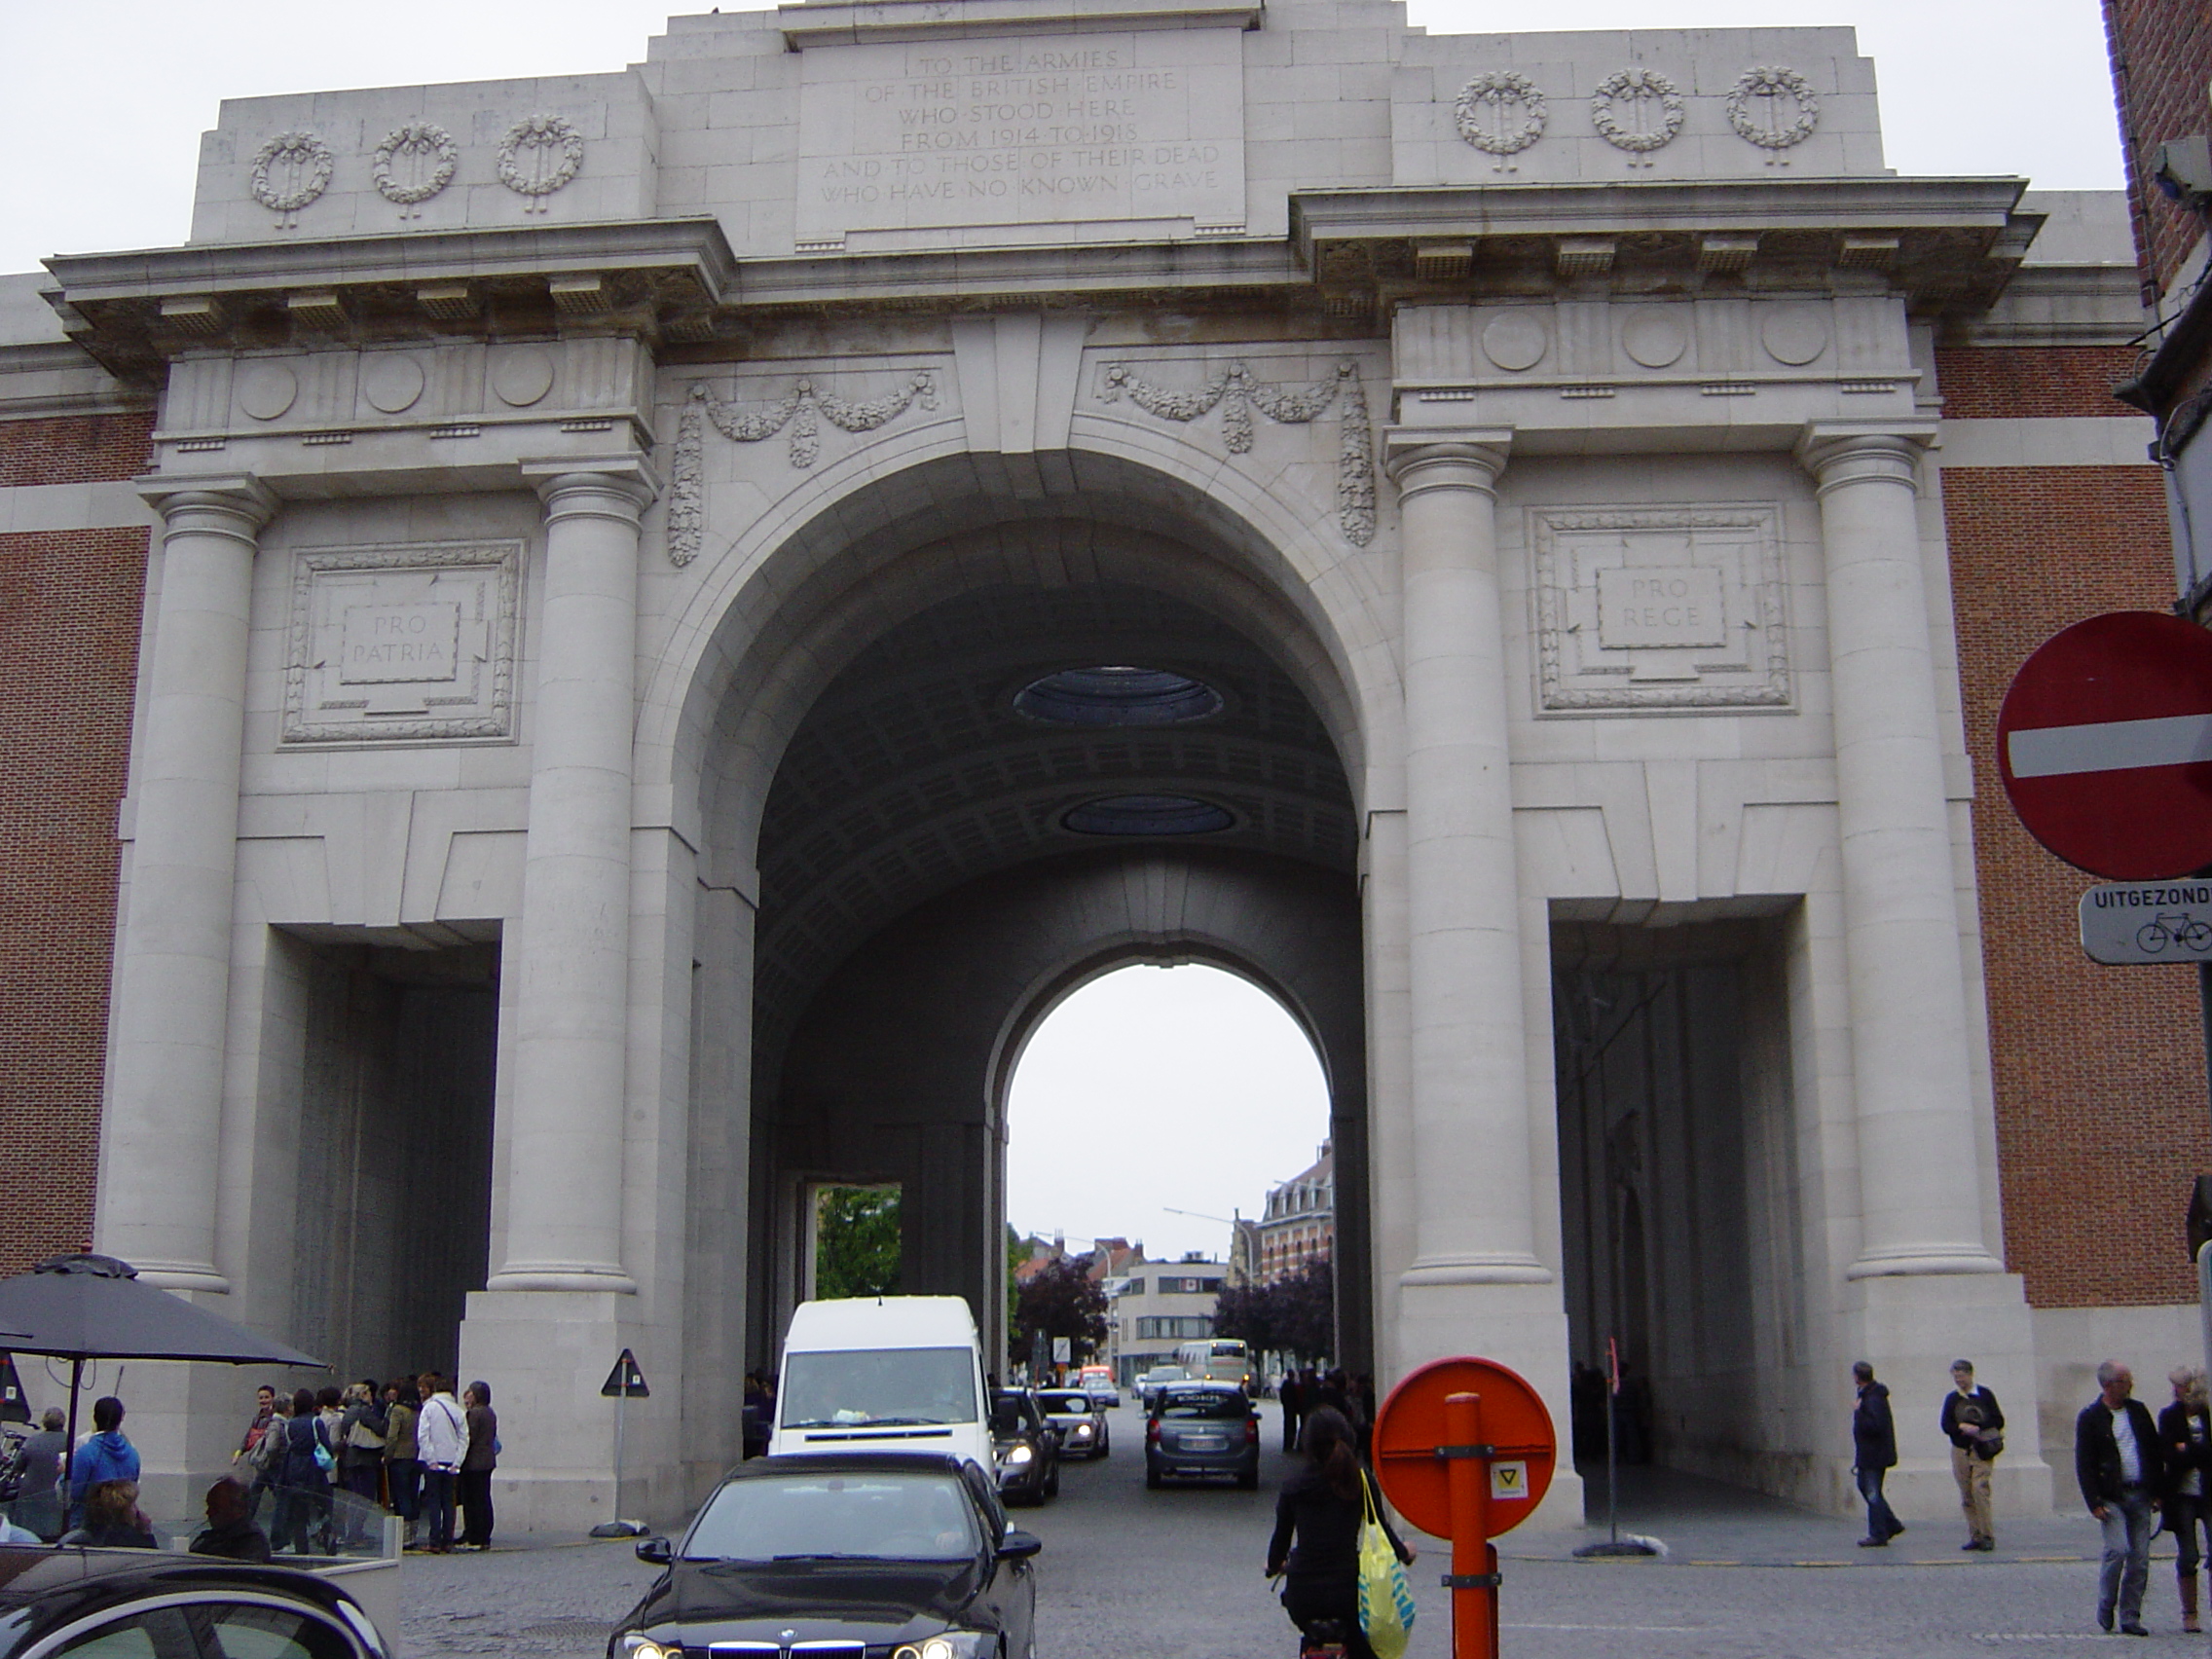
The Menin Gate Memorial to the Missing (photograph left) commemorates more than 54,000 men of all Commonwealth nations, except New Zealand, who died in the Ypres Salient and have no known grave. Every night at 8pm buglers from the local fire brigade play the Last Post to remember those that fought and died.
The New Zealand Memorial in commemoration of the 828 officers and men of the New Zealand Division that have no known grave is located at the Messines Ridge British Cemetery, and United Kingdom and New Zealand servicemen who died after 17th August 1917 are named on the memorial at Tyne Cot Cemetery. The Canadian Corps participation in the Second Battle of Passchendaele is commemorated with the Passchendaele Memorial located at the former site of the Crest Farm on the south-west fringe of Passchendaele village.
 FIRST WORLD WAR TIMELINE