
 28th December 1917: During the Christmas period snow fell in Flanders. With clear skies and a bright moon some patrols wore white overalls, and while patrolling near Hollebeke a white clothed party of the 8th Battalion met and fought a German patrol similarly camouflaged.
21st December 1917: Throughout the winter of 1917-18 the back areas at Messines were extremely quiet. However the AIF 3rd Division was temporarily placed into the front line in the Armentieres sector on the southern end thus extending the Australian Corps frontage. This sector, held by the Portuguese, was deemed unsafe and they had the special task of improving the defences before being relieved on 3rd January 1918.
 20th December 1917: The Australian people rejected conscription for the second time in a referendum. Although the soldiers voted marginally in favour, the majority of the men at the front voted against, with the pro-conscription coming from the newly arrived reinforcements in the depots in England. With voluntary enlistment falling, commanders were facing the prospect of some units having to be broken up.
17th December 1917: A German raiding party of sixteen men were sent to reconnoitre a post belonging to the 8th Battalion. The post was seized but they were driven off by parties of the 7th & 8th Battalions leaving eight of the attackers dead.
16th December 1917: The AIF 2nd Division relieved the AIF 3rd Division and took over the southern section of the Australian Corps front in the vicinity of Ploegsteert.
 14th December 1917: Most expected that the British offensive around Ypres would resume in the Spring, but the attitude changed when Field Marshall Haig issued an order to prepare for a German offensive instead in the Spring and work commenced on developing the defences, plus the conservation of the troops and the training for a defensive battle. His loss of six divisions to Italy and the shortage of reinforcements were as big a part in his decision making as the prospect of facing a regenerated German Army following the collapse of the Russians on the eastern front. The new British Armies had never yet specially practiced defence as almost all their instruction since 1915 were to be on the offensive in Ypres, Arras and the Somme. Haig believed that it was almost impossible to stop a massive German strike at the front so the British Armies prepared for defence in depth, comprising three systems with each having at least three lines. The forward line was to be prepared only as an outpost, designed to stop all but the major attack. The second system was to be placed some two to three miles behind the front line, built on advantageous ground, and some 2,000 – 3,000 yards in depth. The area between the first and second systems would become the battle zone. This was the only period in the war in which the Australian divisions undertook on a large scale the construction of defences with concrete. For operations, orders were given that raids should not be undertaken unless there were special reasons, artillery was to be used in a limited way to reduce the retaliatory firing on the defences, but active patrolling was encouraged. The Germans did likewise and aggressively patrolled attacking the outposts.
11th December 1917: In Palestine, two days after the official surrender by the Turks and exactly six weeks after the fall of Beersheba, General Allenby, commander of the EEF, made his formal entry into Jerusalem. Among the mounted units to accompany Allenby into Jerusalem were the 10th Light Horse Regiment and and a representative of the New Zealand Mounted Rifles Brigade. At this time the 12th Light Horse Regiment was in the Judean Hills on the front line near Kuddis, where the disposition of the Ottoman defenders was static and quiet.
8th December 1917: In light of the recent Russian proposal for peace talks across all fronts, the Australian Prime Minister telegraphed to the Secretary of State for the Colonies: “I am seriously disturbed by the position on the Italian, Russian and Western Fronts and desire to know the views and intentions of the War Cabinet re Trotsky’s peace proposals and prospects on the Western Front and generally. I earnestly hope that His Majesty’s Government will not waver in its resolution to press on at all costs. Though recognising the appalling difficulties…. I am profoundly convinced that to recede one inch from the position taken up and set out by Lloyd George would be absolutely disastrous. Please communicate this telegram to members of the War Cabinet.” Six days later Lloyd George insisted that there could be no true peace for the Allies without reparation.
3rd December 1917: Following the German attack on the 30th November at Cambrai the AIF 4th Division was ordered up to Peronne as the next available reserve. Here it stayed within the British Fifth Army until the New Year, in the area laid waste by the withdrawing Germans to the Hindenburg Line earlier in the year.
30th November 1917: A German raiding party attacked an outpost held by the 59th Battalion and during the stiff defence seven of the eight defenders were left for dead and one captured. A neighbouring post drove off the attackers and discovered all seven men wounded. Meanwhile 3 officers and 70 men of the 39th Battalion raided the German lines sustaining 14 casualties, including Lieut. Ramsay mortally wounded, and killing 30 Germans.
23rd November 1917: Having been the most heavily used division in the AIF in 1917, the 4th Division arrived at Gamaches near Dieppe for a well earned rest, and acting as the Corps reserve division.
22nd November 1917: A German patrol attacked a post of the 54th Battalion, killing one and capturing four Australians.
19th November 1917: The German 102nd IR attempted a raid on a considerable scale against the forward post of the 32nd Battalion. The Australian post killed three and wounded three of the raiders with four of their own wounded.
15th November 1917: The AIF 5th Division relieved the AIF 1st Division and took over the middle section of the Australian Corps front in the vicinity of Messines. For the first time all five Australian divisions were under the single command of the Australian Corps, although for the short term the AIF 4th Division was relegated to a GHQ back area for rest, ostensibly acting as the Corps ‘reserve’ division. For Corps Commander General Birdwood the focus was now turning to the winter and how to keep the troops well and avoid the illnesses and trench foot that had caused many casualties the previous winter on the Somme. Sports and entertainment were given high priority.
14th November 1917: The British Army in Flanders went into its winter positions and for I Anzac Corps, relieved from their front line positions, they proceeded to the quiet front at Messines. The Ypres fighting from September to November 1917 had cost the Australians 38,093 officers and men, and with the dwindling stream of reinforcements from Australia, anxieties were growing whether they would be able to reinforce sufficiently.
13th November 1917: A conference was held at Divisional Headquarters to discuss future movements, absence without leave and the approaching referendum on conscription. With regard to the latter it was decided that debates amongst the men should be encouraged, that the necessary facts should be placed before them and that in the interest of discipline no officers shall take a direct part in any propaganda or debate in the matter.
 10th November 1917: The Canadian 1st and 2nd Divisions mounted the final and successful attack to take Passchendaele on the 10th November 1917. The final attack was carried out in a rainstorm. The weather, combined with a reinforcing response to the joint Austrian-German attack in Italy at Caporetto that necessitated the sending of six British divisions to bolster the Italians, resulted in the end for the 3rd Ypres offensive. For the Australian Imperial Force, in spite of the events of 9th October, the Third Battle of Ypres was in the main a successful offensive and in which the Australians played a prominent part. The loss was heavy at an average of 7,300 for each Australian Division, but about 700 lower than at the Somme the previous year. The reputation of the Australians, as well as the New Zealanders and Canadians, increased further during the campaign and acknowledged by friend and foe alike.
 8th November 1917: As a result of the losses from the Third Ypres campaign and the pending manpower shortage in the Australian divisions – each of the five AIF infantry divisions suffered on average 7,300 casualties – Australian Prime Minister William Hughes (photograph right) announced that there would be a second referendum on conscription to be held later in the year.
4th November 1917: The AIF 3rd Division took over the southern section of the Australian Corps front in the vicinity of Ploegsteert.
 31st October 1917: After a period of stalemate in Southern Palestine from April to October 1917, on 31st October General Edmund Allenby, who replaced General Murray in June, attacked the Turkish garrison of Beersheba with some 47,500 rifles of the XX Corps and about 15,000 troopers in the Anzac and Australian Mounted Divisions (Desert Mounted Corps). Orders were issued for a general attack on Beersheba by the dismounted 1st and 3rd Light Horse Brigades and the mounted 4th Light Horse Brigade. As the leading squadrons of the 4th Light Horse Regiment of Victorians, and the New South Wales’ 12th Light Horse Regiment came within range of the Ottoman riflemen in defences directly in their track, a number of horses were hit by sustained rapid fire. While the 4th Light Horse Regiment attacking these fortifications dismounted after jumping the trenches, most of the 12th Light Horse Regiment on the left rode through a gap in the defences to gallop into Beersheba to capture the garrison. The Turkish defenders suffered many casualties and between 700 and 1,000 troops were captured.
Having weakened the Ottoman defences which had stretched almost continually from Gaza to Beersheba, they were finally over-run by 8th November after the Battle of Tel el Khuweilfe, the Battle of Hareira and Sheria, and the Third Battle of Gaza.
 28th October 1917: During a night gas attack the 5th & 6th Batteries on Anzac Ridge were put out of action. Between mid–October and mid-November there were over 1,300 casualties in the Australian Field Artillery alone, and although only a small number, 20, were quickly fatal the effects lasted for years to come. The condition of the worst cases was pitiful with eyes swollen and streaming, voices gone and bodies blistered. Whole battalions came out of the line hoarse. [Photograph showing a Howitzer from a Siege Battery firing with gas masks on – five of the men were killed in action on 4th October 1917.]
27th October 1917: The AIF 2nd Division came back into the I Anzac Line replacing the AIF 5th Division.
26th October 1917: The Second Battle of Passchendaele began to complete the previous stage and gain a base for the final assault on the village of Passchendaele. The 6th Battalion took part in an attack by the Canadians towards the Keiberg, and despite early success they had to withdraw. The attackers on the southern flank quickly captured Crest Farm and sent patrols beyond the final objective into Passchendaele. The attack on the northern flank again met with exceptional German resistance. The 3rd Canadian Division captured Vapour Farm on the corps boundary, Furst Farm to the west of Meetcheele and the crossroads at Meetcheele but remained short of its objective. In the three subsequent battles in which the Canadians captured Passchendaele the Australian infantry took no part, but supported with artillery and machine gun fire.
25th October 1917: The AIF 4th Division Artillery having suffered 1,000 casualties in almost continuous action at Bullecourt, Messines and Ypres had to be withdrawn as a result of the gas attacks, though no fresh batteries relieved it.
24th October 1917: The AIF 1st Division comes back into the I Anzac Line replacing the AIF 4th Division.
22nd October 1917: The AIF 3rd Division in the II Anzac Corps Line was relieved by the Canadian 4th Division, with the Canadian 3rd Division relieving the New Zealand Division the following day.
16th October 1917: For four nights between the 14th & 19th October the Germans drenched the valleys behind the lines with mustard gas, causing 116 casualties in I Anzac Corps area on the 16th alone. The 43rd Battalion in II Anzac Corps had to evacuate 40 men blistered and gassed after work on the railway near Zonnebeke.
 12th October 1917: The capture of Passchendaele (map courtesy of Australians on the Western Front 1914-1918) was to be effected in three phases: the first objective (Red Line) was practically the second objective for the previous attack; the second (Blue Line) half-a-mile farther on, creating the jumping off line for the assault on the village and with the final objective being the Green Line some 400 yards beyond the village. II Anzac Corps AIF 3rd Division would attack Passchendaele ridge and the village, and the New Zealand Division Bellevue Spur, with the AIF 4th Division on the right flank. The attack of the 12th October, which would later be known as the First Battle of Passchedaele would start at 5.25am and the Green Line reached by 12.11.
The attacking battalions made their way forward in the rain as the Germans fired gas shells in approaches. An hour before zero hour the rain ceased but as before when the barrage came it was thin and provided only light protection. Also any chance of the attacking battalions catching up with the advancing barrage disappeared in the mud. The 9th Brigade came under heavy machine gun fire from ruined houses, Augustus Wood and scattered pillboxes, creating heavy losses before the first objective was achieved. The 10th Brigade came under strong machine gun fire too from Augustus Wood and sniping from a pillbox, requiring the attackers to hop from shell-hole to shell-hole to their first objective. The attacking battalions of the 9th Brigade pushed on at 8.25am to the second objective and three posts were established. One party of the 10th Brigade on the left having no distinguishable barrage to follow pushed straight on for Passchendaele and the church, but with no support had to withdraw to the left flank of the 9th Brigade, and while doing so observed that the enemy had rallied and were trooping forward again. Furthermore there was no sign of the New Zealanders on the left – which had been held along their entire front by the mud, dense wire and crowded pillboxes, losing 2,700 men in the process – and as the Germans began to file down the Bellevue Spur the situation was becoming precarious and the relentless shelling taking its toll. With the position now becoming hopeless and the prospect of annihilation the decision was made by the forward commanders to withdraw. The 12th Brigade of AIF 4th Division did not fare any better on the flank. Early success petered out and when it was seen that the AIF 3rd Division were withdrawing they too made their way back to their starting points.
 The failure of the 12th October mirrored that of the 66th Division just days before, with the dead and wounded of both attacks lying mingled in the mud. The following day stretcher-bearing parties struggled in the bog searching for the wounded, and even some non-wounded stuck fast in the mud. During the failed attack the AIF 3rd Division suffered some 3,200 casualties, and the 12th Brigade (4th Division) 1,000. For the New Zealand nation, in terms of lives lost this was their blackest day since its existence (photograph of the New Zealand Memorial). The British Fifth Army attacking to the north gained little ground, and while the attacking troops had been exhausted and depressed, the Germans in spite of the severity of the casualties on their side also, had been encouraged and reinvigorated. Field Marshall Haig now recognised that the hope of obtaining great strategic results from this year’s campaign had vanished.
10th October 1917: Field Marshall Haig issued the order for the attack on Passchendaele with II Anzac Corps leading in the centre and with the AIF 4th & 5th Divisions of I Anzac Corps replacing the worn out 1st & 2nd on the right flank. Aversed to attacking in the wet General Gough had concerns regarding the coming attack, particularly when informed that II Anzac Corps would be attacking from much further back than planned, and that the preparatory time for bombardment had been reduced from eight to just three days. The weather and hence ground conditions was still providing serious issues for the movement of artillery forward for the attack. Ammunition became coated with mud and unusable until cleaned, and the experienced personnel, living in sodden shell-holes quickly dwindled through exhaustion and sickness.
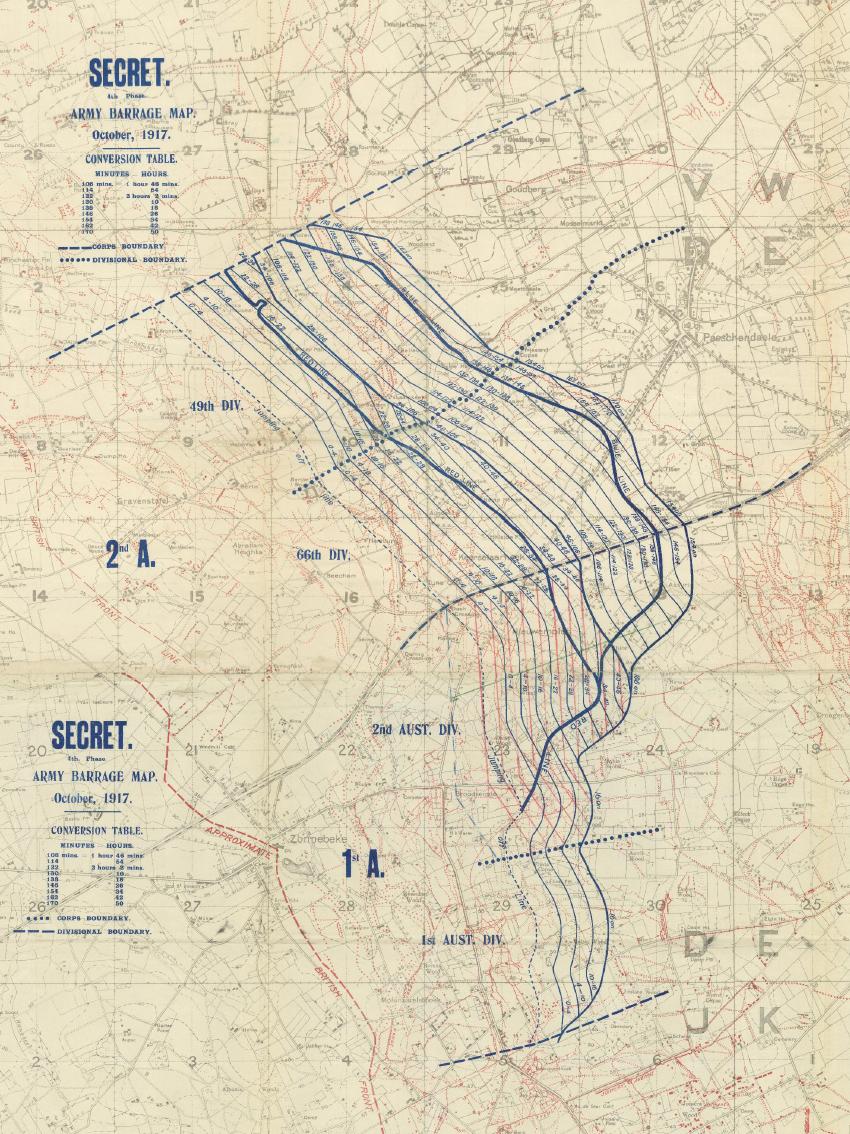 9th October 1917: The Battle of Poelcappelle. The operation in the Anzac sector (see barrage map, right) entailed the taking of two objectives, the red and blue lines being some 650 and 850 yards forward respectively, bringing the attacking British 66th Division of Gen. Godley’s II Anzac Corps 750 yards from the centre of Passchendaele. The AIF 2nd Division of Gen. Birdwood’s I Anzac Corps would provide the 5th and 6th Brigades for the right flank of the attack. The 66th was an untried division which caused anxiety in Australian circles, and with drenching rain making passage forward extremely difficult, the right 197th Brigade was barely at the jumping-off tape by zero hour having marched for twelve hours over a distance that should have taken just over an hour. Although an hour late the ragged formation of the 197th Brigade advance met little enemy resistance and the Passchendaele crest, the second objective, was taken. However neither the 198th Brigade on the left nor the Australians on the right were within touch or view.
In the early hours the 20th Battalion of the 5th Brigade with the 17th to their rear formed up on the tapes near Tyne Cot. Though stronger than the battalions in the 6th Brigade their companies were down to 50-60 men. When they advanced at 5.20 am under what appeared to be a thin barrage the 66th to their left was nowhere to be seen. The barrage seemed to shorten or at least remain stationary and the 20th Battalion, having put in its junior officers, got caught and sustained enfilade fire from a German strong post near Defy Crossing. Part of the 20th worked around it, took 40 German prisoners and took the first objective. Few parties of the Germans offered more than feeble resistance, and sustained Australian fire resulted in many bolting from Decoy Wood and the Keiberg hedges. The intensification of the barrage signalling the time for further advance was not easily detected, and resistance was met at the railway cutting. The 5th Brigade made its second objective, but alone and with numbers too small to eject the Germans who remained between the posts, they themselves were beaten back to the first objective suffering heavy losses.
 On the right the 6th Brigade attacked with all four battalions – 23rd, 21st, 24th and 22nd from north to south (see map, left) – on a frontage of 1,200 yards but with an average strength of just 7 officers and 150 other ranks, and at least half fresh from the nucleus at Caestre. So thin was the barrage that from the start the German machine guns were able to cause havoc for the advancing parties. On the right two detachments of the 22nd Battalion under Captain Bunning and Lieutenant Anderson attacking the area of the old German headquarters at the sandpit reached their objective but suffered heavily in the fighting with the nearby German posts. The 24th Battalion met strong rifle fire before reaching Daisy Wood, and then a machine gun turned on them from Dairy Wood before it was put out of action. The 21st which should have passed between the woods was mostly held up before reaching them. The 23rd Battalion encountered less resistance at first had veered northwards behind the 17th, missing Dairy Wood from which the Germans were firing and with arrangement with the 17th Battalion dropped posts thus safeguarding the flank. During its advance 60% of the 23rd Battalions casualties were caused by rifle and machine gun fire first from Daisy Wood and then from Busy Wood. The 6th Brigade had placed a few posts near its objective but the cover was thin and Germans were in posts to the rear. Brigadier-General Smith of the 5th Brigade decided to use his last reserve and successfully took both the woods thus securing the first objective, but the 66th Division that had made its way to the second objective of the crest and along with other sporadic out-posts were repulsed. During the attack the AIF 2nd Division suffered 1,253 casualties.
8th October 1917: Torrential rain fell in the late afternoon, and the meteorological experts forecasted no improvement in the weather. Field Marshall Haig, to the surprise of many, decided to push on with the offensive. General Birdwood, who knew that his troops were almost exhausted, hoped for postponement, but as his I Anzac Corps had but a minor task on the right flank for the next Poelcappelle attack he did not protest. II Anzac Corps to their left would have a bigger task attacking towards the village of Passchendaele.
 6th October 1917: Having only just come out of battle, the tired and wet men, particularly of the 6th Brigade, spent hours cable laying in atrocious conditions. Having no coats they carried their waterproof sheets as capes and returned to their shell holes to find them drenched. Over the next day hundreds were evacuated with exhaustion, and many with trench feet. By the time of the attack the 6th Brigade would be down to just 600 available men, and the 7th down to 800. The 5th Brigade that had not been used in the previous attack still had 2,000 men.
5th October 1917: The success of the previous day had brought high expectations that further attacks could lead to a decisive breakthrough, but while Field Marshall Haig was having good fortune on the battlefield he was now losing the one thing he could not control, the weather. Rain commenced on the previous day during the attack and within a very short period of time the logistics of getting materials (artillery, ammunition, equipment) to the front, and wounded to the rear began to break down. Recently captured pillboxes were now crammed with wounded men trying to shelter from the elements and enemy shells. The rain continued as drizzle through the 5th, were constant showers on the 6th and in bitter drenching squalls on the 7th. Mules and pack-horses endlessly ploughing their way along the limited tracks quickly rendered them almost impassable.
4th October 1917: The Battle of Broodseinde (map courtesy of Australians on the Western Front 1914-1918). In the early hours the whole attacking force of I and II Anzac Corps lay crowded about the front line. At 5.30 am, some thirty minutes before zero hour, German flares were sent into the air followed by the opening of their barrage. The men lying out in no-man’s land with their capes over their heads against the rain endured the barrage thinking that they had been observed, and casualties with the AIF 1st and 2nd Divisions from the shelling began to mount. At 6 am, zero hour, the British barrage crashed down and the men began to move forward, but as if by miracle the German bombardment ceased at this very moment. Through the smoke ahead shapes were seen moving around, and most of the Australians who saw them grasped the fact that they were Germans assembling for their own attack at the same zero hour and began firing.
 In contrast with the experience of 20th September, the Germans put up stiff resistance at most of the pill-boxes, but they were outflanked and captured, including four large pillboxes by the 6th Brigade as the advance of I Anzac Corps brought it across remnants of the Flandern I Line. To their left the AIF 3rd Division of II Anzac Corps came across a main avenue of communication, pillboxes and shelters crowded with Germans, and many were brought is as prisoners. The Red Line first objective had been reached across the Anzac front by 7.20 am at which time a temporary halt was called to enable re-organisation prior to the push to the summit of the ridge. However fire was coming in from German strongpoints and it became increasingly difficult for impatient forward troops to wait and individual moves were made against shell holes and pillboxes containing German defenders. Once dispatched the sight of German troops fleeing over the crest proved too much for some in the forward companies of the 22nd, 21st and 24th, pursuing the enemy before being hastily brought back before the next phase.
 At 8.10 am after four minutes of intense artillery bombardment the second stage of the attack was launched. On the front of the 1st and the 2nd Divisions the summit was crossed almost immediately without difficulty, and the troops now found themselves looking over a landscape that had been hidden from the British infantry since May 1915, including farmland with grazing cows and field fringed with trees. The whole objective of I and II Anzac had been gained, and as this was part of Haig’s step-by-step approach orders were given to dig in. The news from other parts of the battlefront was almost equally as good.
This was the third blow struck by the British at Ypres in fifteen days with complete success, driving the Germans from one of the most important positions on the Western Front. General Plumer (photograph above) indeed called this ‘the greatest victory since the Marne’, and at this point the British faced the possibility of decisive success. For the Germans their Official History referred to the 4th October as a ‘black day’ as they had suffered a serious defeat and losses. However, losses too for the Australians were heavy with the three divisions sustaining 6,500 casualties plus a further 1,850 for the New Zealanders.
3rd October 1917: The I Anzac boundary had now been shifted to the Menin Gate, which was used by both corps, and all the Australian divisions had their headquarters in the dugouts in the ramparts, those of the 1st and 2nd Divisions by the Lille Gate, and those of the 3rd at the Menin Gate. The Anzac attack battalions began to move east and bivouacked in shell holes, and at various hours after dusk moved to the tapes. As Bean recalls the 1st and 2nd having carried out one great attack just two weeks before advanced to this second operation in exuberant mood, their spirits lifted by having four Anzac divisions fighting alongside each other plus having the British 7th Division on their right whose fighting quality had been seen by the Australians at Bullecourt five months previous. The chief danger to the operation would appear to the chance of a break in the weather.
 2nd October 1917: In the days preceding the Broodseinde attack Anzac engineers and pioneers were engaged in extending the duckboards along the tracks for the approach march, but there was not enough time to lay boards for the whole route nor plank the way forward for the artillery for the next advance. The weather was uncertain and misty rain of the next day warned of problems if the weather broke.
1st October 1917: For the first time in the war, four Anzac divisions were side by side in the front line, with the AIF 1st Division on the right followed by the 2nd, the 3rd then the New Zealand Division on the left. Further to the right (south) of the Anzacs the British X and IX Corps were positioned, and on the left (north) the XVIII and XIV Corps. In summary twelve divisions and parts of two others would attack the Broodseinde Ridge on a 14,000 yard frontage. The preliminary bombardment commenced consisting of a series of practice barrages, twice daily, but no other intense bombardment until zero hour.
30th September 1917: The AIF 5th Division was relieved from the front-line at Polygon Wood, with the 55th and 56th Battalions withdrawn and replaced by the British X Corps. The attention was now turning to the third phase of the Battle for Ypres, the main German buttress running along the Broodseinde Ridge that looked down over the British positions to the west. II Anzac Corps would play the chief part by extending the capture of the ridge to beyond Passchendaele.
 26th September 1917: The Battle of Polygon Wood (map courtesy of Australians on the Western Front 1914-1918) was the second of three great successes for the AIF in the Third Ypres campaign in 15 days. The barrage which commenced at 5.50am just as the plateau became visible was the most perfect that ever protected the Australian troops. The ground was dry and each shell burst raised a wall of dust and smoke behind which the AIF 4th & 5th Divisions of I Anzac Corps together with British divisions on their flanks advanced, but this cloud created confusion for the advancing battalions and they soon became intermingled. The 15th Brigade had the hardest day where pillboxes to the right of the 31st Battalion were causing problems. The 14th Brigade attacking the Butte (photograph below) and the 4th & 13th Brigades to their left fared better, outflanking the pillboxes, and achieving their objectives with relative ease. Protective barrages were then put in place and with the determined work by the infantry to secure their positions, successfully deterred the expected German counter-attacks. In taking its objective the 14th Brigade captured some 200 prisoners and 34 machine guns. However the success of the operation was largely down to the leadership of Brigadier-General Elliott (photograph below), commanding officer of the 15th Brigade whose Battalions suffered that greatest of the 5,500 Australian casualties that day.
 25th September 1917: The next phase in Haig’s plan lay principally with I Anzac Corps, with the British X Corps on the right flank and V Corps on the left. Attacking on a front of 2,100 yards the AIF 5th Division, fresh from four months rest, would attack the harder task on the main ridge, and the AIF 4th Division which had been withdrawn from the Messines Ridge just three weeks before would attack Tokio Spur. The attack on the Butte in Polygon Wood (photograph right) would fall to the 14th Brigade under Brigadier-General Hobkirk. The new operation involved moving forward almost the whole of the massed artillery, but the battlefield had been churned by the guns of both sides such that movement was impossible until tracks of some sort – light railway was the preferred option – had been made. On the 25th September 1917 two practice barrages took place in preparation for the following day’s attack – the first at 6.30am by the whole artillery of the army lasting an hour, and at 8.30am by the guns of I Anzac Corps for 18 minutes. The German artillery was also active and at 5.30am the SOS signal went up and two hours later it was clear that the Germans had attacked and seized part of the front line, the forward ammunition dump for the next day’s attack had been blown up, and that preparations including the creation of the JOT for the attack would be visible to the enemy. 15th Brigade Commanding Officer Brigadier-General ‘Pompey’ Elliott (photograph below) decided to send two companies of the 60th Battalion forward to restore the breached line and shore up his flank, but against a deteriorating system
  with the Germans shelling and aeroplanes shooting at his troops. Columns of Germans were seen moving forward against the 58th Battalion and by 10am had worked their way round their flank to fire at them from behind. The Middlesex’s supported by the Argyll & Sutherlands pushed forward on the 15th Brigade flank and the German thrust ended, but for Elliott he had thrown in all but the 59th Battalion of his infantry for the following days attack, and the 58th and 60th had suffered heavy losses. At 7pm Elliott called General Hobbs (AIF 5th Division Commanding Officer) to inform the seriousness of the situation however Hobbs and Birdwood confirmed that the attack would take place and that the 8th Brigade would lend two battalions.
23rd September 1917: During the night the relieving battalions of the AIF 1st & 2nd Divisions were themselves relieved by the AIF 4th & 5th Divisions in preparation for the next blow. So ended with complete success the first phase in Field Marshal Haig’s step-by-step tactics, with the British Army achieving its objectives and even more cleanly than at Messines in June. British and German losses were comparable, between 20,000 to 25,000 men on both sides, of which Australian casualties within the AIF 1st & 2nd Divisions numbered 5,013. However the German troops came out of this battle crushed, and the British comparatively fresh, leading to an air of optimism both in the field and in England and France.
21st September 1917: Late in the afternoon the advance parties of Australian relieving battalions began to make their way forward to various parts of the front. At 6.30pm a heavy bombardment fell heavily on the pillboxes in the 2nd Division area. Anzac House and Garter Point were hit repeatedly.
20th September 1917: The Battle of the Menin Road. At 5.37am German field guns began to come into action, movement having evidently been discovered by the Germans, but in fact they were prepared having recently found operational papers on a captured officer of the AIF 2nd Division. Three minutes later the British artillery and machine-guns opened up signalling the start of the attack. The Australian 1st & 2nd Divisions, together with four British on their right and five on their left on an eight mile front moved forward. This was the first time in the War that two Australian divisions had attacked side by side, and this gave a boost to the men knowing who was on their flank.
 The Battle of the Menin Road (map courtesy of Australians on the Western Front 1914-1918) went to plan. The artillery barrage was the densest that had covered the Australian troops so far, and it was the artillery that did the damage. In many cases the Germans in the heavily protected pill-boxes offered little resistance. By 6.09am the first objective was reached along the whole of the British offensive. After three-quarters of an hour the main barrage returned to the immediate front of the infantry signalling the next advance was imminent. The second stage was even easier than the first, and in front of the 5th Battalion on the right the pillboxes mostly surrendered without resistance, enabling the Australians to reach their objective and assist the British 23rd Division on their right. The same advance brought the 12th Battalion on the left of the AIF 1st Division to the edge of Polygon Wood, which by now was barely recognisable as a wood, capturing many unfired machine guns and their crews from pillboxes. Thus between 7.30 and 7.45am the second objective had been reached on the Australian front and most of the British front in accordance with the timetable. At 9.53am the long pause ended and the barrage came down in front of the Blue Line, but in some areas such as at Black Watch Corner the artillery was falling short. The advance to the third objective, the Green Line, by the 17th, 28th, 26th 9th, 10th, 7th and 8th Battalions, was short lived with prisoners taken and pillboxes captured. Shortly before noon German troops and artillery were seen moving in preparation for a counter-attack, but almost immediately were drenched with shells. Nightfall was marked by another German movement met once again by a ferocious artillery barrage, and with this ended the fighting on the Anzac front. British and German losses were comparable, between 20,000 to 25,000 men on both sides, of which Australian casualties within the AIF 1st & 2nd Divisions numbered 5,013. However the German troops came out of this battle crushed, and the British comparatively fresh, leading to an air of optimism both in the field and in England and France.
19th September 1917: By order of General Plumer all attacking troops were given, if possible, a few hours rest and then after dark the approach march to the jumping-off tapes began. To keep the columns clear of the nightly stream of wheeled traffic on the Menin Road, four tracks mainly across open country had been prepared, one for each brigade, three passing south of Ypres, the fourth through the Menin Gate. As the battalions began to arrive the weather had turned from clear to drizzle and then to steady rain, with the battlefield changing from dust to mud.
18th September 1917: The attacking Brigades of the AIF 1st Division (2nd & 3rd Brigades) and AIF 2nd Division (5th & 7th Brigades) for the Menin Road attack were brought forward to easy marching distance of the front line.
 16th September 1917: During the night of the 16th/17th the 1st Brigade relieved the British 47th (London) Division on the edge of Glencourse Wood, along with the 6th Brigade on the Westhoek Spur, with one battalion from each holding the line. It was the 22nd Battalion that was assigned the front line duty for the 6th Brigade and during this short 48 hour tour 33 men from the 22nd were killed or died from their wounds as a result of the heavy German shelling, a response to the preparatory bombardment for the coming Menin Road attack.
15th September 1917: The main bombardment (photograph above) ahead of the I Anzac Corps offensive at the Menin Road began.
 12th September 1917: The infantry of I Anzac Corps began to move forward in preparation for their entry into the Third Ypres offensive, with the AIF 2nd Division to Reninghelst (photograph right) and the 1st Division the following day to Ouderdom. During the moonlit nights and during the day the German air force harassed the troops in their camps or on the move by bombing or machine-gun attacks. At no time within the experience of the Australian infantry were the German airmen so active behind the lines. At night searchlights would pick out their prey before the anti-aircraft batteries would try and shower them with shrapnel.
7th September 1917: Focus by the engineering force of I Anzac Corps on the laying of tracks in the area to assist in the movement of munitions and materials for the forthcoming offensive.
 29th August 1917: Inspection of the AIF 2nd and 5th Divisions before they moved to the front by Field Marshal Sir Douglas Haig (photograph right)
26th August 1917: The AIF 4th Division, coming out of the line at Messines, was transferred back to I Anzac Corps, and with the impending return to the front-line would make it the most heavily used AIF Division in 1917.
 16th August 1917: The Australian No.3 Casualty Clearing Station at Brandhoek (photograph right) was bombed killing an officer and one man, and five days later the Germans began to shell it. The nurses refused to leave, but eventually the hospital had to close and move to British No.10 CCS. Also on this day saw the second of the general attacks in the 3rd Ypres offensive, the Battle of Langemarck.
31st July 1917: The Third Battle of Ypres began with the 3.50am attack by the British infantry at Pilckem Ridge, supported by the artillery of the AIF 1st, 2nd & 5th Divisions moving forward with their limbers as the advance began. By nightfall of a ‘most satisfactory’ day Haig’s British and French troops had taken and held the third objective on the left and centre of the attack, the second objective on the right centre, and first objective on the right. To the right of the main attack Godley’s II Anzac Corps within Plumer’s Second Army carried out a feint attack, the New Zealanders on La Basse Ville and the 42nd & 43rd Battalions of the AIF 3rd Division on outposts in front of the Warneton Line. The attacks were successful and new forward posts established, withstanding the German counter-attacks, but at a cost of 550 casualties for the 11th Brigade.
26th July 1917: The transfer north of I Anzac Corps to Flanders began, with corps headquarters to Hazebrouck and the AIF 1st, 2nd and 5th Divisions to the neighbouring areas. By this time the battalions were well rested and trained in the evolving techniques of overcoming the German defences of this area characterised by pillboxes dotted across the countryside.

22nd July 1917: Australian No.2 Casualty Clearing Station at Trois Arbres near Armentieres was attacked by German aircraft. Nurses ran to the tents shattered by bombs to rescue patients, either carrying them to safety or placing tables over patient’s beds in an effort to protect them. For their actions during the attack Alice Ross-King (photograph right), Dorothy Cawood, Mary Jane Derrer, and Clare Deacon, were awarded the Military Medal.
15th July 1917: The great bombardment at Ypres began, with the British 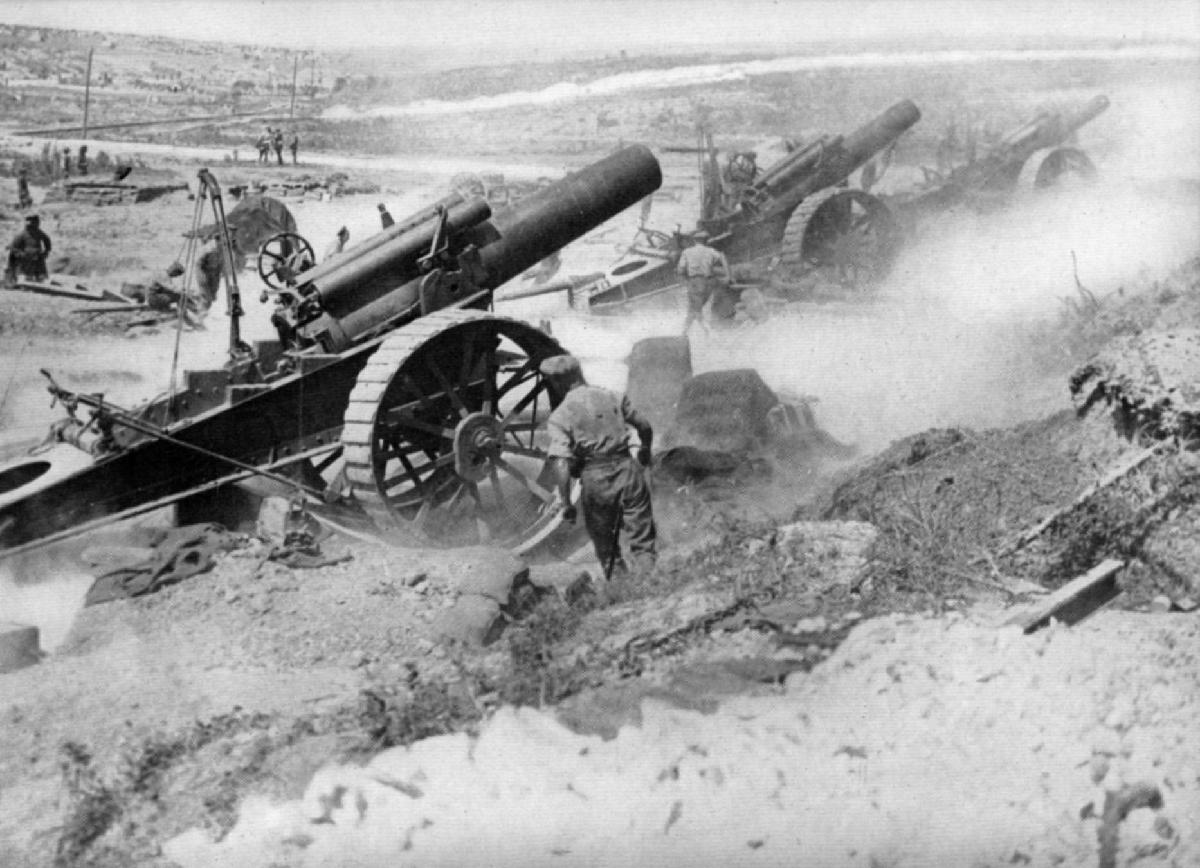 guns one to every six yards of front, more than at Arras earlier in the year and almost twice as many that the 4th Army had on the Somme a year previous. For the arriving Australian artillery they would endure conditions much more severe than on the Somme, where due to German air parity and being positioned on the plains overlooked by the German spotters, the positions in the rear including the gun batteries were targeted much more heavily causing many casualties at such a rate that it was feared reinforcements would have to be raised on a scale similar to the infantry.
 10th July 1917: In 1917 the northern most part of the Western Front ran along the small Yser river until it entered the sea at Nieuwpoort. Previously held by the French the sector was passed over to the British 4th Army in preparation of a coastal attack (Operation Hush) to support the latter stages of the forthcoming Ypres offensive. To assist in the attack it was deemed preferable to undermine a German strongpoint and for this task the 2nd Australian Tunneling Company was chosen on account of its experience in tunneling in soft sandy conditions. Tunneling was progressing well but the Germans knowing that this was a weak point for them in the defence of the expected Ypres offensive decided to mount a limited offensive. A bombardment of the British lines caused damage to the shallow mine shafts and once the German 3rd and 10th Marine Divisions attacked at dusk, many of the Australian miners found themselves, as they dug and broke through into the open, behind the enemy. Of 50 tunnelers beyond the river only four managed to escape back to their lines, the majority being captured. In all the Germans took 1,284 prisoners and suffered themselves 700 casualties, mostly of light wounds.
 8th July 1917: The six artillery brigades of the AIF 1st, 2nd and 5th Divisions of I Anzac Corps began to leave the Somme and after a week reached the bleak village of Dickebusch three miles to the south-west of Ypres. The AIF 4th Division’s artillery had already been sent forth and stationed at the Ypres-Comines Canal.
2nd July 1917: While escorting Premier of New South Wales, William Holman, to survey the Messines battlefield, Major-General William Holmes, Commanding Officer of the AIF 4th Division was mortally wounded by a shell. Maj-Gen. Holmes (photograph above right) was the most senior Australian officer to be killed on the Western Front.
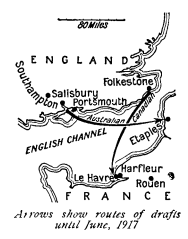
29th June 1917: The first Australian depots in France were established in March 1916 at Etaples, but this was inconvenient both in time and increased risk of submarine attack. Etaples camp was not a pleasant place and with tough training regimes soldiers were said to be pleased to return to their units on the front! The line of transport from Southampton to Etaples crossed that of the Canadians whose English depots were near Folkestone and their French depots at Le Havre, consequently in June 1917 the depots of the two dominions changed place, with the Australians moving to the much nicer location of Harfleur outside of Le Havre (map source: Bean Official History Vol III, P.178)

28th June 1917: Following the earlier offensive at Arras, British High Command was becoming increasingly concerned over German tunneling activity and that charges were being placed under the British position of Hill 70. Supported by infantry of the 11th Essex and 2nd Durham Light Infantry three parties of tunnelers from the 3rd Australian Tunneling Company raided the German lines, located and successfully destroyed the three shafts. During the determined German counter-attacks Major Coulter, Commanding Officer of the 3rd ATC, and Sapper Griffin were killed, so too 2nd Lieut. FB Wearne (photograph right) of the 11th Essex who was posthumously awarded the Victoria Cross.
23rd June 1917: The AIF 3rd Division relieved the British 25th Division between the Blauwepoortbeek and the Douve. Thus began a difficult eighteen days for the 11th Brigade as the German artillery, machine-gunners and snipers were active as the Australians improved their positions in front of the Warneton Line.
12th June 1917: The AIF 3rd Division was relieved during the night by the New Zealand Division, and the AIF 4th Division by the British 25th Division.
11th June 1917: The German garrison holding the front posts at Messines withdrew to the Warneton Line, three quarters of a mile to the rear.
10th June 1917: At 10pm the 50th & 52nd Battalions attacked to the north of the Blauwepoortbeek with a view to enter the Oosttaverne trench and bomb south into the valley. The 45th Battalion to the south of the valley again launched a bombing attack but as previously failed on account of the machine guns located in the impeding blockhouse. The 45th Battalion had entered into the battle in greater strength than any other Australian battalion, but came out the weakest having lost 16 Officers and 552 men.
9th June 1917: On the south flank of the battlefield the AIF 3rd Divisions 9th & 11th Brigades pushed forward patrols either side of the Douve to set up forward posts but both met with stiff resistance. Farther north the 13th Brigade night attack down the Blauwepoortbeek was beaten back with enemy fire coming from the blockhouses and defences.
8th June 1917: General Godley ordered the retaking of the ‘ground vacated’ for the early hours of the following morning. At 3am the 44th Battalion of Monash’s 3rd Division and the 48th Battalion of Holmes 4th Division began their advance and were able to retake the position in the Oosttaverne trench with relative ease. In the south of the battlefield a section of the Line in the Blauwepoortbeek valley remained in German hands, part protected by a blockhouse. The Australians were now the dominant force, thus ended the enemy’s counter-attacking activity in the Australian sector, though their artillery put down a heavy bombardment both on the Australian new lines and to the rear where new trenches were being dug.
7th June 1917: The Battle of Messines Ridge: At 3.10am the big guns began to fire and at that moment the first of the great mines exploded. Within the following few seconds the Messines – Wytschaete Ridge erupted from right to left as one after another 19 huge mines were detonated, causing an explosion so loud that it could be heard in London. The mines blew vast craters as much as 300 feet in width and 50 -70 feet deep and the devastation caused by the mine explosions plus the tremendous barrage enabled the assaulting companies advancing under the dust cloud to make easiest gains yet experienced by the Australians in the war.
 The 10 mile frontage for General Plumer’s Second Army was to be attacked by three British Corps (X, IX and II Anzac). General Godley’s II Anzac Corps would be on the right of the offensive in the vicinity of the villages of Wytschaete and Messines and consisted of the British 25th Division on the left, the New Zealanders in the middle (in front of Messines village), and the AIF 3rd Division on the right slope of the ridge and what would be the right flank of the whole operation. The AIF 4th Division would also be called into action in the second wave pushing through to the second objective, the Oosttaverne Line. This was the first time that the Australians had encountered these ‘pillboxes’ en-masse, a form of defence structure favoured by the Germans in Flanders due to the waterlogged nature of the ground. The taking of these blockhouses often required the infantry attacking from the rear supported by rifle grenadiers keeping the defenders under cover. By sunset the final British objective had been won along practically the whole of the battle-front, and with a speed beyond any other major achievement attained by the British Army in France thus far.
6th June 1917: Shortly after 11pm the eight attack battalions of the AIF 3rd Division left their camps and billets and began their move to the front. In and around Ploegsteert Wood the infantry were coming under German artillery fire including gas, high explosive and incendiary shells. At least 500 men in the wood had been affected and put out of action, many from the effects of gas. For the others the efforts of having to proceed and carry while wearing their gas marks meant that they arrived at the jumping off line exhausted.
3rd June 1917: German field artillery pours gas and tear-gas shells into Ploegsteert Wood causing trouble for the artillery and carrying parties based there.
31st May 1917: The concentrated preparatory bombardment of the German positions on the Messines Ridge began. However German retaliation, despite attempts including smoke to signal the start of an infantry advance, was less than expected leading British commanders to believe they were keeping their guns concealed until the last moment when the attack was actually underway. During these practice barrages raids were also conducted by the attackers into the German trenches.
 27th May 1917: The AIF 3rd Division’s operation order was issued for the forthcoming attack on the Messines Ridge. By this time the attack had been practiced by each brigade in the training area, and the objectives explained to the companies and platoons with the aid of two large models of the battlefield (photograph right) constructed a few miles behind the front.
26th May 1917: At Bullecourt the AIF 5th Division was relieved by the British 20th Division, and I Anzac Corps by British IV Corps. Meanwhile the AIF 4th Division learns that it will be involved in the Messines attack, and unlike its sister divisions of I Anzac Corps misses the longest and most complete rest granted to the infantry of the AIF. From this time onwards the AIF 4th Division gained the reputation of the hardest worked and least rested of the Australian divisions.
18th May 1917: Just across the Franco-Belgium border 37 heavy batteries and five field artillery brigades arrived in the II Anzac Corps area for the Messines offensive. By the time all the guns had been assembled some 2,400 guns and howitzers, of which 800 were heavy, were available making it the largest concentration so far of artillery on the British front, with one gun to every seven yards of front. In the II Anzac Corps area the hedges behind Hill 63 and Ploegsteert Wood were teeming with guns, hidden from enemy observation by screens of camouflaged netting.
 17th May 1917: In the early hours the British 173rd Brigade began an operation to take Bullecourt, but on entering the remains of the village discovered that the Germans were in the process of withdrawing and captured 40 men engaged in demolishing the dugouts. The British penetrated beyond the village and occupied OG2, north of which the Germans were found to be holding a line of posts. With this action saw the end of offensive on the right flank of the Arras campaign, and one which resulted in 10,000 Australian casualties over the two Bullecourt battles.
16th May 1917: The AIF 4th Division arrives in Flanders as reserve division to the II Anzac Corps for the forthcoming attack at Messines.
15th May 1917: An intense German bombardment of the 54th Battalion preceded an attack on the OG Lines east of Central Road, and OG2, which was thought to have been securely sealed a few days earlier was penetrated. A double counter-attack was launched, one bombing up OG2 and the other up a cross trench to entrap the German attackers who were all killed or wounded. This was the seventh German general counter-attack and proved to be the last attempt made by the Germans at Bullecourt.
12th May 1917: The next British attempt for the capture of Bullecourt was assisted by the 15th Brigade moving along OG2 and another party of the 58th Battalion moving across open ground. However the 58th had been heavily bombarded in the night leading up to the assault that they had to reinforced by a company of the 59th. The OG2 attack was met with the customary desperate bomb fight between the two sides, with the 60th Battalion providing additional bombing squads, rifle-grenadiers and Lewis gunners. In the attack 186 Germans, trapped in a deep dugout, were taken prisoner. Junction with the 7th Division was made and thus the northeast of the village was secure, though the Germans remained stubbornly in the southwest of the village causing serious losses for the British 91st Brigade. That night the 15th Brigade handed over to the 173rd Brigade of the British 58th Division.
9th May 1917: The 15th Brigade relieved the 2nd Brigade, and the following day Major-General Hobbs of the AIF 5th Division took over command from the 2nd which had charge of this sector since 14th April. That day and as a consequence of the decision that the British effort would next fall in Flanders, orders were issued to prepare for the move north of the Australian Artillery supporting I Anzac Corps.
8th May 1917: With the British 7th Division attacking towards Bullecourt, the 8th Battalion bombed westwards down OG2. By this juncture, all three Brigades of the AIF 1st Division had been called in by the 2nd Division in succession to its own three. It now became necessary for the AIF 5th Division to be employed, and that night the 14th Brigade came into the line replacing the 3rd along with the 7th in front of Noreuil.
7th May 1917: At 3.45am the 20th Brigade of the British 7th Division with the 2nd Gordon Highlanders and the 9th Devon Regiment attacked Bullecourt, supported by the AIF 9th Battalion moving westwards and the twenty-four guns of the Australian field artillery providing enfilade fire. The Highlanders following the barrage seized the trench to the west of Bullecourt and began to bomb along it. At 3.58 the 9th Battalion started their bomb fight along OG1 and at 5.15 linked up with the forward party of the Highlanders. By night fall the flank posts of the Highlanders and the Australians interlocked and the left flank of the Australians was at last secure.
On the night of the 7th May the 2nd Brigade took over the left sector from the 1st Brigade.
6th May 1917: Just before dawn the Germans attempted another major counter-attack from the Moulin Sans Souci road, this time supported by flame-throwers, and pushed down to the Central Road. Once the flame-throwers had been neutralised, the shaken men of the 11th and 12th Battalions rallied and bombed their way back down OG1 and OG2.  The Germans sixth and most dangerous general counter-attack at Bullecourt had been beaten, and the 10th Battalion now took over the right. Given the difficulty of thrusting the right flank further eastwards orders were issued for this end of the Hindenburg Line to be finally barricaded off that night in its present position, with several bays beyond to be filled in and wire entanglements to be laid.
5th May 1917: On the morning of the 5th the captured position was now over 1,100 yards, with the 1st Brigade on the left and 3rd Brigade on the right, but still just connected by the one Pioneer Trench (Central Road) back to the railway. By this time the trenches occupied by both sides had been largely destroyed by shell-fire. Indeed the shelling on the 5th May was of an intensity not experienced since Pozieres, with men being buried and having to be dug out with hast by their comrades.
4th May 1917: At 1am the first companies of the relieving 1st and 3rd Battalions began to arrive in OG1 and OG2, and by 3am the remnants of the 6th Brigade was filing out of the trenches. While doing so the Germans suddenly counter-attacked and the 6th Brigade stood fast and helped the fresh troops beat off this attempt. The 6th Brigade had held on magnificently, and the four battalions reorganised as four companies went into reserve. As Bean wrote, ‘the 6th Brigade’s achievements on this day had few parallels in the history of the AIF.’ In the whole sixteen miles of battle from Vimy to Queant, theirs along with the Canadians on the far left at Fresnoy, had been almost the only success’.
The position won by the 6th Brigade was extremely vulnerable. The British 7th Division began an attempt to take Bullecourt on the left, but the village was extremely difficult to attack and resembled the conditions at Mouquet Farm with heaps of rubble concealing the deep dugouts from which the defenders could appear. For the 1st Brigade now holding the trenches it was their turn to try and bomb east and west along the trenches and to hold back the inevitable counter-attacks. By the end of the day the 2nd and 4th Battalions had managed to successfully bomb their way along 400 yards of the OG Lines. Through the night the 2nd Pioneers and working parties of the 6th Brigade dug communication trenches to strengthen the position.
Gellibrand and the remnants of the 6th Brigade were relieved on the night of 4th/5th by the 3rd Brigade and returned to Noreuil-Longatte Road.
3rd May 1917: The Second Battle of Bullecourt. At 3.45am the British barrage began, from Lagnicourt in the south to Vimy in the north. On the right of this front in the re-entrant between Bullecourt and Queant the AIF 2nd Division prepared to attack. Australian engineers and their protective patrols had been in No-Man’s Land since 10pm the previous night laying the tapes to mark the Jumping Off line. From 2.30am the infantry of the 5th and 6th Brigades had started to move across the railway embankment in their wave formations to their jumping off positions, but light from the now sinking moon and a searchlight from Hendecourt sweeping the open ground picked out movement and brought a barrage from trench mortars onto the Australian forward positions. The Germans also threw down a precautionary barrage at 3.32, as with  other preceding mornings, on the railway embankment, but by this time the leading battalions were mainly ahead of this shelling. At 3.42 the barrage ceased and for three minutes the front became silent. With the opening of the British barrage bayonets were fixed and the advance began with the first waves led by the 22nd, on the left and closest to Bullecourt, the 24th, the 17th and with the 19th on the far right, and then followed by waves of the 21st, 23rd, 18th and 20th respectively.
Despite the practice and rehearsals the attack did not start well for the 5th Brigade on the right and a halt in front of the German line to allow the barrage to lift proved fatal and the German defenders despite the barrage manned the parapet and poured fire into stalled attack, leading to many of the officers at their head being killed, confusion setting in, and orders given to retreat. By now the following waves were catching up and becoming intermingled and they too retired. Isolated groups managed to get through to OG1, but they were quickly bombed out and back to the road. The 6th Brigade fared better and the 24th and 23rd on the Brigade right had the welcome protection of the half sunken Central Road protecting their right flank, and Lewis gunners firing from the hip were able to silence many of the defenders enabling them to reach the wire with little loss. Upon the lifting of the barrage on OG1 the attackers were able to suppress the enemy garrison before they were able to appear from their dugouts, and pushing right went as far as possible along the trench before setting up a defensive barricade. The three following waves of the 24th and those of the 23rd passed over OG1 and when the barrage on OG2 lifted this too was taken, some 30 minutes after the start of the attack. For the 22nd and 21st on the left, progress was far more hazardous as they had to pass a point-blank range of the German garrison on the east side of Bullecourt village, which despite extra suppressing fire from trench mortars and machine guns, poured in heavy fire into the attacking waves. The heavy fire from the left meant that away from the 24th the waves had fallen behind the barrage and when it lifted the German garrison in OG1 was able to get in position to add to the attackers difficulties, many forced back to shell holes by the German wire.
 A fierce bombing struggle ensued for OG1 and OG2 on the left of the attack, while on the right of the 6th Brigade the next waves were readying themselves for the attack towards the 2nd and 3rd objectives. Capt Maxfield of the 24th Battalion advanced with the barrage and with 30 men reached and took the second objective at 5.34, just nine minutes later than planned and now 500 yards beyond the Hindenburg Line. However with the 5th Brigade not having taken their objectives, the position of Maxfield in the second objective was precarious, so a defensive flanking position was taken along the Central Road to protect the 6th Brigades right flank. Some of the right side of the 22nd and 21st linked up with Maxfield and began a flanking fight westwards towards Bullecourt, but a well placed German machine gun made this untenable.
Thus two hours from the commencement of the attack the centre of the AIF 2nd Divisions had reached the second objective, but with troops barely sufficient to hold it, much less to push on at 6am to the third objective at Reincourt. Furthermore both the left and right had failed so the centre was having to fight flanking attacks in both trenches of the Hindenburg Line to hold its 400 yard foothold. As a result the attack plans were altered to delay the move on the third objective and the artillery held its defensive fire to protect the forward 6th Brigade holding the second objective.
Attempts were made to push forward on the right by a reformed unit of the 5th Brigade and by the 25th Battalion of the 7th Brigade towards the village of Bullecourt itself, but both failed. Meanwhile Maxfield was coming under pressure from a counter-attack to his front as well as on the flanks. Losses were mounting and Maxfield himself was wounded, and while heading back to the Hindenburg Line was killed. About this time the 24th withdrew and Gellibrand brought back the barrage to protect the troops in the Hindenburg Line.
By 2pm the 7th Brigades 28th Battalion came up along the Central Road carrying large supplies of bombs, and was tasked by Divisional Commander Smyth to attack the 5th Brigades earlier objectives of OG1 and OG2, thereby relieving the pressure on 6th Brigade having to hold back their flank. Each Company had been organised into four bombing squads, each comprising two bayonet men to lead the way, three throwers, three carriers and five rifle grenadiers. German defence in OG2 was stiff, but the Australians had success in OG1 pushing along some 450 yards, half of the 5th Brigades objective. Running short of bombs, the 28th was forced back to Central Road by the counter-attacking Germans, before attacking again and reaching the Noreuil-Riencourt Road. The Central Road was thus the vital link to the front for the carrying parties bringing their bombs to support the ceaseless bomb fighting. Time and time again, attack was followed by counter-attack, before finally the 28th and remnants of the 5th Brigade withdrew again leaving the 6th Brigade exposed. To the left of the road, the 6th Brigade garrison in both trenches amounted to just 300 men, with only 4 officers and 25 other ranks from the 22nd Battalion. They now found themselves alone in the Hindenburg Line through the  night, faced with an enemy on three sides. No rest was possible, nor could any man be spared to help the wounded back.
The work of the stretcher-bearers of the field ambulances was unceasing and carried out in dangerous exposed country. In nine hours 1,800 wounded had been cleared from the main dressing station, including an unusually high percentage of severe cases. 30% of the Field Ambulance carriers became casualties themselves.
2nd May 1917: Final arrangements completed for the attack on 3rd May, with the AIF 2nd Division and the British 62nd Division having three objectives: first the Hindenburg OG1 and OG2 Lines; second the Fontaine-Moulin Sans Souci road; and third the advance on Riencourt and Hendencourt. The 62nd, which would attack the village of Bullecourt itself, would be supported by ten tanks in the attack while the Australians elected to attack without them. The battalions would form up on tapes 500 yards from the German line, much closer than before, and the infantry would advance under the protection of a creeping barrage. The advance would also be supported unprecedented ninety-six Vickers machine guns. Also, learning lessons from the failed AIF 4th Division attack, greater effort was made to ensure efficient ammunition and supplies went forward with the troops, and large supplies of rifle-grenades carried forward to count the longer range of the German stick and egg bombers. The weakest part of the plan, a consequence of attacking a re-entrant, was to fall on the 6th Brigade attacking to the east of the German defences in the village of Bullecourt. Brigadier-General Gellibrand’s 6th Brigade HQ moved forward to the railway embankment, practically on the front line.
30th April 1917: The Australian 5th Pioneers had completed the extension of the light railway from Fremicourt as far as Vaulx-Vraucourt enabling rations to be brought forward and freeing horse transport to be used for carrying engineer stores, materials for roads etc. Dugouts were also being constructed, hutments for troops, water-supply, all replacing those that had been destroyed by the withdrawing German Army earlier in the year.
25th April 1917: On the 3rd Anzac Day, the British 11th Division took over the southern sector under the command of I Anzac Corps, relieving the AIF 1st Division. Delays to the next Bullecourt attack meant that General Smyth of the AIF 2nd Division was able to plan and rehearse the operations with the thoroughness for which there had never been such an opportunity in the history of the AIF.
20th April 1917: Heavy shelling had by now reduced Bullecourt to rubble and wire entanglements were becoming shredded, though because so extensive still posed a formidable obstacle. The use of Bangalore Torpedoes by the AIF 2nd Division were also partially successful in cutting a path through the wire.
18th April 1917: Heavy howitzers of British V Corps concentrated on Bullecourt and the sugar factory beyond it, while enemy shelling heavy at intervals on the 6th Brigade. Experiments held with Bangalore Torpedoes, partially successful.
16th April 1917: The First and Third British Armies were ordered to send to the I Anzac Corps twelve batteries of heavy artillery, and British V Corps to the Australians left in front of Bullecourt were similarly strengthened. Before the end of the month I Anzac Corps heavy artillery had grown from 15 to 31 batteries. The field artillery was also slightly increased. The British Fifth Army’s daily allowance of shells was also increased.
 15th April 1917: Before dawn the Germans mounted an attack on the whole front of the AIF 1st Division and the right company of the AIF 2nd Division in front of Lagnicourt. Due to the broad nature of the frontage, the Australians had to defend their isolated posts beating back the attackers by Lewis gun fire and by bombs when the attackers drew near to their positions. As with Bullecourt ammunition was becoming a major issue and messengers shot down as they attempted to make the journey back to the rear, often by German snipers that managed to encircle and then enfilade their positions. German infiltration also meant that the forward field artillery batteries were being threatened and orders were given to withdraw their breech blocks and dial sights and retire. The guns of all four batteries of the 2nd Brigade were abandoned followed shortly by three batteries of the 1st Brigade. By 5.30am the Germans had penetrated a mile and a half behind what was the Australian forward positions at the start of the day. However with daylight the task of the defenders became easier and were able to pour relentless Lewis gun and rifle fire from the rear defensive positions into the now faltering Germans, now caught between the defensive barrage falling to their rear and the advancing Australians.
 In defeating this attack the I Anzac Corps had suffered 1,010 casualties of which approximately 300 were taken prisoner. The Germans suffered 2,313 casualties, and despite having been temporarily in possession of 36 artillery pieces, 31 were back in Australian operation that afternoon (photograph showing one of the destroyed guns). The attack was a failure, particularly as the Germans threw four times the amount attackers against the thinly spread 4,000 Australians holding the line, and did not disrupt the preparations for the next Allied attack at Bullecourt. For the Allies it also demonstrated the virtues of defence in depth.
13th April 1917: During the night the AIF 4th Division was relieved by the 2nd Division concentrated in the Noreuil sector. At the same time the AIF 1st Division farther east completed its approach further forward to within 1,000 yards of the Hindenburg Line, now responsible for a large 13,000 yards of frontage.
11th April 1917: The First Battle of Bullecourt – click on link below to Combat Areas > AIF Divisions > Bullecourt for a more detailed account.
Troops of the AIF 4th Division assaulted the Hindenburg Line at Bullecourt in what was a poorly planned and executed attack. Instead of relying on the customary artillery barrage to destroy the thick belts of barbed wire, British commander General Hubert Gough decided to employ 12 tanks to advance ahead of the infantry in order to retain the element of surprise. On 10th April almost all of the tanks failed to arrive at the rendezvous point. The attack was delayed until following day, giving the Germans full warning of an imminent assault. The 4th and 12th Brigades set off to attack the Hindenburg Line with little support from the tanks. The infantry covered over 1,000 yards of no-man’s land without artillery support, in full view of German machine-gun crews, but still managed to negotiate thick belts of barbed wire and gain partial possession of the Hindenburg Line. The Australians quickly expended all their ammunition while holding the line against German counter-attacks. Ordered to withdraw, they negotiated a no-man’s land swept with German artillery and machine-gun fire. The battle cost the 4th Division over 3,000 casualties, of which 1,170 were taken prisoner – the largest capture of Australian troops on the Western Front.
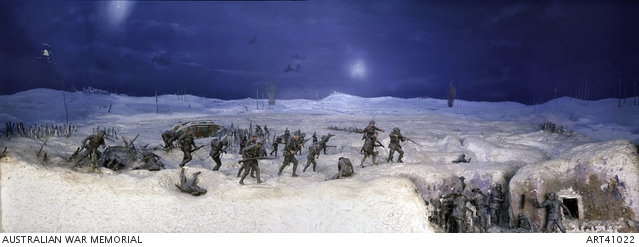
Above diorama exhibited in the Australian War Memorial, Canberra, depicting events of the 11th April 1917.
Meanwhile Australian artillery to the east of Bullecourt and situated in the valleys around Noreuil and Lagnicourt became targeted by the German artillery, particularly after the fighting at Bullecourt ceased.
10th April 1917: British Royal Engineers fire gas cylinders over Bullecourt in preparation for the attack. By 4.15am the attacking battalions of the 12th and 4th Brigades were in position to their tapes and assembly positions, but there was no sign of the tanks. Lying out in the snow, the two Brigades would be easily seen between Bullecourt and Queant once dawn arrived. At 5am the message arrived that the ‘stunt is off’, those lying on the tapes simply rose and walked back without formation like a crowd from a football match. But communication between the AIF 4th Division and the British 62nd Division was lacking, and the British pushed on with their attack but without support were forced to retire suffering some 162 casualties.
Later that day Field Marshall Haig’s Chief of Staff calls General Gough informing that the Third Army was going to resume the attack in the morning to the north and to press home their gains, and that the Fifth Army must support the effort, against Birdwood and White’s serious concerns, not least a heavy reliance upon the tanks and the tiredness of the troops.
9th April 1917: The main attack on the village of Boursies began at 4.45am and took place on the same day as the start of the Arras offensive, this action acting as a minor feint to the main battle taking place further north. The 10th and the 12th Battalions took the village at a cost of 341 casualties. The attack by the AIF 1st Division also included a successful attack on the village of Hermies by the 1st Brigade. Except for a few of the garrison, practically all of the Germans were either killed or taken prisoner, but at a loss of 253 officers and men for the 2nd and 3rd Battalions, of which a high proportion of 1 in 3 were killed. The 1st Battalion moved on Demicourt and occupied the village, sustaining 55 casualties.
By successive local advances made at night without serious opposition, the I Anzac line was over the next few nights pushed forward to within less than a mile of the Hindenburg defences. General Gough telegraphed his congratulations to the AIF 1st Division adding ‘Throughout the advance since the end of February the enterprise, tactical skill, and gallantry of the whole Anzac Corps has been remarkable and is deserving of the highest commendation.’
Meanwhile at dawn the British First and Third Armies launched their great offensive at Vimy and Arras respectively. It had been prepared by a massive artillery bombardment greater than that at the Somme, and the infantry advanced more effectively under a creeping barrage. The attack succeeded in most of the areas and at Arras was almost complete taking the first two defensive systems. With early reports of the success coming through and having received a bullish representation from the commander of the 11 British tanks, despite the doubts given by Birdwood and White, Gough gave the order for the attack at Bullecourt to be conducted by the AIF 4th Division in the I Anzac Corps sector begin at dawn on 10th April.
8th April 1917: The preliminary movement against the three remaining villages in the I Anzac Corps sector began with a movement to secure the high ground above Boursies. Two companies of the 12th Battalion and two from the 10th Battalion attacked at 3am and successfully created a small salient, though subject to bombing counter-attacks, and at a cost of 90 casualties.
7th April 1917: Later than planned, the bombardment of the German wire in front of the Hindenburg Line using the 4.5inch howitzers with the instantaneous fuses began. However the positioning of the German Line on the reverse slope meant that accurate bombardment of the trenches and the entanglements was difficult. That day two airmen reported that damage to the wire was uneven, and largely intact. General White requested a postponement of the attack until the wire was cut, and he was given to the 12th April, a delay of two days.
6th April 1917: After three weeks of rest and training the AIF 1st Division began taking over the front-line positions of the AIF 5th Division, plus a portion of the 4th at Lagnicourt to enable the AIF 4th Division to focus on the projected diversionary attack at Bullecourt in connection with the Arras offensive.
5th April 1917: To the west of Bullecourt the 49th Battalion reached the railway embankment that ran parallel to the Hindenburg Line about half a mile away.
 4th April 1917: A limited number of batteries began their bombardment of the Hindenburg Line, their reduced number caused by delays in being able to bring the artillery forward and the limited obscured places available for them in this sector on account of the geography of the valleys running perpendicular to the front line. Furthermore, the supply of ammunition for the artillery was also limited by the difficulty of transporting it forward, though the Germans were surprised how much the British were able to bring in to their forward position given the destruction they had caused to the infrastructure during their withdrawal.
2nd April 1917: The I Anzac Corps envelopment attack on Noreuil was undertaken by the 50th and 51st Battalions of the 13th Brigade, with the 50th attacking from the captured village of Lagnicourt. The operations were still in open country, clear of all fortifications except the wire entanglements and trenches bent around the outskirts of the villages and a sprinkling of sentry posts, frequently in the sunken roads which were common in these parts of France. The sunken roads would not only provide cover but by scooping into the sides could provide shelter, and in some locations such as at Noreuil the Germans were able to tunnel deep dugouts in the road-banks.
 At 5.15am the supporting barrage started to fall on the enemy positions and the two battalions advanced together. The 51st met with machine-gun fire from the left, right and the sunken Noreuil-Longatte road ahead, causing eighty men to fall, before the position was taken and prisoners captured. The 50th were having difficulties as the suppressing barrage was too thin to be effective, and suffering enfilade fire from pockets of Germans behind the steep bank. During the fighting Pte Jensen (photograph right) rushed a position and bluffed more than forty Germans to surrender, and was awarded the Victoria Cross. With the Lewis gunners firing from the hip, the battalion advanced. However by 8.45 the position was becoming precarious. The Germans were holding the gullies in strength and the Australian casualties were mounting as the Germans started to attack with bombing parties. Fighting continued all day, but by dawn when the 51st were preparing to rush the German positions, they had found that they had retired during the night.
The attack by the British on the villages to the north had met with similar difficulties, but they too had succeeded. The two brigades of the 7th Division suffered about 400 casualties, but the loss to the 13th Brigade exceeded 600, with the 50th Battalion losing 360 of which about 100 were killed and 60 taken prisoner. Further south the AIF 5th  Division’s 55th Battalion captured Doignies with limited casualties, whereas the attack on Louverval by the 56th Battalion wasmore problematic and resulted in 484 casualties for the 14th Brigade, many as a result of subsequent shelling of Doignies, Louverval and Beaumetz. Only twelve prisoners were taken in this area.
Thus on the left half of the Fifth Army’s front the last obstacle to Gough’s projected diversion against the Hindenburg Line had been removed, and all divisions began pushing their posts closer to the main defences which scarred the open country a mile or so ahead of them.
1st April 1917: It was decided that the British Fifth Army and the right of the Third should attack on the same day the string of villages that lay as outposts before the Hindenburg Line. The taking of Noreuil would fall to I Anzac Corps. The next village in the Australian sector, Lagnicourt, had already been taken, leaving the right hand column tasked with seizing Louvrel and Doignes. The villages of Boursies, Demicourt and Hermies also lay in this chain but they were considered less of an objective as no serious attempt against the Hindenburg Line would be made behind them.
29th March 1917: The 7th Division in the British Third Army to the left tried for a third time to take the villages of Croisilles and Ecoust in front of the Hindenburg Line but again failed.
26th March 1917: The British Fifth Army and the right of the Third which was to take part in the great Arras offensive were separated from the Hindenburg by a chain of villages. One such village was Lagnicourt and the 26th and 27th Battalions were tasked with attacking the village, supported by Elliott’s 15th Brigade on the right flank. The village was the first of this line to be taken but at a cost of 377 casualties. The Germans did not try to retake the village but heavily shelled the buildings and it was from a shell bursting in a sunken road that Capt. Cherry (photograph below left) of the 26th Battalion, who through his good work earlier in the day had been awarded the Victoria Cross, was killed. After the capture of Lagnicourt the AIF 2nd Division was relieved by the 4th which came into the line fresh from a month’s rest and training.
 General Gough informed his corps commanders that the sector to be seized by the British Fifth Army during the attack on the Hindenburg Line and supporting the main Arras Offensive on their left would be at Bullecourt, with British V Corps attacking to the west of the village and I Anzac Corps to the east. With time short and the date for the offensive approaching the infantry would be attacking in the open since there would be no time to dig a trench system, and the artillery would have just enough time if they fired hard in the week leading up to the attack. Furthermore the line that they would be attacking lay between the German salients of Bullecourt and Queant giving the Australian commanders cause for concern facing fire from three sides.
24th March 1917: General Gough orders his corps commanders to bring forward all their heavy artillery as soon as the roads permit in preparation for the bombardment of the Hindenburg Line in April. This would be in preparation for a flanking attack as part of the great Arras Offensive now deep into its preparation scheduled for the 8th April
23rd March 1917: With Elliott’s 15th Brigade progressing faster than the rest of the front, the Germans – including a company of storm-troops – attempted to retake the village of Beaumetz but were beaten back. This attack was evidence of Ludendorff and Hindenburg’s plan to hit back hard at the following troops, and justified Haig’s precautionary and cautious approach of not over exposing his advancing armies.
 21st March 1917: The 7th Brigade having relieved the 6th witnessed an aerial combat between four British and five German aeroplanes. A German plane came to ground in front of their posts, and several Queenslanders rushed forward shooting the pilot as he tried to run away. The pilot happened to be Prince Frederick Charles of Prussia (photograph right), and though carried to the aid post he died of his wounds in hospital a few days later.
20th March 1917: 6th Brigade’s Maj-Gen. Gellibrand working on his own initiative attempted to take Noreuil. The 21st and 23rd Battalions met with heavy resistance from machine guns in the surrounding villages supported by artillery. The first that Divisional HQ knew about it was when Gellibrand sent messages including falling back. To Generals Birdwood and Smythe the unexpected news of this engagement and the casualties suffered – which was eventually found to be more than twice as Gellibrand at first believed, totalling 13 Officers and 318 other ranks – came as a shock. As a result Gellibrand never regained the high opinion and confidence with General Birdwood which his vigour in previous stages of the pursuit had won.
Meanwhile, General Gough met with his two Corps commanders to lay out the plan to assist the Third Army with the infantry and not just artillery. Gough’s belief was that the German’s were occupying the Hindenburg Line merely as a rear-guard operation, and that the Line should be attacked on 8th April on a front of 3,000 – 4,000 yards, with the Cavalry exploiting the breach and meeting up with the Third’s cavalry coming through at Vimy. Twelve tanks were also allotted to Gough.
18th March 1917: The 6th (Gellibrand) and 15th (Elliott) Brigades were selected as the force to drive forward, supported by troops from the 13th Light Horse and a battery of field artillery. The advance columns would be advancing without the main body of troops behind them, therefore incurring increased risk as they approached the Hindenburg Line. In this new phase of open warfare the infantry progressed cautiously, uncomfortable crossing open countryside despite there being only few of the enemy around, and weighed down by their heavy packs. However spirits were raised as they were away from the trenches and mud of the Somme battlefields and winter was turning to spring. The infantry were also becoming practiced in the art of enveloping or surrounding a village before effecting its capture.
To the north at Messines, the British 2nd Army’s plan for the capture of the ridge was explained to General Godley who in turn briefed his II Anzac Corps Divisional commanders.
 17th March 1917: Brigade Commanders Gellibrand (6th) and Smith (5th – and former 22nd Battalion commander) drew up plans for a simultaneous attack on the expected German rear guard, but by the time the advance the enemy had gone. Bapaume (photograph right), the objective for the great 1916 Somme offensive, was entered. As the Allies followed the Germans in a period of cautious open warfare against the German rear-guards, bitterness grew not just amongst the French but also in world opinion against the excesses of the German military in destroying everything in its wake for little military advantage.
15th March 1917: Vigorous patrolling continued with a view to ascertain the strength of enemy opposite the Brigades’s front. Aeroplanes active that day.
13th March 1917: The second large raid conducted by the AIF 3rd Division in the Messines area is a disaster and ends with Lieut. Taylor and 19 other ranks from the 11th Brigade being killed with another 45 wounded.
12th March 1917: Patrols from the 5th and 6th Brigades report that German front line RI, which had recently been heavily bombarded, was empty in expectation of an attack, though the 8th Brigade to the right was meeting with resistance. The 5th and 6th Brigades were now operating in almost entirely green countryside, raising the spirits of the men, as they moved to within 300 yards of the RII line.
11th March 1917: Aeroplanes on both sides very active. Four British planes brought to earth, with one German plane crashed in Loupart Wood.
10th March 1917: On the left of the 25th Battalion, the British II Corps attacked the German outpost in Grevillers Trench with 370 prisoners being taken.
5th March 1917: Heavy plumes of smoke rose from the town of Bapaume indicating that the Germans would be retreating further, while British airmen reported a greatly increased amount of train movement eastwards.
3rd March 1917: Expecting that the withdrawal of the German Divisions was in preparation for a major offensive in Flanders, any British Divisions that could be spared from the front-line should be withdrawn, and the AIF 1st Division was duly withdrawn and their frontage taken over by the AIF 2nd and 5th Divisions.
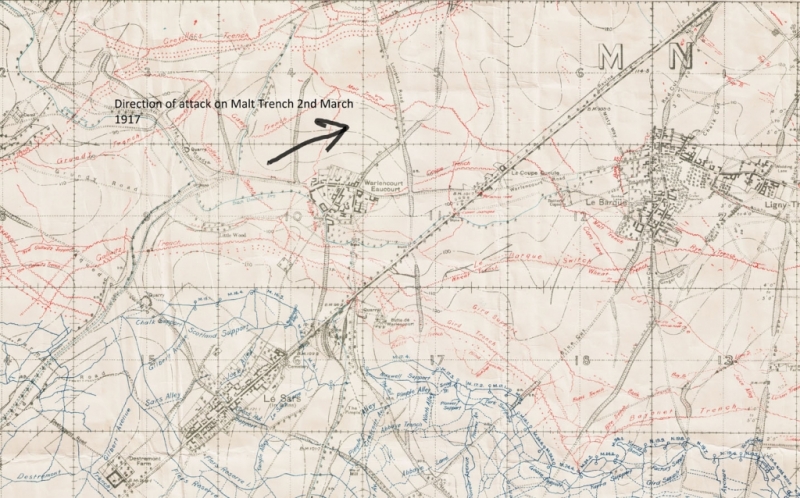 2nd March 1917: Three battalions of the 7th Brigade, with the 5th supporting on the right, attacked towards Malt Trench. Despite bombing attacks, artillery and counter-attacks the 2nd Division had established itself on the Loupart bastion and in position to create a ‘jumping off’ line for Gough’s intended assault on the next main German R.I. Line. The AIF 1st Division to the east had been digging in when came a series of counter-attacks, with the Germans penetrating behind the Australian lines. Both sides had men killed and captured, though the loses to the German attackers had been greater.
 28th February 1917: By the morning of the 28th the villages of Thilloy, Ligny-Thilloy and Le Barque were within the AIF 1st Division’s line, which now lay in comparatively green country and a distance of some 500 – 800 yards from the German main position, Till Trench. On the right the 15th Brigade of the AIF 5th Division had cleared the enemy from Barley Trench to the German pivot point at Le Transloy. To the west the 7th Brigade made seven attacks to Malt Trench but all were bombed back with heavy loss on both sides. British Fifth Army commanding officer General Gough visited the area and seeing the importance of Malt Trench gave the order for the bombardment of the German wire to begin at once.
27th February 1917: Preceded by a program of smaller raids through January and February, the AIF 3rd Division conducted its first major raid at Houplines on the French/Belgium border outside of Armentieres. Carried out by a composite battalion of the 10th Brigade of 20 Officers and 804 other ranks, the large successful raid was preceded by a bombardment which included gas and smoke shells, a tactic that AIF 3rd Division Commanding Officer General Monash would use to great effect later in the war when commanding the AIF.
25th February 1917: Advancing under the partial cover of fog from the sporadic threat of enemy machine gun fire from harassing rear-parties, snipers in villages, and artillery, I Anzac Corps began occupying the forward and support positions abandoned by the Germans. The German rear-parties would fire then run, and this advance was the nearest approach to open warfare that most of the men had yet experienced. The dugout entrances in the support trenches had been systematically blown in and care had to be taken to avoid booby-traps left particularly under loose duck-boards. The German withdrawal appeared to pivot on the front being explored by I Anzac Corps as the 14th Brigade (5th Division) on the far right observed that the German trenches around Le Transloy had been fully garrisoned. To the Australian troops advancing the sight ahead of comparatively green valleys with buildings and trees would have been a welcome lift after the months of the grey and mud.
 24th February 1917: Reports came in from British V Corps that the Germans had abandoned their forward trenches. I Anzac Corps along with British II Corps were ordered that night to probe and from their discoveries and prisoners taken it became apparent that the Germans had made a massive change in their strategic plans and what was being observed was the voluntary abandonment by the Germans of their great salient between Arras and Aisne. The German plan was thus for their naval campaign waged through submarines to force victory and for their land forces to hold out as long as possible. With the prospect of an Allied breakthrough on the Somme in 1916 a possibility, construction was started in September on a new 100 mile defensive line across the base of a great salient from Arras in the north to Soissons in the south, and it was to this location that the decision was made to fall back. The withdrawal decision would have two immediate effects: a shortening of the line saving a large number of divisions; secondly it would disrupt the Allied plans of attack and buy the submarines more time to have a decisive impact. The new line, being constructed in quiet surroundings and chosen for their defensive qualities would offer stronger and more comfortable shelter for the German troops in deep concrete shelters, protected by deep belts of wire entanglements.
The depth of the withdrawal to what would be known as the Hindenburg Line would vary between twelve miles near Bapaume to nearly thirty near Roye. In front of the line a 15 kilometre belt was laid bare of houses and trees for shelter, and the roads, railways, bridges and wells all rendered useless.
22nd February 1917: The 45th Battalion captured another length of trench along with thirty-two prisoners. Meanwhile in preparation for the impending British offensive that would be happening further north, General Birdwood ordered the withdrawal of the AIF 4th Division from the front-line to refresh and be ready to support a possible flanking attack by I Anzac Corps west of Bapaume northwards in the direction of Arras.
21st February 1917: Wireless messages intercepted by the British Fifth Army from the rear of the three German divisions facing it ‘to dismantle and be prepared to move with all material, and not to leave anything behind’.
16th February 1917: The weather turned warmer and the frost of the last month ended. Within days the communication trenches had returned to a quagmire hindering the supply of bombs to the front for further attacks.
 15th February 1917: The I Anzac Corps is transferred from the British Fourth Army to the Fifth Army (formerly Reserve Army) under the command of General Sir Hubert Gough (photograph right). Meanwhile back in England and following the agreement by the Australian Government to form a 6th infantry division, the creation of a new brigade, the 16th, was begun consisting mostly of men having recovered from their wounds or sickness.
14th February 1917: Following the lessons learned by Nivelle’s French forces at Verdun, the new British drill of attack was formally authorised, though could not at this stage be practiced by the AIF as they were in the front line. This included placing specialists such as bombers and Lewis guns into the platoons to make them more self-sufficient.
11th February 1917: At midnight the 46th Battalion launched an assault covered by a shower of rifle-grenades and captured 150 yards of enemy trench. The small wearing down operations on the Somme were now in full swing, and three days later the 46th launch another attack and capture a further 25 yards.
10th February 1917: Raids of the AIF 1st Division against Bayonet Trench and the point of The Maze were repulsed by strong wire entanglements and stubborn German defence, despite signs witnessed along the front that morale within the German army was starting to weaken.
4th February 1917: The 13th Battalion was tasked in attacking Stormy Trench again. In order to meet the chief danger of the German counter-attack 12,000 bombs were carried forward to the ‘jumping-off’ position, plus 1,000 rifle grenades to combat the greater range of the enemy egg bombs. The field  artillery was also to double its expenditure of shells. To avoid noise during assembly the men’s feet were muffled with sandbags. As with the previous attack good progress was made and the trench easily captured along with a number of deep dug-outs. The counter attack came and desperate bombing fights ensued, followed by a swift, heavy and accurate German barrage on the supporting and bomb-carrying troops. The success of the attack was largely due to Capt. Murray’s (photograph right) leadership on the right for which he was awarded the Victoria Cross, though the operation had cost the Australians about 350 casualties against the German losses of 250 including 100 missing.
1st February 1917: The 15th Battalion of the AIF 4th Division moving swiftly following a short barrage took the enemy by surprise and captured Cloudy Trench, a German salient north-east of Gueudecourt. However an insufficient defensive barrage resulted in a successful German counter-attack which forced the attackers back. In this action the 15th Battalion lost 144 officers and men, of whom 42 were missing. Meanwhile with the plan to take over more of the French line, the British Government asked for the formation of a 6th Australian infantry division, along with an additional New Zealand and more Canadian Divisions.
28th January 1917: General Legge falls ill with the flu and the opportunity is taken to relieve him of his command of the AIF 2nd Division, where upon he returned to Australia. Legge was replaced by Brig-Gen Smyth, VC.
22nd January 1917: A successful German raiding party on 36th Battalion AIF 3rd Division to the south of the Lys in Flanders leaves 11 Australian killed, 36 wounded and 4 taken prisoner. This was one of only two successful raids out of eight by the Germans against the AIF 3rd Division from the beginning of the New Year until 13th March.
18th January 1917: General McCay of the AIF 5th Division was relieved and became the GOC AIF depots on the Salisbury Plain in England and was replaced by Brig-Gen Hobbs.
 17th January 1917: A heavy fall of snow fell which lasted in the bitter cold for exactly a month. Food was carried forward but water had to be melted from the ice in shell holes. However the cold was preferable to the mud. The ground was dry, trench walls ceased to fall in and men could move around and stamp their feet without creating a quagmire. It was also easier to bring food up to the front. At this time the number of cases of trench feet diminished. However, it also became more obvious which trenches were manned and posts garrisoned, this harassing fire became more precise. [Painting: ‘Christmas 1916’ by William Barnes Wollen – an Australian outpost at Fleurbaix.]
14th January 1917: The wet weather that had prevailed since October gave way to bitter frosts.
10th January 1917: General Rawlinson asked his Fourth Army Corps commanders to plan for a series of attacks to keep the enemy under strain.
2nd January 1917: To support Nivelle’s plan for the 1917 offensive, the British Fourth Army extended its front requiring I Anzac Corps to put all four of its divisions (1st, 2nd, 4th & 5th) into the front-line.
 FIRST WORLD WAR TIMELINE