Background
Towards the end of 1915, a combined Franco-British offensive at the place where the two armies met either side of the Somme river was being proposed by the Commander-in-Chief of the French Armies, General Joseph Joffre. Following the major German offensive against the French Army at Verdun in February pressure soon increased on British Commander-in-Chief Sir Douglas Haig to mount this large-scale operation to help relieve pressure on the besieged French at Verdun, as well as taking the lead as the French had to reduce their participation to a  supporting role in the Somme operation as a result of the German attack. The intentions of Haig was to burst right through the German defences, sending his cavalry on to Bapaume, and rolling up the entire German position on the Western Front. The British planned for 11 divisions of General Rawlinson’s Fourth Army to attack on a 24km (15 miles) front between Serre, north of the River Ancre, and Curlu, north of the Somme. Five French divisions would attack a 13km (8 miles) front south of the Somme, towards Peronne. The Battle of the Somme would be the debut of the British New Army created by Lord Kitchener’s call for recruits at the start of the war.
The summer 1916 Somme Offensive commenced with a seven day bombardment, the intensity of which had not been witnessed before on this battlefront. The bombardment was designed to cut through the German barbed wire defences and smash their front line trenches and rear supply routes, as well as wear down the morale and nerves of the German defenders. Unconcealed preparations for the assault and the week-long bombardment gave the Germans clear warning of a pending attack. Happy to remain on French soil, German trenches were heavily fortified and, furthermore, many of the British shells failed to explode. When the bombardment began, the Germans simply moved underground and waited. Reports about the state of the enemy wire were varied, and generally it appeared from these reports that the wire had been better cut on the right of the Fourth Army front, south of the Albert-Bapaume road, than on the left front.
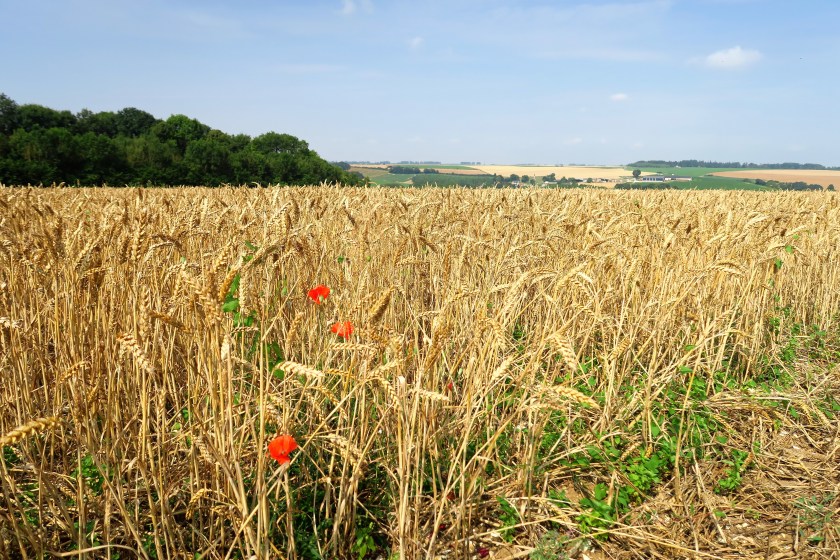
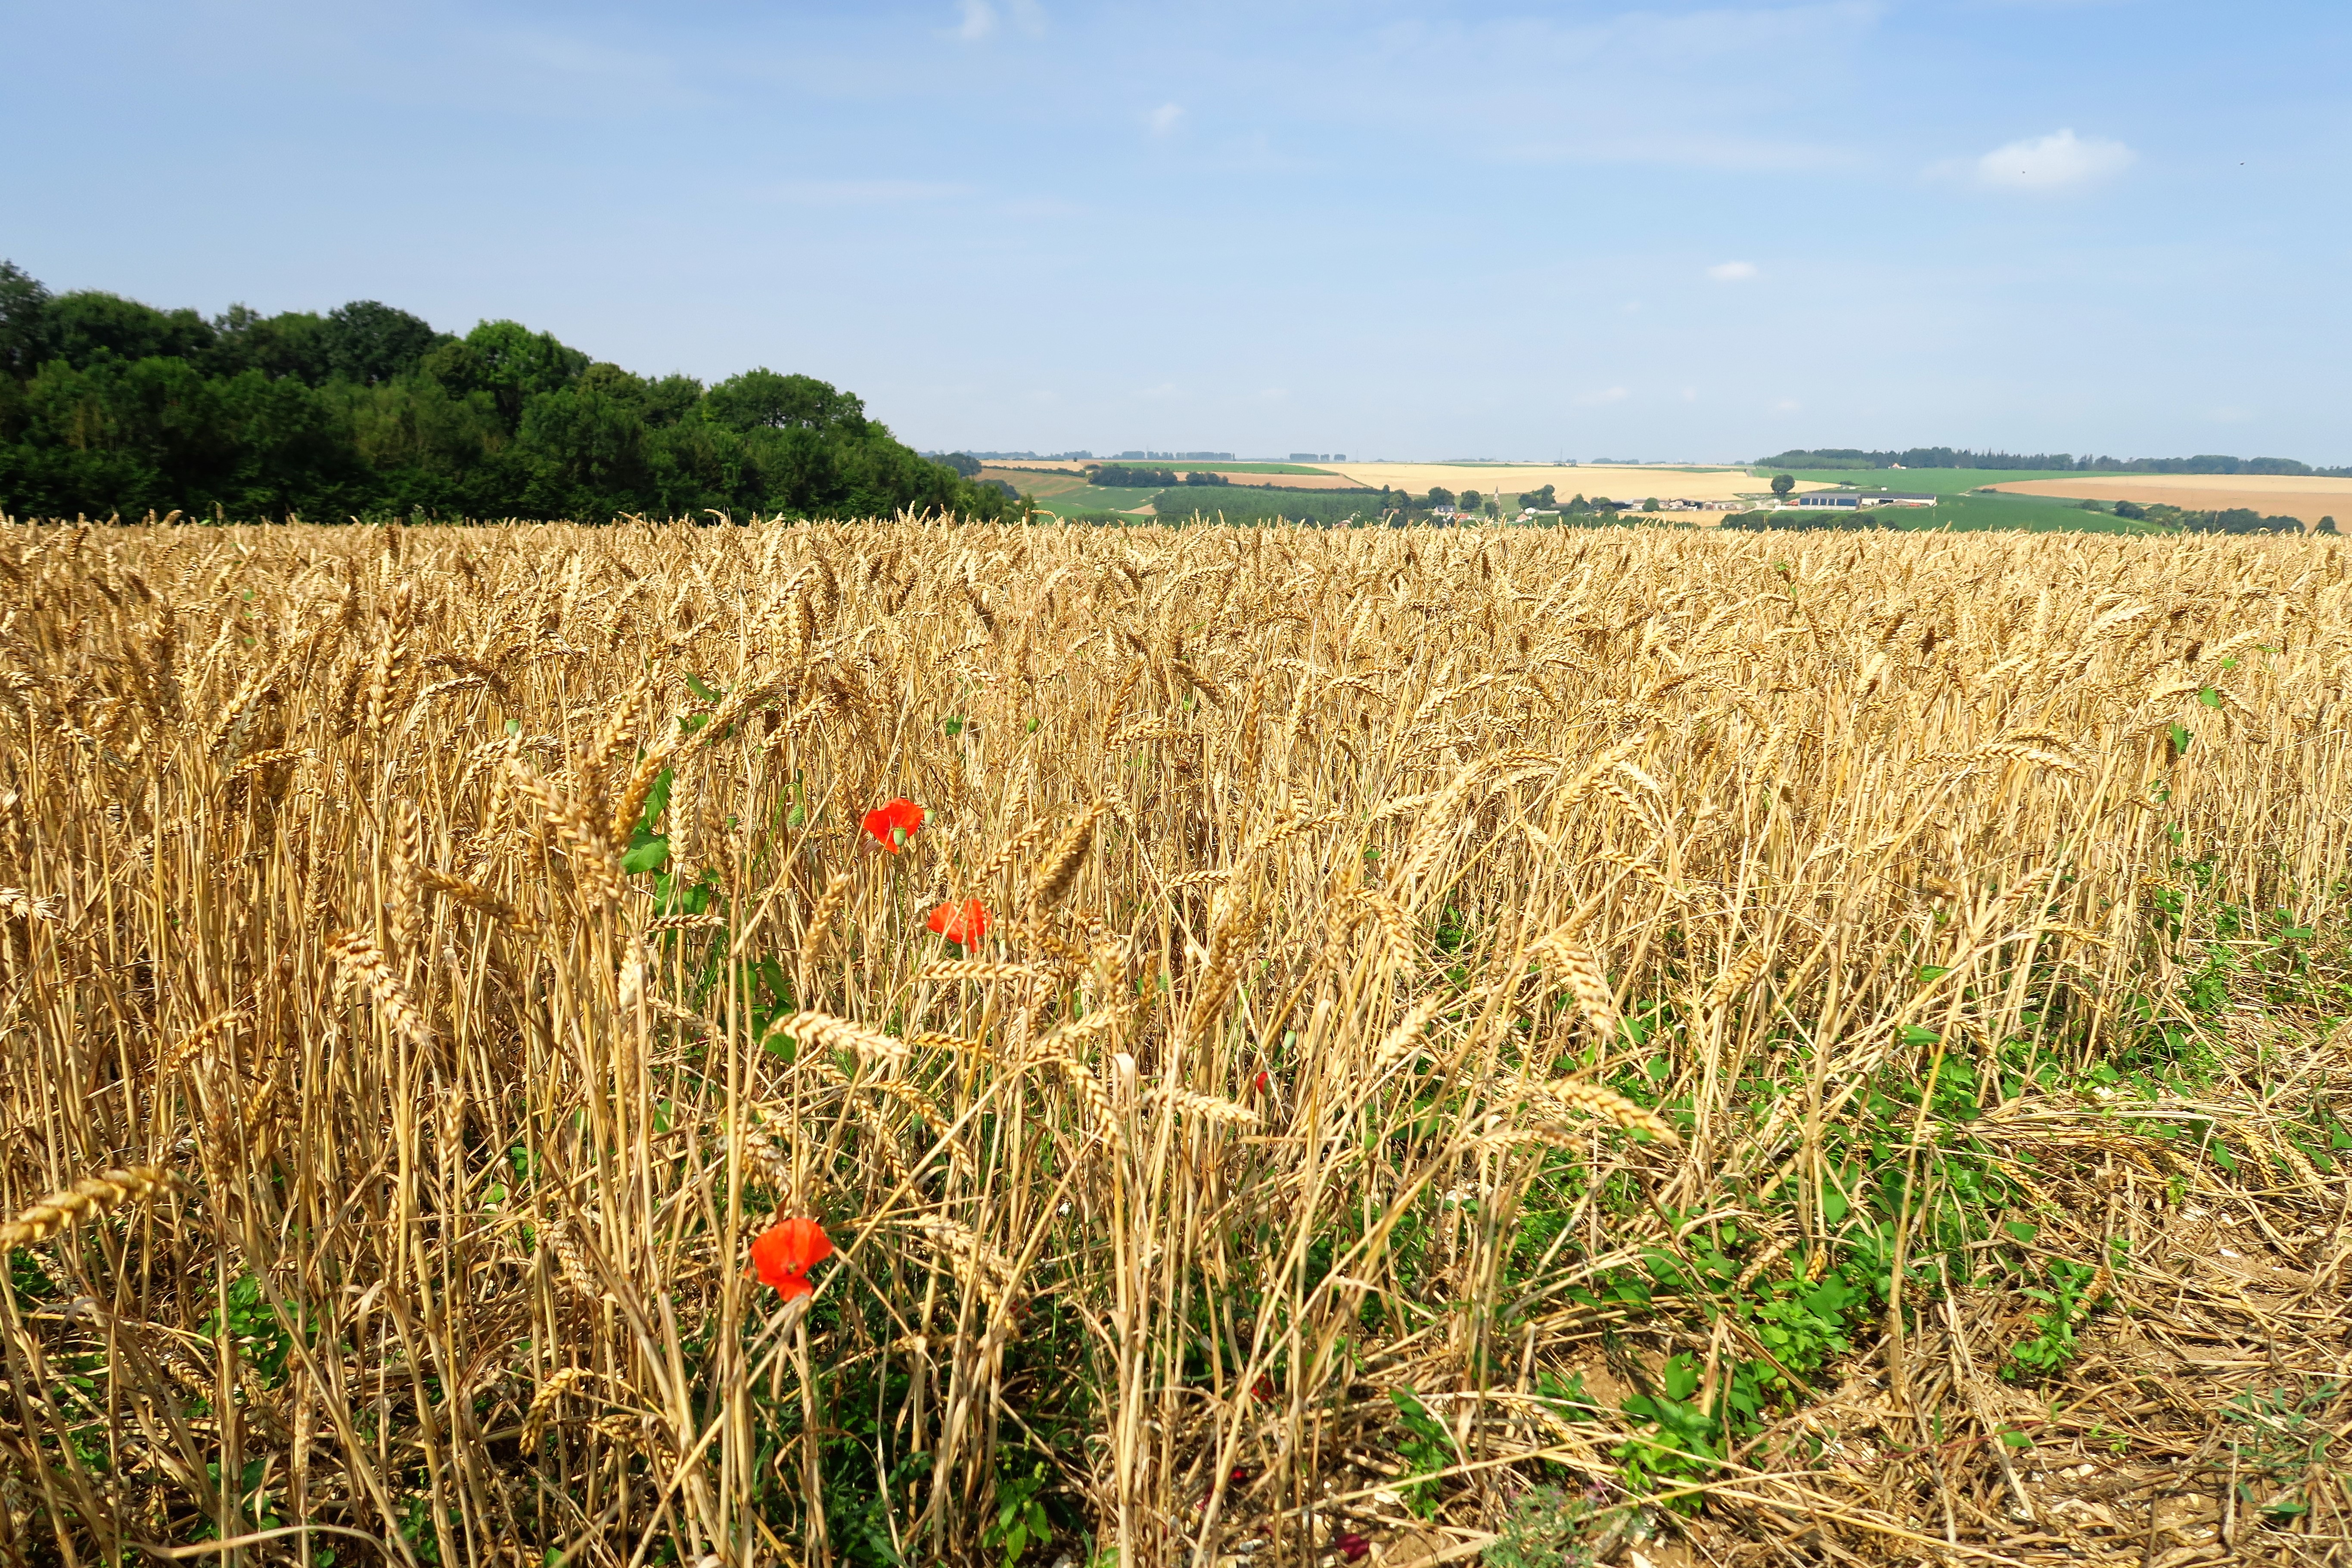
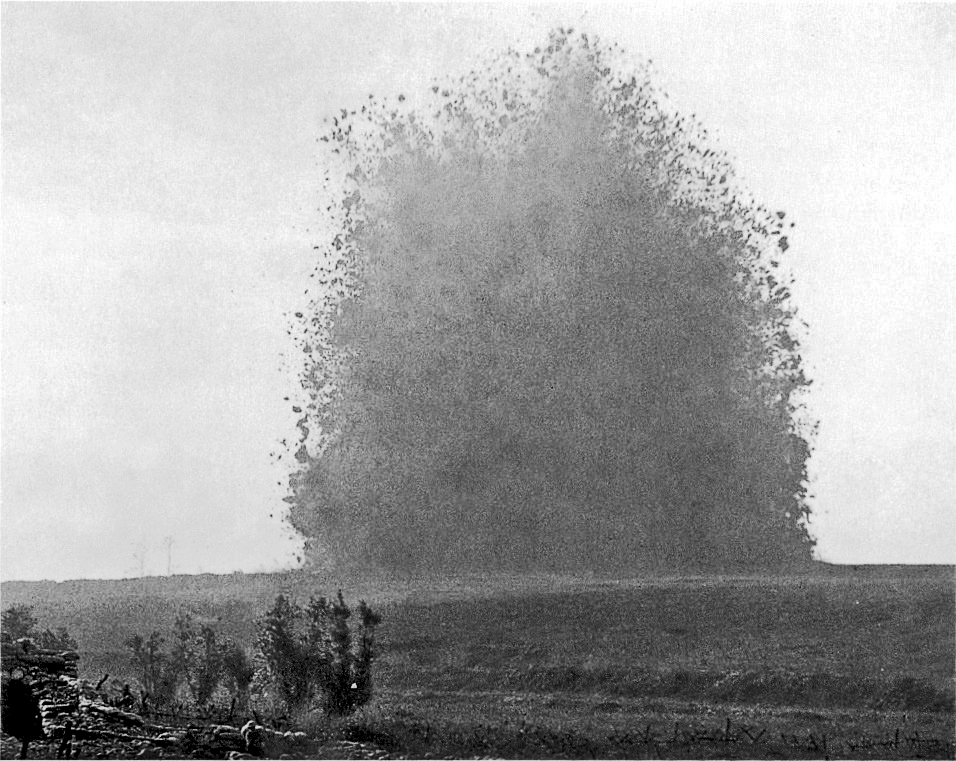 In order to knock out a number of key defensive positions in the German Front Line the British exploded eight large mines (image below taken from the Geoffrey Malins film of the mine at Hawthorn Ridge) minutes before Zero Hour. At 7.30 am on 1st July 1916, whistles blew to signal the start of the attack. With the shelling over, the Germans left their bunkers and set up their machine gun positions. As the 11 British divisions walked towards the German lines, the machine guns started and the slaughter began. [Wheat-field photograph below of the location of the British line in front of Thiepval Wood, taken in July 2016 and looking like many of the fields across which the men had to advance a century previous]. Casualties on the first day were the worst in the history of the British Army, with 57,470 British casualties, 19,240 of whom were killed. So began one of the bloodiest chapters of the First World War that would end in November, as a result of the appalling winter conditions, in stalemate with over a million casualties on all sides.
 The first day ended with a mixture of success and failure for the attacking British and French. To the south the French met with a high degree of success and so too, but at a lesser extent, the British to the south of the Albert – Bapaume road. However to the north of the road from their commanding positions the Germans were able to withstand the attack, with their positions more or less intact and able to inflict huge losses on the British. Against Joffre’s wishes, Haig abandoned the offensive north of the Albert – Bapaume road, to reinforce the success in the south, where the Anglo-French forces pressed forward towards the German second line, preparatory to a general attack on 14th July 1916 which, known as the Battle of Bazentin Ridge, marked the start of the second phase of the Battle of the Somme. The 14th July attack, conceived by Fourth Army Commander General Rawlinson bore little resemblance to the failed plan of 1st July, and learning from the mistakes of two weeks previous, saw marked changes in tactics. Firstly the attacking front was much narrower at 5 kms, about a quarter of the 1st July frontage, but with two-thirds of the artillery at their disposal. Also the artillery tactics changed with a lighter bombardment in the preceding days therefore not obviously signalling an attack, and with a ferocious hurricane bombardment lasting only five minutes before the attack, with a focus on counter-battery fire to eliminate the German guns. In addition this was a dawn attack enabling the attacking divisions to creep into No-Man’s Land and lie as close as possible to the German barbed wire and the barrage so that they could rush the line as soon as the barrage lifted. Each wave had its set objective, such that the first wave would stay and secure the first objective, allowing the second to pass through to the second objective and so on. The attack turned out to be successful seizing three kilometres of the German second line, however, like the first day, the British failed to exploit their advantage in the wake of the victory and as German resistance stiffened, a period of bloody attrition thus commenced.
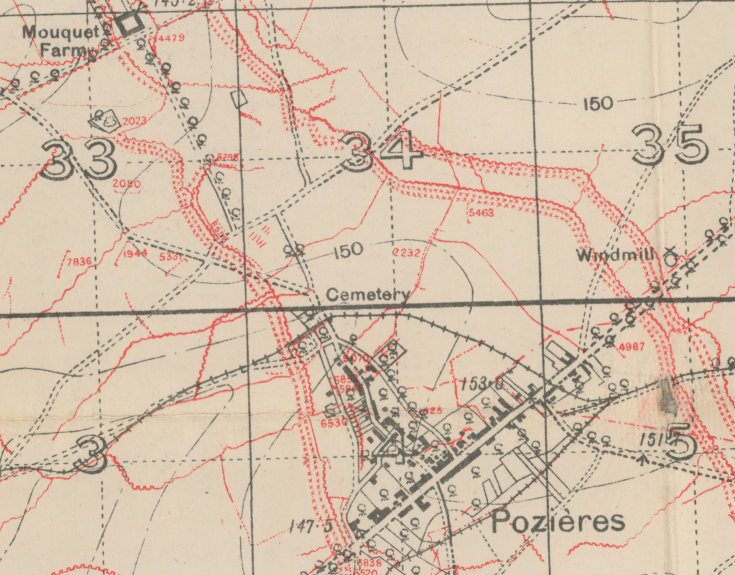
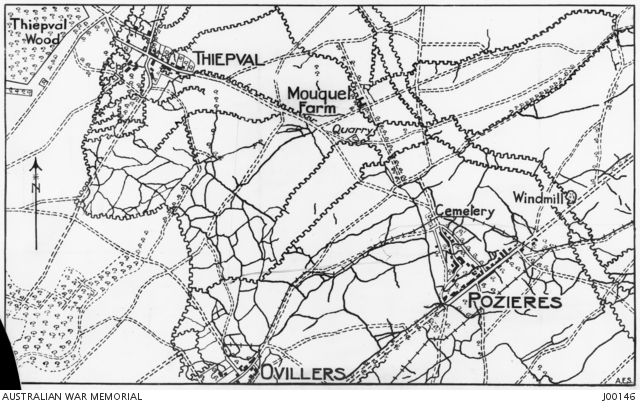
The British started to plan for a third general offensive on the Somme for mid-September which was to include a new secret weapon to be unveiled on the battlefield. Before this attack could be made however more limited and tactical operations would be required to secure the right flank around High Wood and Delville Wood, and on the left flank the pivotal village of Pozieres set on a ridge on the Albert – Bapaume road that had a commanding view over the battlefield and protected the German strongpoint at Thiepval to the north.
Pozieres
 In the original Somme battle plans, a confident General Haig had advocated taking the second line German defensive system that ran through Pozieres on the first day. General Rawlinson anticipating strong German defence was more cautious and indeed it was only to the right of the battle that the first line was breached. Further progress was made during the second general offensive on the 14th July where the second line was breached to the south of the Albert – Bapaume road. The village and ridge at Pozieres now stood a key obstacle to the British advance, and General Gough’s Reserve Army, originally to be used to push through to Bapaume was tasked to take Pozieres and turn north to outflank the German stronghold at Thiepval and the surrounding area that had thus far repulsed the British attacks. Following their move south from the Fleurbaix sector, the 1st, 2nd and 4th Australian Divisions of I Anzac Corps were now assigned to Gough’s Reserve Army for the attack on Pozieres.
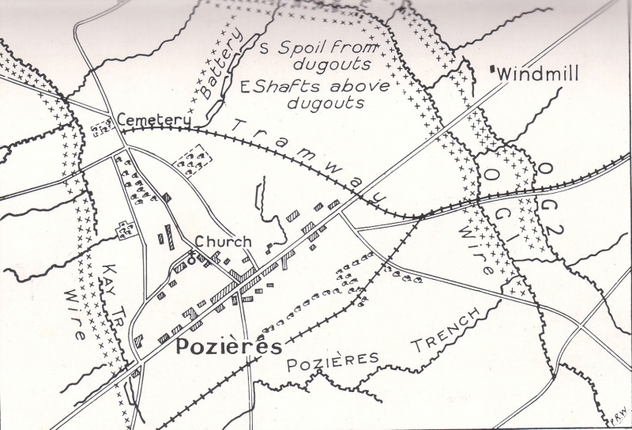 On the 19th July the systematic bombardment of Pozieres by heavy artillery began in preparation for the assault by the 1st Australian Division, the targets being roads and barricades, and two days later the houses, trenches and strong-points within the village. [Click link for geo-referenced Trench Map reproduced, along with trench map below, with the permission of the National Library of Scotland]. Just after midnight on the 23rd July 1916, men and officers in the first wave, with the 1st Brigade on the left and the 3rd Brigade on the right crept
 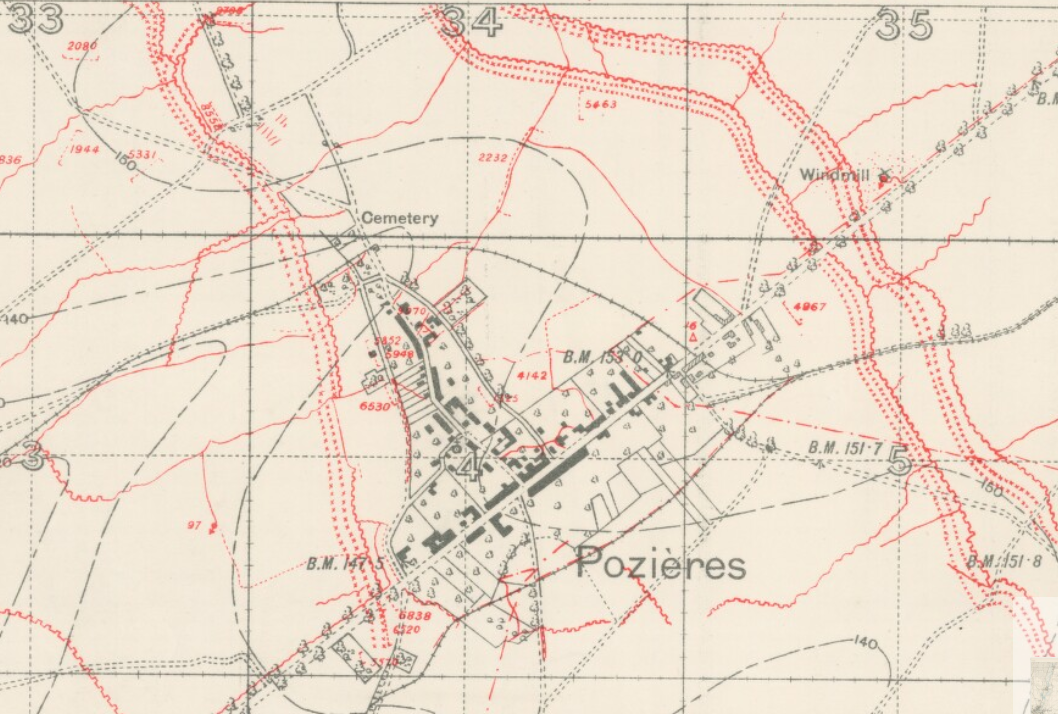 forward from their jumping-off trenches in order to approach the German position before the final bombardment began. At 12.28 the 1st Division’s field artillery burst on the enemy trench immediately in front of the crouching infantry. At 12.30 the 1st Division guns lifted their fire to the line of the orchards and the infantry rushed for Pozieres Trench (running east -west south of the village) which was taken with little opposition, and the second line passed through the men of the first and lay up near the barrage ready to assault the second objective along the back hedges of the village. Only on the extreme right in the Old German (OG) Lines did the first attack meet
  with heavy resistance, and where 2053 Pte Leak (photograph right) of the 9th Battalion rushed forward throwing bombs to help clear the situation and was awarded the Victoria Cross. By 2.30 along the whole length of the village a new front line was being dug parallel and close to the Bapaume Road, to entrench themselves by day-break. The objectives in Pozieres had thus been taken without much resistance from the enemy, but in the OG Lines to the east the attack had been much more stubbornly opposed and was stopped 600 yards short of its objectives. For the Australians they had achieved their first victory of importance on the Western Front and their reputation, begun in Gallipoli, took hold in Europe.
With reports that Pozieres had been abandoned, plans were now drawn up to capture the rest of Pozieres, with small parties venturing forward and climbing over the rubble, flushing the small groups of Germans and snipers from the dugouts and ruins, including over twenty men being taken prisoner in the ‘Gibraltar’ strong-point (photograph below) to the west of the village. By the early hours of the 24th July, Pozieres had thus been captured and the Australian position was strong from a defensive point of view. On the following day the enemy’s endeavour to retake OG 1 led to one of the most desperate bomb-fights in the history of the AIF. The range of the German bombers was greater than that of the Australians, and trying to remedy this by crossing open ground all but two of the regimental bombers of the 5th Battalion were either killed or wounded. Since the  holding of the trench depended on maintaining the bomb supply, a large
proportion of the reinforcements were engaged in carrying forward bombs as fast as they could. At the barricades hastily built in the trench the surviving bombers, being covered by riflemen and Lewis gunners, threw until their arms gave way. With the arrival of three platoons of the 7th Battalion the Germans were driven back along OG 1 to the railway, resulting in the Australians taking about a quarter of their intended objective.
By the time of the relief by the 2nd Australian Division on the 26th July, with the exception of the OG Lines to the south of the Bapaume road, the 1st Division had met all its objectives but at a cost of 5,285 officers and men. The total loss was thus slightly less than that suffered by the 5th Division at Fromelles a few days earlier, but many positives were achieved including better communication and execution of plans, having liaison officers with artillery, engineers and flanking British brigades, accurate supporting artillery fire, the bold use of Lewis guns in forward positions, plus the fast support of pioneers to dig communication trenches, strong-points etc. Also, despite a constant barrage, all men in the front-line received water, ammunition and a certain amount of food. Finally through his inability to observe from the air, the enemy’s bombardment of the back area had been negligible, and the artillery slow to locate the new front as it advanced. However for the men this was a very harrowing experience. Although not faced by immediate danger from the German infantry, the artillery fire was relentless and with the trench system being no more than hastily dug ditches, men were being easily buried by the soil being lifted and frantic efforts thus followed in trying to extricate their mates. Many were killed by the bombardment and many others now succumbing to shell shock.
 With the arrival of the 2nd Australian Division, the 22nd and 24th Battalions of the 6th Brigade occupying the trenches bordering the east and north of the village were subjected to the dreadful bombardment that had been poured upon Pozieres for the past week. By the end of the month the village had been wiped away (photograph right), the shell pitted ground covered with powdered brick dust and soil, and under the summer heat resembled more like the Egyptian desert that they had previously been in. Trenches that had been dug were quickly filled in by the next shell, making navigation by night extremely difficult as the landscape kept changing.
 An attack to capture the OG Lines to the east of the village was attempted on the night of the 29th July and would be conducted by five battalions of the three Brigades of the 2nd Australian Division. [Click on link for geo-referenced trench map reproduced with the permission of the National Library of Scotland]. No other important attack was being launched that night in any part of the Somme battlefield. An intense bombardment of OG 1 occurred at 12.14am and a minute later lifted to OG 2 as the infantry attacked. The continued presence of red enemy flares over the front-line from German commanders to their artillery indicated to the 2nd Australian Division commanders that the attack was not preceding well, and later it was apparent that only the 23rd Battalion on the far left had succeeded in its objectives, despite the loss of seven officers and 326 other ranks. It turned out that the Germans had been well warned of the attack, first by the severe artillery fire during the day, later by reports of Australian troop concentration in Pozieres and finally by detection of the 5th Brigade deploying. The main cause for failure was the rushed preparations and lack of time, together with a complete lack of surprise. Also the lack of a close enough Jumping Off Trench meant that the attacking forces had far too much open ground to cover thus subject to withering machine gun fire, and when they reached the OG 1 they found that in many places the wire entanglements had not been cut. The first attempt to take the OG Lines had thus failed, with a loss of 2,000 men from the 2nd Division on top of the 1,500 in holding the front during the previous two days. During the day stretcher-bearers from both sides tended to the Australian wounded out by the wire and in No-Man’s Land. For this failure, Generals Birdwood and White of I Anzac Corps received a serious reprimand from Field Marshal Haig.
In preparation for the next attack the demolition of the OG Lines was to be carried out in four heavy bombardments of an hour by the heavy howitzers of I Anzac and II Corps, the first commencing at 6pm on the 31st July, with subsequent bombardments over the next days. In addition the field artillery took part in separate hurricane barrages designed to mystify and harass the enemy and to practice the field artillery for the actual attack. The problem for the Pioneers, Engineers and other troops tasked with digging the important new communication and jumping off trenches, each time a bombardment occurred the Germans were likely to respond in kind, therefore making their job even more precarious. Sometimes the response was so fierce that many thought that it signalled a counter-attack from the Germans. As Bean wrote of the bombardment ‘in a single tour of this battle, divisions were subjected to greater stress than in the whole of the Gallipoli campaign.’
 On the evening of the 4th August the 2nd Division mounted an attack in four waves on OG 1 (photograph left) and OG 2. To the south of the Bapaume road two battalions of the 5th Brigade had by the time darkness had fallen secured OG 1 and were digging in on the site of OG 2 with their Lewis guns out in front. Protected by a smoke screen covering its southern flank the casualties of the 5th Brigade were light. The advance of the 7th Brigade in the centre succeeded almost as swiftly as that of the 5th, despite delays caused by the incompleteness of the Jumping Off Trench meaning that the 25th Battalion were forced to wait in the crowded communication trench, which in turn blocked the passage of the second wave of the 27th Battalion. Success for the 7th Brigade was delivered by following very close on the barrage, and caught many of the enemy in their dugouts before they had time to remount their machine-guns. Around midnight the German barrage increased its focus on the OG Lines. Casualties amongst the attacking battalions increased so much that few officers were left to organise and direct consolidation, with NCO’s and even privates doing officers work. German counter-attacks followed in the direction of the lines held by the 25th and 27th Battalions but they were repulsed by machine gun fire. To the north and on the left flank a counter-attack was directed towards the 22nd and 26th Battalions and the men scrambled onto the parapet and fired at them. Further west the British 12th Division had pushed forward thus linking up with the Australian left position, and at the other end of the line the 18th Battalion had linked up with 7th Brigade at the Windmill, thus completing the attainment of the 2nd Division objective. The Pozieres Heights had been won, and a position of much importance gained.
 For the Germans it represented a serious loss, and plans were put in place for its re-capture. The bombardment now falling on the whole line was becoming more accurate as the enemy’s batteries were registered on the new front line, which as a result of the action was now a salient and upon which the Germans could fire from three sides. Furthermore both lines were visible to the enemy, OG 2 from front and flank, and OG1 from the left rear from the direction of Thiepval. Batteries close to the Thiepval Ridge were now able to ‘snipe’ at even solitary men making their way across the crater-field to the rear of the lines. The German artillery was thus able to systematically work up and down trench lines and communication trenches. In OG 1 men were able to take shelter in the dugouts, but not so in OG 2 where few officers now survived and the Lewis guns were gradually being destroyed. In an attempt to reduce casualties orders had already been received to thin out the garrison to a minimum to defend the position, and the 27th Battalion withdrew to OG 1. Meanwhile the 4th and 12th Brigades of the 4th Australian Division were being readied to effect the relief of the three brigades of the 2nd Australian Division. The bombardment on the night of 5th/6th August took a heavy toll on men of both Divisions, particularly in K Trench to the west of the village. Dead and wounded lay everywhere, some killed on their stretchers with stretcher bearers lying amongst them. During its twelve days of practically continuous bombardment the 2nd Australian Division endured conditions seldom experienced elsewhere. In all, the Division lost 6,846 men killed, wounded or missing. Many of the wounded were suffering from shock in addition to their physical wounds – an eyewitness recorded that of many later sitting in front of Vadencourt Chateau to have their wounds seen to were shaking like a leaf.
 At about 4am on the 7th August the enemy barrage suddenly ceased on the Australians in the OG Lines and began to fall heavily far back beyond Pozieres. The forward posts immediately began to observe men moving towards them up the slope from Courcelette. On the Australian left, OG 2 Line was still be manned by the 14th and 15th Battalions and as the Germans passed to their right towards OG 1 rapid fire was poured into the advancing column. Some of the outposts were overrun and about 40 men of the 48th Battalion were captured and taken prisoner. The Germans continued to pour past the OG Lines in the centre, throwing bombs into the dugouts one of which contained Lieutenant Jacka (photograph right), the first Australian Victoria Cross recipient in Gallipoli, who with the remnants of his platoon having been roused by the deafening explosion, emerged into open to see that a large number of Germans were now between his position and Pozieres. Jacka lined up his men and decided to dash through the enemy back to Pozieres. No sooner had he done this then he encountered the line of 48th prisoners who seeing what was going on then entered the fight, some being shot by their guards, with others overcoming their captors. Other Australians in the surrounding shell holes also rushed forward and what followed was a series of one-on-one life or death battles, with bayonets crossing and men being shot at point blank range. Jacka threw himself into a shell hole in which German bombers were situated, and despite being shot three times, killed or captured his attackers. As Bean wrote, Jacka’s counter-attack stands as the most dramatic and effective act of individual audacity in the history of the AIF, though strangely was awarded just the Military Cross for this action. The bombardment that the 48th Battalion suffered resulted in the loss of 20 officers and 578 other ranks, and the 45th Battalion south of the road 5 officers and 340 men. After this action only four men remained unwounded in Jacka’s platoon in the 14th Battalion. Within an hour the area was clear of the enemy. This action of the 7th August was the last attempt by the enemy to recapture the crest east of Pozieres. With the Pozieres Heights secure, plans were now put in place for the second phase with the push northwards from the Pozieres salient to Mouquet Farm and then to outflank the German stronghold at Thiepval.
Mouquet Farm
 With this new captured position came the dangers inherent of being visible on three sides by enemy artillery observers, and it did not take long before the Germans realised that the point of each attack on a narrow frontage was the farm, thus they could concentrate their fire. To help alleviate part of this problem, each time there was an attack the right flanking battalion was tasked with pushing right and eastward in order to widen the frontage. On the night of the 8th August the 15th Battalion along with the Suffolk Battalion on the left attacked and
 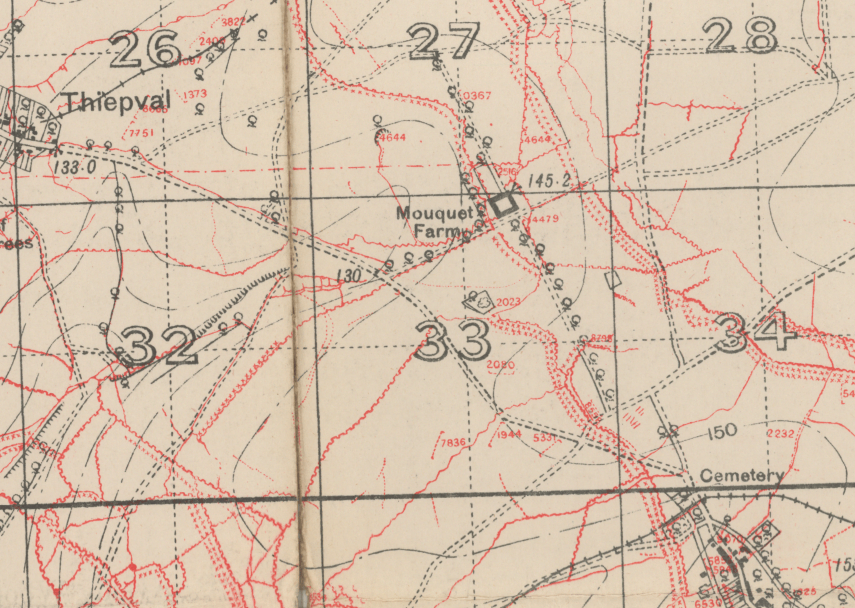 commenced the advance northwards. Having made gains, the 15th Battalion found itself in front of the objective but was forced to withdraw. Thus began a series of attacks over the coming weeks to seize the farm and surrounding area in preparation for Haig’s third major offensive scheduled for mid-September. [Click on following link for geo-referenced map reproduced with permission from the National Library of Scotland]
The formal second stage of the advance of I Anzac and II Corps of the Reserve Army to the line of Mouquet Farm was to be conducted by the British 12th Division to the west and 4th Australian Division’s 4th Brigade to the east assisted by the 50th Battalion, 13th Brigade. As with many before, the passage to the front was fraught with danger and by the time the last company of the 50th Battalion got through they had suffered considerable losses, especially of officers and NCO’s, from the bombardment. The advance of the 50th and 13th Battalions commenced at 10.30pm under a creeping barrage and reports soon came in stating that objectives had been reached. Thus within three and a half days the Australians had advanced a third of a mile along the ridge and the line to the west had come up level with them and making good progress to getting to the rear of Thiepval.
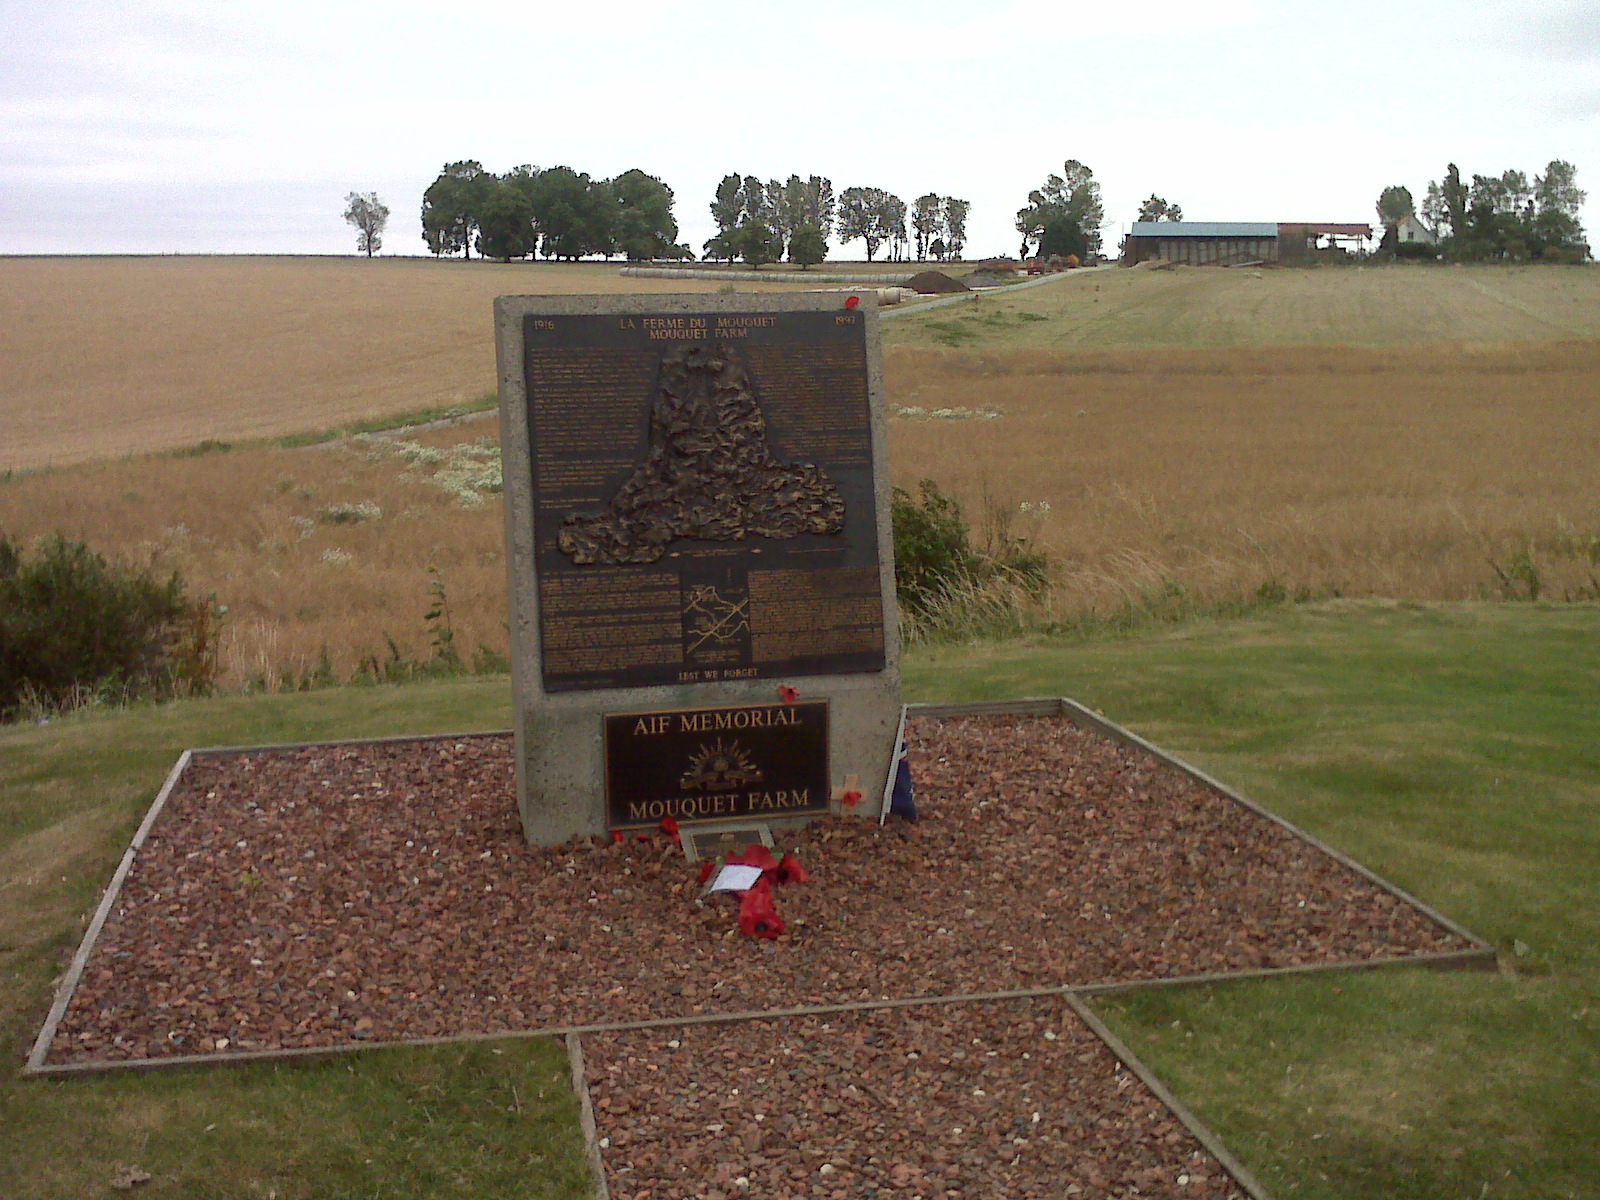
 Orders were given for the capture of objectives of Mouquet Farm (photograph left) and the Fabeck Trench on the ridge behind the farm. However, British documents or papers stating the importance of taking Mouquet Farm had found themselves into German hands around Thiepval and as a result the German Army was expecting a move from the south by the Australians and prepared accordingly. A furious bombardment was placed on the Australians for many hours before their assault scheduled at 10pm on the 14th August. Messages from the three attacking battalions, the 50th, 13th and 51st all recommended a postponement of the attack, but these were overruled. All three battalions pressed on but met stiff resistance and neither the 50th on the left or 51st on the right could make contact with the 13th in the centre, meaning that all were potential subjects of flanking attacks, thus the decision was taken to withdraw. Faced with a strong and continuous defence line through Mouquet Farm, Gough’s and I Anzac’s northward advance had met its first check. All three battalions were worn out, and the 51st had lost some 300 officers and men, the 13th (including earlier engagements) 386 and the 50th 414. The relief of the 4th Australian Division by the 1st Australian Division which had already been brought back to Albert, was therefore begun at once.
With the return of the 1st Australian Division the Australian 1st and 2nd Brigades launched an attack to coincide with other British attacks taking place on the 18th August elsewhere on the Somme. The 7th and 8th Battalions of the 2nd Brigade were to attack eastwards, south of the Bapaume road. Due to difficulties in communication the exact timing of the barrages had not reached the Brigade headquarters, and despite the attack appearing to follow the creeping barrage they were probably too far behind thus giving the enemy too much time to recover once the barrage had lifted. Some men entered the trenches, and with many killed they could not hold on. After the attack the new trenches dug were heavily shelled. By the time that the 2nd Brigade was relieved by the 5th Brigade (2nd Division) on 21st August it had lost 915 of the 3,750 strength that it had when it resumed this tour six days previously. For the 1st Brigade to the north, difficulties had arisen in the exact location of the front-line, and when the pre-attack bombardment came numerous shells were landing on the front line of the 3rd Battalion causing casualties. Parties were sent out but driven back. The 4th Battalion further west had more success and posts were established in the taken trench. However this was now the second operation of great difficulty at Mouquet Farm and had resulted in just one comparatively trivial gain. The 3rd Battalion had lost 9 of its officers and 151 other ranks, at least half by bombardment of its own side; the 4th Battalion had lost 9 officers and 279 other ranks. Immediately to the left of the 1st Brigade the British had successes thus the Mouquet Farm salient was now a little less pronounced, and immediately to the right of the 2nd Brigade the Scots recorded successes in Munster Alley. Elsewhere during this coordinated attack there were also successes further along the line at Guillemont though operations at High Wood had failed.
 The next attack of the 3rd Brigade on the 21st August took place in broad daylight, the first time that the Australians had done this on the Somme. The attacking force was strengthened by two parties from the 11th Battalion but needing to come from way back as Sausage Valley (photograph right) they were seen by the enemy who put down a barrage on the reserve company of the 12th moving up K Trench. To finally get to the front line men had to rush open ground, in view of the enemy. Thus all chance of surprise had gone, and the Germans put down a barrage and within one hour the 10th Battalion had lost 120 of its 620 officers and men. The attacking waves proceeded but with the enemy behind both flanks the 10th Battalion fell back. Some of those that went farthest attempted to retire but without support and surrounded the survivors surrendered. The 12th Battalion though had more success and had created a small salient almost touching the south-eastern corner of the farm. Overall the 1st Australian Division in its second tour had lost 92 officers and 2,558 other ranks. The progress that had been made was miniscule, and the fruitless task was then handed back over to the 2nd Australian Division.
 By the time the 2nd Australian Division had arrived for its second tour, lessons were being learnt not to overcrowd the front line and provide defence through staggered lines and increased artillery. In Pozieres, half a mile behind the front line support companies were in places like K Trench and Centre Way whereas the reserve battalion, usually assigned carrying duties, were in the rear in Sausage Valley or at La Boisselle. In attack, the trend was moving towards effective bombardment with a smaller attacking force which by its very nature had the greater chance of achieving surprise. The 6th Brigade having suffered the least in the first tour was selected as the next attacking battering ram against the farm. These weeks were marked by great aeroplane activity over the battlefield, the Allies – on some days with at least fifty machines simultaneously in the sky – endeavouring to maintain their local superiority. The day of the relief was one such day and as a result the columns moving north were spotted and an intense barrage of shrapnel and high explosive followed, and the 24th Battalion which had suffered heavily in K Trench four weeks earlier, was again caught.
6th Brigade’s Major-General Gellibrand chose to attack, for the first time by the Australians on the Somme, at dawn enabling the attackers the ability to move into position during the dark but allowing them to see the lie of the land for mobility and navigation. In consultation with Divisional headquarters the time of the attack was set at 4.45 on the 26th August, with the 21st Battalion attacking west of the farm, the 24th Battalion to secure the dugouts to the east and a company of the 22nd Battalion to protect the left flank by dropping its platoons one at a time at flanking posts. Though the ground was rough with shell holes they were dimly lit and the troops were able to keep up with the line of shells and made progress towards the farm and managed to seize the trench. To the east the 24th was also making progress and began bombing the cellars, rousing the defenders who started to set up their machine gun rendering digging and further bombing impossible.
On the left flank the 21st Battalion encountered a series of deep dugouts from which came many Germans that had been sheltering and starting firing into the party from the rear. The 22nd Battalion on the left flank however became exposed as the 21st had in fact veered too far to the north-east during its attack. Pockets of men were having to fight off counter-attacks from shell-holes. The attack had come up against a considerably strengthened enemy, and the 21st lost 13 officers and 444 men, and the 6th Brigade out of a fighting strength of about 2,500 lost 896. About sixty men were captured on the night of the 26th August and a few others the next day or so, though some men were able to make their way through German lines and made their way safely through to the British lines at Thiepval. After dark the 4th Brigade of the 4th Australian Division relieved the 6th Brigade.
 On the 29th August orders were given to the 4th Brigade for a renewed attack (the sixth) on the farm. Rain fell heavily that turned every shell-hole into a slimy pool and mud covered the men as they prepared to attack. One of the 13th Battalion’s objectives, Kollman Trench was easily taken, but as they pushed on to the Fabeck Graben they came under attack in front of the thin wire entanglement and could not respond as their rifles and Lewis guns became choked with mud, and even the bombs could not be used as the pins could not be pulled. As a result the survivors had to struggle back to the front line from which they had attacked. The 16th Battalion did not fare any better to the left. The two battalions were relieved the next day with the 13th Battalion having lost 10 officers and 221 other ranks, and the 16th 9 officers and 219 other ranks. With daylight the stretcher-bearers of both sides (photograph above) came out under large red cross flags to search the mud. In front of the 13th Battalion the stretcher-bearers divided No-Man’s Land between them, each handing over any of the others wounded that they had found. Corps HQ, and indeed the German High Command were concerned that the enemy could misuse the collection of wounded to recover guns or conduct fatigues, and both sides sought to limit the amount of stretcher-bearers that could go into No-Man’s Land.
 Just after dawn on 3rd September the British Reserve Army attacked towards Thiepval from three directions, with the 4th Australian Division resuming the attack at Mouquet Farm. Further to the right and east the British Fourth Army and the French Sixth Army would at noon launch the main effort preparatory to the mid-September offensive, towards Guillemont and the Combles area. The attack on Fabeck Graben to the east of the farm was conducted by the 49th Battalion, with the 52nd to their left and the 51st attacking the farm itself. Good progress was made and as the 51st entered into the farm they stopped to bomb all discoverable entrances to the underground works. By 7.30am brigade headquarters had heard that Mouquet Farm had been taken with the exception of a few dugouts that were being dealt with. Beyond the farm progress was being halted by increasing German resistance and machine gunners that not have the luxury of deep dugouts (photoraph above) in which to hide from bombardments, were able to fire quickly into the advancing Australian infantry. The 52nd Battalion began to fall back, and seeing this the 51st Battalion retreated to the farm as the Germans bombed forward, and with the Germans now regaining access to the underground tunnels soon had the place surrounded. With the exception of the 49th Battalion on the crest of the ridge, the Australian thrust had again been defeated. At 6.30pm, having been informed that all efforts by the Reserve Army had failed, General Gough suspended all other operations with the exception of safeguarding the higher ground captured by the 49th with two companies of the Canadian 13th. The following day of the attack saw German counter-attacks and bombardments, but the 49th Battalion though greatly reduced in number held on to this position. The fighting on these two days were some of the hardest fought by the AIF, but part of the Fabeck Graben was held, the only success in Gough’s encircling attack on Thiepval. The 13th Brigade lost 41 officers and 1,305 men, but the men were conscious that they had won and held what was considered an important objective.
 With the relief of the 13th Brigade the participation of the Australians in this phase of the Somme battle had come to an end. The Fourth Army to the right had succeeded at Guillemont, but on the orders of General Haig the Reserve Army’s attempt at securing Thiepval before the mid-September offensive was given up. Seven times the Australians had launched against Mouquet Farm and only on the last and with the greatest effort was any success made. However this was on a front so narrow that it would not hold a deliberate counter-offensive which inevitably came on the 8th September causing terrible loses for the Canadians, and resulting in the Germans retaking the Fabeck Graben.
Outcome
 Pozieres set the standard by which enemy shell fire was ever afterwards measured in the AIF as ‘better or worse than Pozieres’. No village in the Somme area was so completely erased as Pozieres. In the following years, visitors to the battlefield would not have suspected that a village once existed there, in its place just open moorland.
The proportion of casualties to the numbers engaged in the fighting at Pozieres was the greatest suffered by I Anzac Corps. I Anzac Corps had lost in this battle 23,000 officers and men, with the 1st Australian Division 7,654, the 2nd Australian Division 8,114 and the 4th Australian Division 7,058. The rate loss was just slightly higher than the average from the other forty-one British Divisions that fought in the Somme during this time, but when you add the 5,533 casualties of the 5th Australian Division at Fromelles this meant that Australian army in France was faced with the immediate problem of replenishment. The numbers of reinforcements in training in England, or the returning sick and wounded, or on their way from Australia would not be enough to bring the Australian infantry divisions up to strength either in the near future and perhaps not by the end of the year if more tough fighting needed to be undertaken. As a result the move towards the adoption of conscription began to gather pace, leading to the vote in October.
The subjection of a second tour for the 1st & 2nd Australian Divisions so soon after the devastating first was unwise putting a great strain on the soldiers, and should have been avoided if the true conditions were understood. Through the relentless bombardments a number of men would succumb to shell shock that would see them suffer terribly. In addition to the physical and psychological effects of the fighting on the men, they also started to question the effectiveness of the senior British command that under Haig’s orders was to keep the pressure on the enemy by a series of narrow frontage and limited objectives leading up to the major offensive in mid-September. Although German High Command originally decreed the need to retake all trenches that had been lost, the change to that of a more defensive stance utilising the advantages of the deep dugouts and underground passages meant that the attackers were almost always likely to take more casualties. Furthermore, these limited attacks at Pozieres and Mouquet Farm were often the only activity taking place in this sector meaning that the German guns from the north and east could be focused on the men in the salient and its approaches.
The taking of the Pozieres Heights and the village did achieve the objective of preparing the ground for the third major British offensive on the Somme on the 15th September between Flers – Courcelette, the successful battle which saw the introduction of the tank on the battlefield. However the attack on Mouquet Farm proved to be fruitless and a waste of many a good man and resources. Indeed Mouquet Farm would not fall until the Battle of Thiepval on 26th September, which saw the village being taken by a frontal attack rendering the plan of the flanking attack via Mouquet Farm a misguided concept.
 The Australian Divisions would later return to the Somme in the Flers sector after having been re-equipped in Belgium, at a time when torrential rains in October turned the battlegrounds into a muddy quagmire. On the 18th November 1916 the Battle of the Somme ended, with the Allies having advanced only 8km (five miles). During this period the British suffered around 420,000 casualties, the French 195,000 and the Germans around 650,000. [Photograph right of the Thiepval Memorial to the Missing that contains the names of over 72,000 British servicemen that died during the 1916 Somme campaign and have no known grave]. Only in the sense of relieving the French at Verdun can the British have claimed any measure of success. However the battle did take a toll on the Germans. Falkenhayn was sacked and replaced by General Erich Ludendorff at the end of August 1916, and at a conference at Cambrai on 5th September, a decision was taken to build a new defensive line – the Hindenburg Line – well behind the Somme front to which the Germans, conscious of a dangerous lack of men and resources should a new Spring attack come in the new year, retreated to in February 1917.
 BEF Commander Field Marshal Haig and 4th Army Commander General Rawlinson have been criticised ever since, for the human cost of the battle and for failing to achieve their territorial objectives.
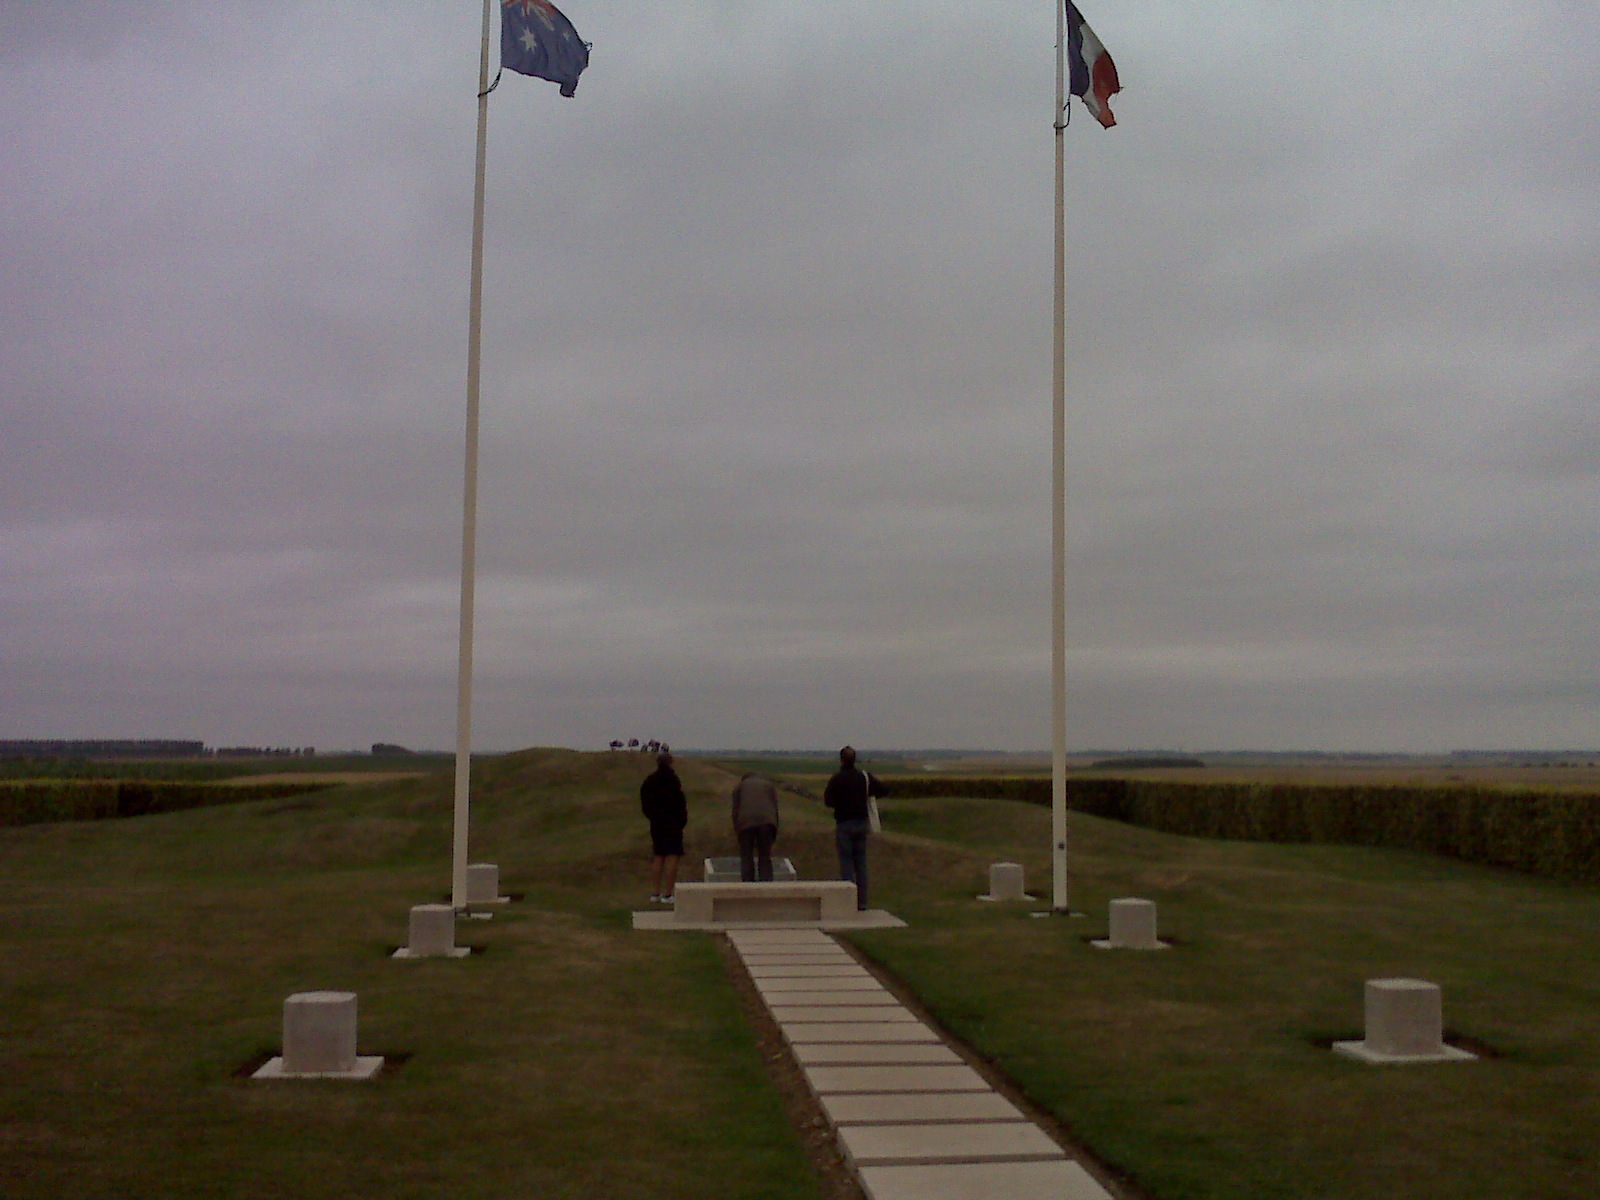
Today, two major monuments in the village stand to honour the bravery and memory of the men of I Anzac Corps during the fighting in Pozieres and Mouquet Farm – the 1st Australian Division monument to the south-west of the village next to the Gibraltar ruins (photograph above taken at the 2016 Centenary), and the Australian Memorial at the Windmill to the north-east of the village (photograph left). At the Windmill a stone commemorates the sacrifice of the Australians who fought here, in the words of Charles Bean ‘who fell more thickly on this ridge than any other battlefield of the war’.
Published as ‘news’ 100 years on to the day, follow the 22nd Battalion on the project website and via Facebook and Twitter
 FIRST WORLD WAR TIMELINE
1914 1915 1916 1917 1918 1919